Registering New Tables with the New Table Wizard

Problem

You want to create a job that includes a table that does not yet exist. This new table might hold the final results of the job, or it might serve as the input to a transformation that continues the job.

Solution

Use The New Table wizard to register the new table. Later, you can drag and drop this metadata onto the target position in a process flow. When the process flow is executed, SAS Data Integration Studio uses the metadata for the target table to create a physical instance of that table. The physical storage page of the wizard prompts you to select a library that contains the table to be registered. (Typically, this library has been registered ahead of time.)

Tasks

Register a New Table with the New Table Wizard

Perform the following steps to register a table that does not exist:
  1. Display the New Tables wizard in one of the following ways:
    • Right-click the folder in the Folders tree where metadata for the new table should be saved. Then select Newthen selectTable.
    • Select Filethen selectNewthen selectTable.
    • Select Newthen selectTable on the SAS Data Integration Studio toolbar.
    The New Table wizard opens.
  2. Enter a name and description for the table that you want to register. Note that the metadata object might or might not have the same name as the corresponding physical table. You specify a name for the physical table in a later window in this wizard.
  3. Verify that the folder in the Location field is the folder where the metadata for the table should be stored. If not, click Browse to select the correct folder.
  4. Click Next to access the Table Storage Information page. Enter appropriate values in the following fields:
    • DBMS
    • Library
    • Name (must follow the rules for table names in the format that you select in the DBMS field. For example, if SAS is the selected DBMS, the name must follow the rules for SAS data sets. If you select another DBMS, the name must follow the rules for tables in that DBMS. For a SAS table or a table in a database management system, you can enable the use of mixed-case names or special characters in names.)
    • Schema (if required by DBMS type)
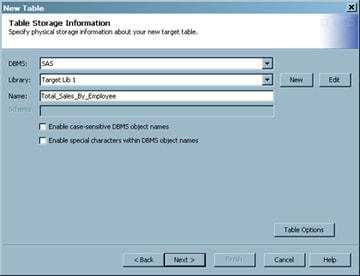
    Use the Table Storage Information page to specify the format and location of the table that you are registering. You also specify the database management system that is used to create the target, the library where the target is to be stored, and a valid name for the target. You can specify new libraries or edit the metadata definitions of existing libraries by using the New and Edit buttons. You can use the Table Options button to specify options for SAS tables and tables in a DBMS. The following display shows these settings for a sample table.
    Sample Table Storage Settings
    Sample Table Storage Settings
    You can handle case-sensitive and special characters in tables and column names by selecting the respective check box.
  5. Click Next to access the Select Columns page. Use the Select Columns page to import column metadata from existing tables that are registered for use in SAS Data Integration Studio.
  6. Drill down in the Available Columns field to find the columns that you need for the target table. Then, move the selected columns to the Selected Columns field.
  7. Click Next to access the Change Columns/Indexes page. Use this window to accept or modify any column metadata that you selected in the Select Columns page. You can add new columns or modify existing columns in various ways. (For details, click the Help button for the window.)
  8. Click Next when you are finished reviewing and modifying the column metadata. If you change the default order of the column metadata, you are prompted to save the new order.
  9. Click Next to access the page labeled as The following metadata is created. Review the created metadata. When you are satisfied that the metadata is correct, click Finish to save the data and close the wizard.