Moving Data Directly from One Machine to Another Machine

Overview

A Data Transfer transformation is a transformation that you can use to move data directly from one machine to another. Direct data transfer is more efficient than the default transfer mechanism.
For example, assume that you have the following items:
  • a source table on machine 1
  • the default SAS Application Server on machine 2
  • a target table on machine 3
By default, SAS Data Integration Studio generates code that moves the source data from one machine (machine 1) to another (machine 2). Then, it moves the data from machine 2 to the target table on a third machine (machine 3). This action is an implicit data transfer. For large amounts of data, an implicit data transfer might not be the most efficient way to transfer data.
The following display shows the icon that is displayed on the affected transformation when implicit data transfer is used:
Implicit Data Transfer Icon
To improve efficiency, you can add a Data Transfer transformation to the process flow diagram. The transformation enables SAS Data Integration Studio to generate code that migrates data directly from the source machine to the target machine. You can use the Data Transfer transformation with a SAS table or a DBMS table with table and column names that follow the rules for SAS names.

Problem

You need to move data directly from a source table on one machine to a target table on another machine.

Solution

You can use the Data Transfer transformation to perform a direct data transfer between source and target tables that reside on different machines. Perform the following tasks to transfer the data directly from Machine 1 to Machine 3:

Tasks

Create and Populate the Job

Perform the following steps to create and populate a new job:
  1. Create an empty SAS Data Integration Studio job.
  2. Select and drag a Data Transfer transformation from the Transformations tree. Then, drop it in the empty job on the Diagram tab in the Job Editor window.
  3. Select and drag the source table from the Inventory tree. Then, drop it before the Data Transfer transformation on the Diagram tab.
  4. Drag the cursor from the source table to the input port of the Data Transfer transformation. This action connects the source to the transformation.
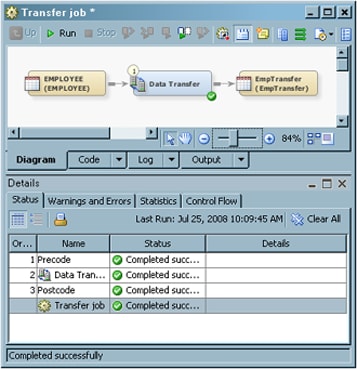
  5. Because you want to have a permanent target table to contain the output for the transformation, right-click the temporary work table attached to the transformation and click Replace in the pop-up menu. Then, use the Table Selector window to select the target table for the job. The target table must be registered in SAS Data Integration Studio.The following display shows a sample process flow diagram for a job that contains the Data Transfer transformation.
    Sample Data Transfer Process Flow
    Sample Data Transfer Process Flow
    Note that the source table for a sample job is named EMPLOYEE. It is stored on Machine 1 and registered in a current metadata repository. The target table is named EmpTransfer. It is stored in the EmpData library on Machine 3.

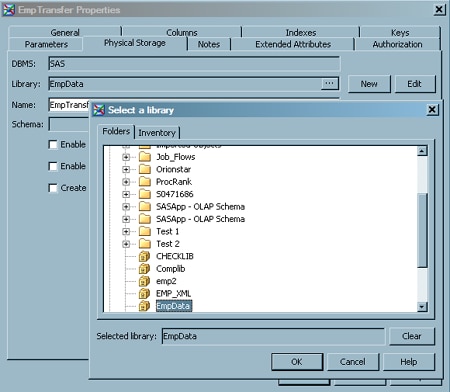
Verify the Storage Location for the Target Table

Perform the following steps to verify that the target table (EmpTransfer) is stored in the library on the remote machine (Machine 3):
  1. Open the properties window for the target table. Then, click the Physical Storage tab.
  2. Select the library for the target table in the Library field by clicking on the Library selection to open the Select a library window.
  3. The Select a library window appears with the library highlighted. The following display shows a sample Select a library window.
    Sample Select a library Window
    Sample Select a library Window
    In the sample job, this library is named EmpData. The target table is stored on Machine 3.

Run the Job

Perform the following steps to run the job:
  1. Right-click on an empty area of the job, and click Run in the pop-up menu. SAS Data Integration Studio generates code for the job and submits it to the SAS Application Server for execution. The following display shows a successful run of the sample job.
    Sample Completed Data Transfer Job
    Sample Completed Data Transfer Job
  2. If the job completes without error, go to the next task. If an error messages appear, read and respond to the messages.

Verify the Result

Perform the following to verify that the job created the desired output:
  1. Right-click the target table on the Diagram tab. Then, click Open in the pop-up menu. The following display shows the target table data for the sample job.
    Sample Target Table in the View Data Window
    Sample Target Table in the View Data Window
  2. Compare the data in the target table to the data in the source table. If the data matches, the data transfer is successful.