Loading a Table and Adding a Surrogate Primary Key

Problem

You want to create a job that loads source data into a target and adds a primary key column. The added key column is known as a surrogate key. The surrogate key in the target replaces the primary key that is loaded into the target from the source. The surrogate key is required because the target contains multiple instances of the primary key in the source.

Solution

You can create a job that includes the Surrogate Key Generator transformation. This transformation is more efficient than the SCD Type 2 Loader because you are not tracking data changes in the target.
The sample job includes the following tasks:

Tasks

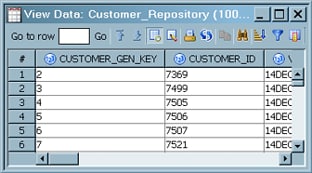
Create and Populate the Job

Perform the following steps to create and populate the job:
  1. Create an empty SAS Data Integration Studio job.
  2. In the Transformations tree, in the Data folder, drag the Surrogate Key Generator transformation into the empty job on the Diagram tab.
  3. Select and drag the source table from its folder and drop it before the Surrogate Key Generator transformation on the Diagram tab.
  4. Drag the cursor from the source table to the input port of the Surrogate Key Generator transformation. This action connects the source to the transformation.
  5. Because you want to store the output of the transformation in a permanent target table, right-click the temporary work table attached to the transformation and select Register Table. Enter an appropriate name in the Name field on the General tab. Then go to the Physical Storage tab and enter a table name that does not exist in the Physical Name field. Finally, select a permanent library for the target table creation and select OK.

Add the Surrogate Key Column to the Target

Perform the following steps to add a new column to the target for the generated key values:
  1. Open the properties window of the target and select the Columns tab.
  2. On the Columns tab, click the New column icon. A new column appears at the bottom of the list.
  3. Enter the name of the new column. This sample uses the name CUSTOMER_GEN_KEY.
  4. In the Type column, change the type of the new column to Numeric.
  5. To reposition the surrogate key column, select its column number in the list and drag the column up to position 1. The following display depicts the completed Columns tab for the sample job.
    Completed Columns Tab for Sample Job
    Completed Columns Tab for Sample Job
  6. Click OK to save your changes and close the properties window.

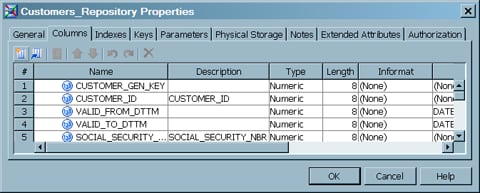
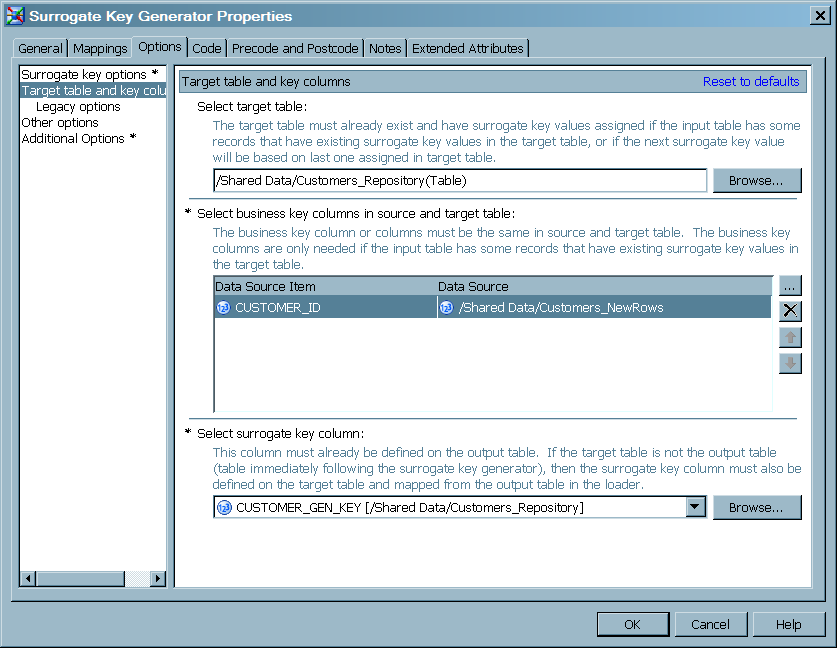
Identify Tables and Columns in the Transformation

The goal of this section is to configure the Surrogate Key Generator transformation. In this sample job, the surrogate key is generated using the default settings. By default, the transformation generates key values based on the largest value in the key column. Remaining configuration steps identify the target table and the key column in the transformation's Options tab. the option values that determine the method of surrogate key generation.
Perform the following steps to configure the Surrogate Key Generator transformation:
  1. Open the properties window of the transformation, and then select the Options tab. On the Options tab, select Target table and key columns.
  2. Specify the name of the target table in Select Target Table.
  3. Specify the business key column or columns by selecting from the list of columns under Select business key columns in source and target table. The business key columns are the primary key columns in the source.
  4. Specify the target column that receives the surrogate key values. Select the down arrow under Select surrogate key column, and click the target column. The following display depicts the completed Options tab in the sample job.
    Completed Options Tab for Sample Job
    Completed Options Tab for Sample Job
  5. Click OK to save the option specifications and close the properties window.

Run the Job and View the Output

Perform the following steps to run the job and view the output:
  1. Right-click on an empty area of the job, and click Run in the pop-up menu. SAS Data Integration Studio generates code for the job and submits it to the SAS Application Server for execution.
  2. If error messages are displayed on the Status tab, read and respond to the messages as needed.
  3. After the completion of the job, right-click the target and select Open to view the generated surrogate key values. The following display depicts the target table data for the sample job.
    Generated Key Values in the Sample Target Table
    Generated Key Values in the Sample Target Table