Managing Connections in Job Editor Windows

Problem

You need to manage the input and output connections for the objects in a SAS Data Integration Studio job. For example, you might need to switch an input table for a transformation with an output table.

Solution

You can use the Connections window for an object on the Diagram tab in the Job Editor window to review or change the input and output connections for the object. You can access the Connections window for the following objects:
  • a table
  • a transformation
  • a temporary output table

Tasks

Review the Connections for the Object

The Connections window displays the input and output nodes for any selected object in the Job Editor window. For example, you can display the Connections window for an object in the sample job shown in the following display.
Initial Process Flow
Perform the following steps to review the connections for an object in the job.
  1. Right-click the object that you need to review. Then, click Connections in the pop-up menu to display the Connections window. The following display shows the Connections window for the Extract transformation in the sample job.
    Connections Window
    Connections Window
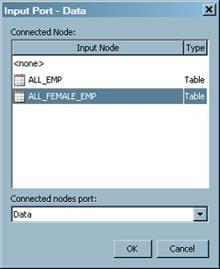
  2. Review the inputs and outputs for the object. Note that the ALL_EMP table is listed as an input node in the Input Ports field. In addition, the ALL_FEMALE_EMP is listed as an output node in the Output Ports field. Both fields also include a Selector button. This button is displayed only when the node can be deleted or replaced with another object in the job.

Change the Inputs and Outputs for the Object

The input and output selector windows enable you to change the connections in and out of the objects that are contained in the job. Perform the following steps to display and use a selector window.
  1. Click the Selector button to display the selector window for an input or output node. The following display shows the Input Selector window for the Extract transformation in the sample job.
    Input Selector Window
    Input Selector Window
    Note that the Connected Node field contains the input and the output tables for the job. The field also contains a <none> field, which you can use to remove the input table to the transformation entirely. The display shows the target table, ALL_FEMALE_EMP selected.
  2. Click OK to save the change to the input node for the object.
  3. Use selector windows to change any other objects that you need to update. Then, save the changes.
  4. Click OK in the Connections window to close the window and save the changes to the job. The following display shows the updated sample job after the source and target tables are dragged to their appropriate places on the Diagram tab.
    Updated Process Flow
    Updated Process Flow
    The source table and the target table have exchanged places.