Browsing Table Data

Problem

You want to display data in a SAS table or view, in an external file, in a temporary output table displayed in a process flow diagram, or in a DBMS table or view that is part of a SAS library for DBMS data stores.

Solution

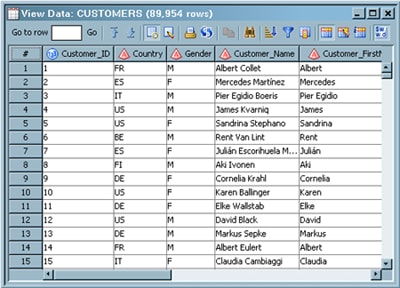
You can use the browse mode of the View Data window, provided that the table, view, or external file is registered on the current metadata server and exists in physical storage. You can browse temporary output tables until the Job Editor window is closed or the current server session is ended in some other way.
Transformations in a SAS Data Integration Studio job can create temporary output tables. If these temporary tables have not been deleted, you can also use the browse mode to display the data that they contain. The transformation must have been executed at least once for the temporary output tables to exist in physical storage.
The View Data window constructs a SELECT query from the metadata for the selected table, view, external file, or transformation. For example, if the metadata for Table 1 specifies three columns that are named Col1, Col2, and Col3, then view data generates the following query for that table:
SELECT Col1, Col2, Col3 FROM Table1
If the metadata for a SAS or DBMS data store does not match the data in the data store, an error dialog box displays. The dialog box gives you the option of ignoring the column metadata that has been registered for the data store and using any column definitions in the data store to format the columns for display.
The View Data window cannot display data for a fixed-width external file unless the SAS informats in the metadata are appropriate for the columns in the data.

Tasks

Use Browse Mode in the View Data Window

Perform the following steps to browse data in the View Data window:
  1. Right-click the metadata object for the table, view, external file, temporary output, or transformation. Then, select Open from the pop-up menu.
  2. Enter the appropriate user ID and password, if you are prompted for them. The information in the table, view, or external file displays in the View Data window, as shown in the following display.
    View Data Window in Browse Mode
    View Data Window in Browse Mode
    The title bar of the View Data window displays the name of the object that is being viewed and the total number of rows.

Browse Functions

The browse mode of the View Data window contains a group of functions that enable you to customize how the data in the window is displayed. These functions are controlled by the view data toolbar, as shown in the following display.
View Data Browse Toolbar
Perform the tasks that are listed in the following table to customize the data display:
Browse Functions in the View Data Window
Task
Action
Navigate within the data
Perform the following steps:
  • Enter a row number in the Go to row field and click Go to row to specify the number of the first row that is displayed in the table.
  • Click Go to first row to navigate to the first row of data in the View Data window.
  • Click Go to last row to navigate to the last row of data in the View Data window.
Select a View Data window mode
Perform the following steps:
  • Click Switch to browse mode to switch to the browse mode.
  • Click Switch to edit mode to switch to the edit mode.
Note that the Switch to browse mode and Switch to edit mode buttons are displayed only for SAS tables.
Perform utility functions
Perform the following steps:
  • Click Print to print the View Data window.
  • Click Refresh to refresh the data in the View Data window.
Copy one or more rows of data into the copy buffer
Perform the following steps:
  • Highlight one or more rows of data. Then, click Copy to copy the selected text into the copy buffer.
Manipulate the data that is displayed in View Data window
Perform the following steps:
  • Click Show search pane. Then, use the search toolbar to search for string occurrences in the data set that is currently displayed in the View Data window.
  • Click Launch sort screen. Then, use the Sort By Columns tab in the Query Options window to specify a sort condition on multiple columns. The sort is performed on the data set that is currently displayed in the View Data window.
  • Click Filter. Then, use the Filter tab in the Query Options window to specify a filter clause on the data set that is currently displayed in the View Data window. This filter clause is specified as an SQL WHERE clause that is used when the data is fetched.
  • Click Subset columns. Use the Columns tab in the Query Options window to select a list of columns that you want to see displayed in the View Data window. You can create a subset of the data that is currently displayed in the View Data window by selecting only some of the available columns in the Columns field. The redrawn View Data window includes only the columns that you select here on the Columns tab.
Determine what is displayed in the column headings
You can display any combination of column metadata, physical column names, and descriptions in the column headings.
  • Click Show column name in column header to display physical column names in the column headings.
  • Click Show column description in column header to display optional descriptions in the column headings.
  • Click Show column metadata name in column header to display optional column metadata in the column headings. This metadata can be entered in some SAS Business Intelligence applications, such as the SAS Information Mapping Studio.
Determine whether metadata formats are applied
Perform the following steps:
  • Click Apply metadata formats to toggle between showing formatted and unformatted data in the View Data window.
To sort columns and perform related tasks, right-click on a column name and select an appropriate option from the pop-up menu. To set options for the View Data window, select Filethen selectOptions from the SAS Data Integration Studio menu bar to display the Options window. Then, click the View Data tab. For information about the available options, see Specifying Browse and Edit Options for Tables and External Files.