Using the Migration Wizard
Overview of the Wizard
The Migration Wizard
enables you to migrate multiple projects to the SAS Enterprise Guide
4.3 format at one time. If you have the SAS Add-In 4.3 for Microsoft
Office installed, the wizard also migrates files that are used with
the SAS Add-In 2.1 or 4.2 for Microsoft Office, such as Microsoft
Word files or Microsoft Excel files. You can use the wizard to identify
the projects and documents that you want to migrate and specify new
locations for objects in the migrated files. The wizard converts the
projects and documents to the correct format and makes global changes
to the changed object references.
Using the Wizard
-
Create all required metadata objects in metadata. If you need to create new metadata definitions for objects such as servers or libraries, you should create these definitions before you run the migration wizard. The wizard does not create any metadata definitions. If you run the wizard before you create new definitions, you will receive an error whenever you open a project that refers to a metadata object that has not been defined.
-
-
On page 2, verify that the active connection is correct. Click Modify to display the Connections dialog box, where you can change the active profile or create a new profile.If the selected connection contains information about SAS folders that have been moved or renamed as part of the SAS installation and migration process, click Import. The information that is imported from your connection is used by the Migration Wizard to automatically remap the location of SAS folders.
-
On page 3, select the files that you want to migrate. You can select files from local directories, servers, and SAS folders. Use the arrow to move files (preserving the tree structure) to the Selected Files area. Selecting a node such as a folder or a server automatically selects all files under that node. Expand the Local, Server, or SAS Folders nodes to locate individual files or directories. Use the Show field to select the type of files that are displayed. To access files on a remote machine, click Add Location. The Windows Add Network Drive dialog box is displayed, which enables you to map a network drive to a remote location.
-
If the wizard finds a mapping file, it will ask whether you want to use it. A mapping file is an XML document that specifies correlations between old locations and new locations for objects. A mapping file enables you to specify the object mappings once and then have those mappings automatically applied in the wizard. The location for the mapping files depends on your operating system:
-
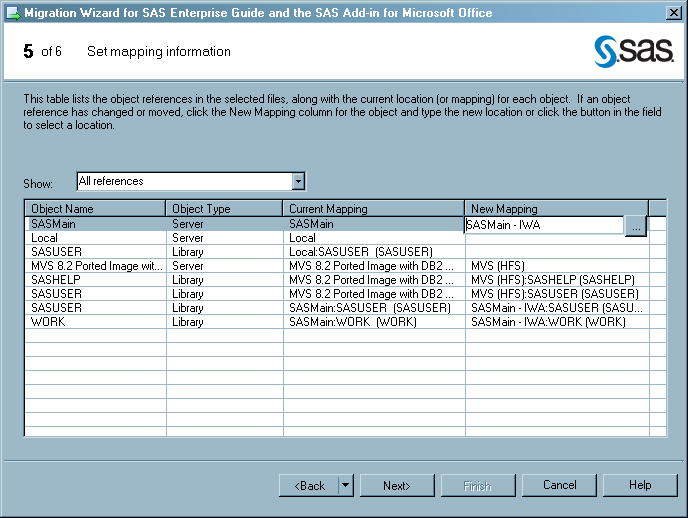
Page 5 lists all of the metadata objects that are referenced in the selected files, identifies their type, and provides the currently specified location of the object. To change the mapping for an object, click in the New Mapping column for the object, click the button in the field to open the Change Resource dialog box, and enter a new location or browse to the new location. By default, the new location is automatically applied to all objects in the migration list that use the current value. No changes are made until the wizard completes.
-
On page 6, you can specify the name of the migration record file, which contains all of the settings that are specified in the wizard. Whenever you run the Migration Wizard from the command line, you can specify the migration record file as a parameter, which initializes the wizard with all of the settings that you used when the file was created. You can also use the migration record file when creating a mapping file. You can use the MappingInformation section of the migration record file as the mapping file. For more information, see Mapping File Format.On this page, you can also specify the location of a log file and specify whether files will be backed up before conversion. By default, migrated files are backed up and the original files are overwritten.You can specify that the migration process attempts to verify that the new resources exist and note the status in the log. The changes are applied whether or not the resources are verified. In order to accurately verify the remappings, you must have Read permissions in metadata for objects such as servers and libraries and operating system Read permissions for file locations. Click Finish to migrate the selected files.
Mapping File Format
The following is the
format of the mapping file that is used to identify correlations between
old and new locations for metadata objects. This file must be named
MappingInformation.xml. Include as many <MappedItem> blocks
as needed to change the mapping for all affected objects. The format
of MappingInformation.xml is as follows:
<MappingInformation>
		<MappedItem>
			<ReferenceName>server name</ReferenceName>
			<ReferenceID>server ID</ReferenceID>
			<ReferenceType>Server</ReferenceType>
			<CurrentMapping>old server definition</CurrentMapping>
			<NewMapping>new server definition</NewMapping>
		</MappedItem>

		<MappedItem>
			<ReferenceName>library name</ReferenceName>
			<ReferenceID>library ID</ReferenceID>
			<ReferenceType>LIBRARY</ReferenceType>
			<CurrentMapping>old library definition</CurrentMapping>
			<NewMapping>new library definition</NewMapping>
		</MappedItem>

		<MappedItem>
			<ReferenceName>stored process name</ReferenceName>
			<ReferenceID>stored process ID</ReferenceID>
			<ReferenceType>SAS.EG.ProjectElements.StoredProcess</ReferenceType>
			<CurrentMapping>old stored process definition</CurrentMapping>
			<NewMapping>new stored process definition</NewMapping>
		</MappedItem>

		<MappedItem>
			<ReferenceName>external file name</ReferenceName>
			<ReferenceID>external file ID</ReferenceID>
			<ReferenceType>SAS.EG.ProjectElements.ExternalFile</ReferenceType>
			<CurrentMapping>old external file definition</CurrentMapping>
			<NewMapping>new extenal file definition</NewMapping>
		</MappedItem>

		<MappedItem>
			<ReferenceName>information map</ReferenceName>
			<ReferenceID>information map ID</ReferenceID>
			<ReferenceType>SAS.EG.ProjectElements.InformationMap</ReferenceType>
			<CurrentMapping>old information map definition</CurrentMapping>
			<NewMapping>new information map definition</NewMapping>
		</MappedItem>

		<MappedItem>
			<ReferenceName>OLAP catalog name</ReferenceName>
			<ReferenceID>OLAP catalog ID</ReferenceID>
			<ReferenceType>OLAPCATALOG</ReferenceType>
			<CurrentMapping>old catalog definition</CurrentMapping>
			<NewMapping>new catalog definition</NewMapping>
			<OLAPCatalogName>old OLAP catalog name</OLAPCatalogName>
			<OLAPServerName>old OLAP server name</OLAPServerName>
			<OlapServerType>old OLAP server type</OlapServerType>
			<OlapProviderName>old OLAP provider</OlapProviderName>
			<OlapLoginMode>old login mode</OlapLoginMode>
			<OlapExtProperties>extended properties for connecting to the
				OLAP server</OlapExtProperties>
			<OlapHostName>old host name</OlapHostName>
			<OlapPort>old port</OlapPort>
			<NewOLAPCatalogName>new OLAP catalog name</NewOLAPCatalogName>
			<NewOLAPServerName>new OLAP server name</NewOLAPServerName>
			<NewOlapServerType>new OLAP server type</NewOlapServerType>
			<NewOlapProviderName>new OLAP provider</NewOlapProviderName>
			<NewOlapLoginMode>new login mode</NewOlapLoginMode>
			<NewOlapExtProperties>new extended properties for connecting to
				the OLAP server</NewOlapExtProperties>
			<NewOlapHostName>new host name</NewOlapHostName>
			<NewOlapPort>new port</NewOlapPort>
		</MappedItem>

		<MappedItem>
			<ReferenceName>OLAP server name</ReferenceName>
			<ReferenceID>OLAP server ID</ReferenceID>
			<ReferenceType>OLAPSERVER</ReferenceType>
			<CurrentMapping>old server definition</CurrentMapping>
			<NewMapping>new server definition</NewMapping>
			<OLAPServerName>old OLAP server name</OLAPServerName>
			<OlapServerType>old OLAP server type</OlapServerType>
			<OlapProviderName>old OLAP provider</OlapProviderName>
			<OlapLoginMode>old login mode</OlapLoginMode>
			<OlapExtProperties>extended properties for connecting to the
				OLAP server</OlapExtProperties>
			<OlapHostName>old host name</OlapHostName>
			<OlapPort>old port</OlapPort>
			<NewOLAPServerName>new OLAP server name</NewOLAPServerName>
			<NewOlapServerType>new OLAP server type</NewOlapServerType>
			<NewOlapProviderName>new OLAP provider</NewOlapProviderName>
			<NewOlapLoginMode>new login mode</NewOlapLoginMode>
			<NewOlapExtProperties>new extended properties for connecting to
				the OLAP server</NewOlapExtProperties>
			<NewOlapHostName>new host name</NewOlapHostName>
			<NewOlapPort>new port</NewOlapPort>
		</MappedItem>


(repeat as needed for all objects)
</MappingInformation>
Initializing the Wizard by Using a Migration Record File
You can create a migration
record file when you run the Migration Wizard. This file contains
a record of all of the information that is provided in the wizard.
If you start the Migration Wizard from the command line and specify
the migration record file as a parameter, the wizard will be initialized
with the same settings that you used when the file was created.