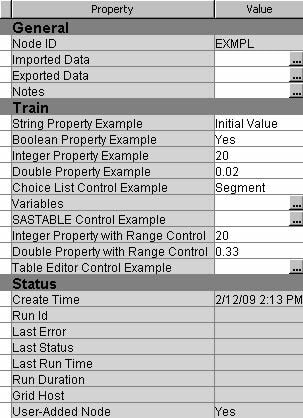
Table Editor Controls
Basic Table Editor
TableEditor Control elements enable your extension
node to access SAS data sets that are accessible by the Enterprise
Miner server or that are generated by your extension node's server
code. The server code that is required for a TableEditor Control is typically minimal. The essential
purpose of the server code is to provide a way for the Enterprise
Miner server to identify and track the data sets or files that are
to be accessed by the Control. The Control elements also typically provide a way for you
to add more sophisticated functionality beyond the minimal requirements.
The following XML code
illustrates the most basic configuration of a
String Property with a TableEditor Control:
<Property description="write your own description here"
	displayName="TableEditor Control Example"
	name="TableEditor"
	type="String">
	<Control>
		<TableEditor key="COMPANY">
			<Actions>
				<Open name="OpenTable" />
				<Close name="CloseTable" />
			</Actions>
		</TableEditor>
	</Control>
</Property>
This configuration requires
a single
Control element. This Control element has no attributes. Nested inside of
this Control element is a single TableEditor element. The TableEditor element has a key attribute. The value
of the key attribute is the name of a file
key that you register using the %EM_REGISTER macro. In this example,
the node prefix is EXMPL and the key is COMPANY,
so the name of the table is EMWS.EXMPL_COMPANY.
You also need some code
that associates a data set with that
key.
For example, you might have code in the CREATE action that registers
the key, COMPANY, and a SAS DATA step that
associates the key with the data set Sashelp.Company:
If you want the table
to be available before run time, place the code that associates the
data set with the key in the CREATE action. However, in some cases,
the table that you are opening with the
TableEditor Control is not created until after the
node is run. The data set might be created by a process within the
TRAIN code. In that case, you could still register the key in your
CREATE code, but the code that associates the key with the data set
would be in your TRAIN code. If the user attempted to open the table
before the node was run, an error message would appear indicating
that the table does not exist.
Nested within the
TableEditor element is an Actions element. The Actions element associates
a block of SAS code with a user action. Inside of the Actions element are an Open element and a Close element; both have
a name attribute. In your node's main program,
you can add code that might look like this:
%if %upcase(&EM_ACTION) = OPENTABLE %then %do;
	filename temp catalog 'sashelp.emext.example_actions.source';
	%include temp;
	filename temp;
	%OpenTable;
%end;

%if %upcase(&EM_ACTION) = CLOSETABLE %then %do;
	filename temp catalog 'sashelp.emext.example_actions.source';
	%include temp;
	filename temp;
	%CloseTable;
%end;
The values of the  ) icon:
name attributes correspond to the names of the actions
that are executed when the user either opens or closes the table.
The following actions occur when the user opens the table by clicking
the ellipsis ( ) icon:
You must have at least
one named action (
Open or Close) specified in the XML properties file for a TableEditor Control. However, you are not required
to write any code or to include a call to the action in your main
program. When you do not have any code that you want to execute when
the table is opened or closed, the Actions, Open, and Close elements act as placeholders.
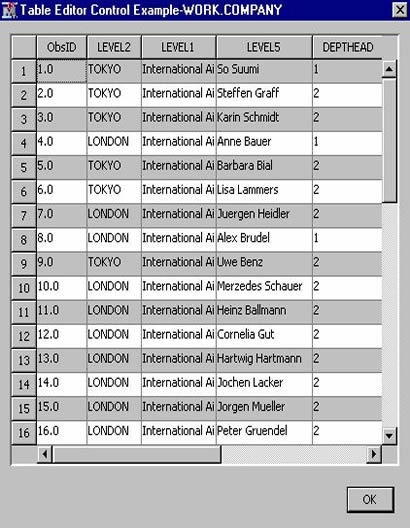
When a user clicks the  icon, a SAS Table Editor window appears, displaying the table that is associated with the
Control.
 icon, a SAS Table Editor window appears, displaying the table that is associated with the
Control.
In this example, the
entire table is displayed when the user clicks the  icon and the table cannot be edited. Adding a
 icon and the table cannot be edited. Adding a
 Column element with nested Column elements enables you to control which variables appear in the table
and whether a variable's values can be edited by the user. In the
following example, the Control configuration
restricts which variables are displayed in the table and enables the
user to edit the values of those variables:
<Property description="write your own description here"
	displayName="TableEditor Control Example"
	name="TableEditor"
	type="String">
	<Control>
		<TableEditor key="COMPANY">
			<Actions>
				<Open name="OpenTable"/>
				<Close name="CloseTable"/>
			</Actions>
		<Columns displayAll="N">
			<Column name="DEPTHEAD"
				type="String"
				editable="Y"/>
			<Column name="JOB1"
				type="String"
				editable="Y"/>
			<Column name="LEVEL3"
				type="String"
				editable="Y"/>
			<Column name="N"
				type="int"
				editable="Y"/>
			<Column name="LEVEL4"
				type="String"
				editable="Y"/>
		</Columns>
		</TableEditor>
	</Control>
</Property>
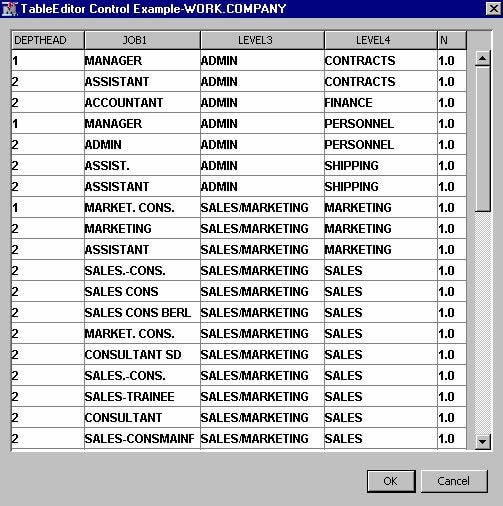
In the
Columns element, the displayAll attribute has a
value of N. This indicates that only those
variables that are specifically identified by Column elements should appear when the table is opened. Four Column elements are specified. In each Column element, there are three attributes defined as follows:
When the
editable attribute of a Column element is set to Y, the user can edit the values of the corresponding
variable by typing a new value in the SAS Table Editor window.
You can also add
Range Control elements to restrict
the values that can be used to edit the values in the table. For example,
suppose you add a Range Control to the N Column element as follows:
<Property description="write your own description here"
	displayName="TableEditor Control Example"
	name="TableEditor"
	type="String">
	<Control>
		<TableEditor key="COMPANY">
			<Actions>
				<Open name="OpenTable" />
				<Close name="CloseTable" />
			</Actions>
			<Columns displayAll="N">
				<Column name="DEPTHEAD"
				type="String"
				editable="Y">
				</Column>

			<Column name="JOB1"
				type="String"
				editable="Y"/>

			<Column name="LEVEL3"
				type="String"
				editable="Y"/>

			<Column name="LEVEL4"
				type="String"
				editable="Y"/>

			<Column name="N"
				type="int"
				editable="Y">

				<Control>
				<Range min="1" max="3" />
				</Control>

			</Column>
			</Columns>
		</TableEditor>
	</Control>
</Property>
Table Editor with Choices
You can also add a ChoiceList
Control to restrict the values that can be used to edit the values
in the table. For example, suppose you add a ChoiceList Control to
the DEPTHEAD Column element as follows:
<Property description="write your own description here"
	displayName="TableEditor Control Example"
	name="TableEditor"
	type="String">

	<Control>
		<TableEditor key="COMPANY">
			<Actions>
				<Open name="OpenTable" />
				<Close name="CloseTable" />
			</Actions>
			<Columns displayAll="N">
				<Column name="DEPTHEAD"
				type="String"
				editable="Y">

				<Control>
				<ChoiceList>
					<Choice displayValue="1" rawValue="1"/>
					<Choice displayValue="2" rawValue="2"/>
				</ChoiceList>
				</Control>
				</Column>

				<Column name="JOB1"
				type="String"
				editable="Y"/>

				<Column name="LEVEL3"
				type="String"
				editable="Y"/>

				<Column name="LEVEL3"
				type="String"
				editable="Y"/>

				<Column name="N"
				type="int"
				editable="Y">

				<Control>
					<Range min="1" max="3" />
				</Control>
				</Column>
			</Columns>
		</TableEditor>
	</Control>
</Property>
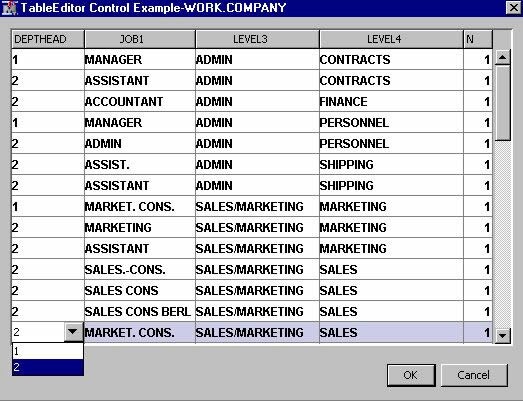
When the SAS Table Editor window appears and the user clicks
on a value in the DEPTHEAD column, a drop-down list appears. The user
can edit the value by choosing from the list that contains the values
1 and 2. If users want to edit the value of the N column, they can
enter an integer value of 1, 2, or 3. If they enter a value outside
of the range permitted by the
Range Control, a missing value appears in that observation.
Table Editor with Dynamic Choices
A
DynamicChoiceList Control enables you to dynamically populate
a choice list rather than hardcoding values in the XML properties
file. The following example demonstrates the functionality that this
control provides as well as the steps necessary to implement it. There
are four steps to implementing this type of Control.
<Property description="write your own description here"
	displayName="TableEditor Control Example"
	name="TableEditor"
	type="String">

	<Control>
		<TableEditor key="COMPANY"
		choiceKey="CHOICE">
		<Actions>
			<Open name="OpenCompanyTable" />
		</Actions>
		<Columns displayAll="N">
			<Column editable="Y"
			name="DEPTHEAD"
			type="String">
			</Column>

			<Column name="JOB1"
			type="String"
			editable="Y">

			<Control>
				<DynamicChoiceList/>
			</Control>

			</Column>

			<Column name="LEVEL3"
			type="String"
			editable="Y"/>

			<Column name="LEVEL4"
			type="String"
			editable="Y"/>

			<Column name="N"
			type="int"
			editable="Y">
			</Column>
		</Columns>
		</TableEditor>
	</Control>
</Property>
The
TableEditor element now has a choiceKey attribute with
a value of CHOICE. The Column element for JOB1 now has a Control element with a nested DynamicChoiceList element. In the CREATE action, the following line of code is added:
Typically, the code
that generates the data set that is used to populate the
DynamicChoiceList is in the OPEN action. However, it
can actually be placed wherever it is most appropriate for the purpose
that it serves. In this example, the code is placed in the CREATE
action so that the SAS Table Editor is functional when the node is
first placed in a process flow diagram.
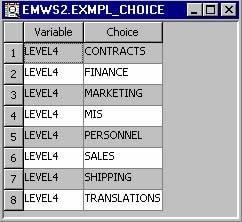
The data set Sashelp.Company
has a variable named Level4. The
DynamicChoiceList is populated with the unique values of that variable. The following
code generates the data set:
proc sort data=sashelp.company nodupkey out=&em_user_choice(keep=LEVEL4);
	by LEVEL4;
run;

data &em_user_choice(keep=Variable Choice);
	length Variable $32 Choice $32;
	set &em_user_choice;
	Variable="LEVEL4";
	Choice=LEVEL4;
run;
The
DynamicChoiceList element can be applied to multiple Column elements in a TableEditor Control. In such a case, the data set has a repeated measures structure.
That is, suppose that there are k Column elements
to which you want to apply a DynamicChoiceList. You still create one data set to populate the k lists. The data
set has the following structure:
	Variable					Choice
variable-name_1		value 1_1
variable-name_1		value 1_2
variable-name_1			...
variable-name_1		value 1_N1
variable-name_2		value 2_1
variable-name_2		value 2_2
variable-name_2			...
variable-name_2		value 2_N2
		.						.
		.						.
		.						.
variable-name_k		value k_1
variable-name_k		value k_2
variable-name_k			...
variable-name_k		 value k_Nk
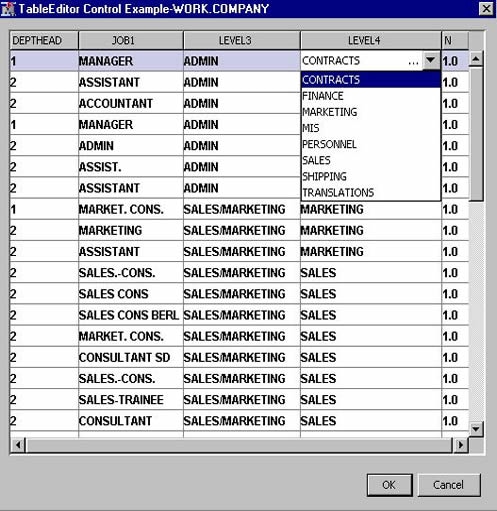
In this example, when
the Table Editor window is opened, the user
can modify the value for LEVEL4 in any observation by selecting from
the list of values that already exist in the data set.
You can provide some
additional control over how the data is displayed in the SAS Table Editor window by adding
whereClause and whereColumn attributes to the TableEditor element. For example, change the TableEditor element as follows:
The
whereClause attribute is redundant, but it is required; it should have a value
of Y. The whereColumn specifies the name of a variable in the data set. Including these
two attributes sorts the data set by the values of the variable specified
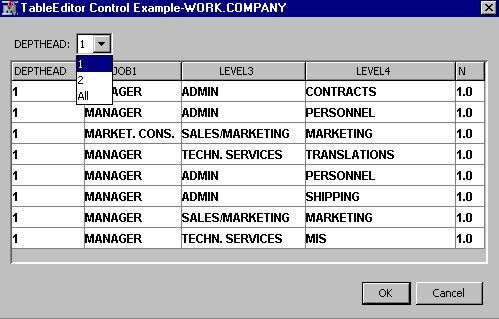
in the whereColumn attribute. A drop-down
list is added at the top of the SAS Table Editor window. The values in the list correspond to the unique values of
the variable specified in the whereColumn attribute and the additional value of All. By default, only observations with a value corresponding to the
first value in the list are displayed. The user can then select a
different value from the drop-down list; the table is refreshed and
the observations that correspond to the new value are displayed. If
the user selects All, the entire table is displayed.
Table Editor with Restricted Choices
In the example above,
the choices for the variable Level4 were populated using a
DynamicChoiceList Control.
By adding a single new attribute and modifying the accompanying SAS
code, you can take advantage of the hierarchical structure of the
SASHelp.Company data set to restrict the values that are used to populate
the choices. For example, consider the following modified Property configuration:
<Property
	description="write your own description here"
	displayName="TableEditor Control Example"
	name="TableEditor"
	type="String">

	<Control>
		<TableEditor key="COMPANY"
			choiceKey="CHOICE"
			keyVar="LEVEL3"
			whereClause="Y"
			whereColumn="DEPTHEAD">

			<Actions>
				<Open name="OpenCompanyTable" />
				<Close name="CloseCompanyTable" />
			</Actions>

			<Columns displayAll="N">
				<Column editable="Y"
					name="DEPTHEAD"
					type="String"/>
				<Column name="JOB1"
					type="String"
					editable="Y"/>
				<Column name="LEVEL3"
					type="String"
					editable="Y"/>
				<Column name="LEVEL4"
					type="String"
					editable="Y">
			<Control>
				<DynamicChoiceList/>
			</Control>
			</Column>

				<Column name="N"
					type="int"
					editable="Y"/>
			</Columns>
		</TableEditor>
	</Control>
</Property>
The essential addition
to this configuration is the
keyVar attribute
of the TableEditor Control. In this example, the keyVar attribute
is assigned the value of "LEVEL3". This means that when the choices
for the variable LEVEL4 are presented for a given row in the table,
the choices are conditional on the value of LEVEL3 in the same row
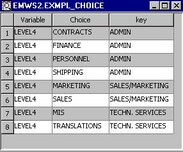
of the table. To accomplish this, a table with a hierarchical structure
of choices must be generated as follows:
%em_register(type=data, key=CHOICE)

proc sort data=sashelp.company nodupkey
	out=&em_user_choice(keep= LEVEL3 LEVEL4);
	by LEVEL3 LEVEL4;
run;

data &em_user_choice(keep=Variable Choice key);
	length Variable $32 Choice $32 key $32;
	set

&em_user_choice;
	Variable="LEVEL4";
	Choice=LEVEL4;
	key=LEVEL3;
run;
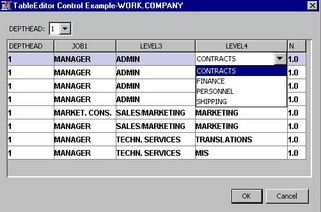
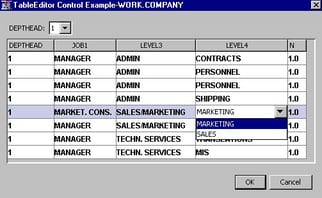
In this example, when
the user clicks on the variable Level4 in a row where the variable
Level3 is "ADMIN" they are presented with one set of choices:
Ordering Editor
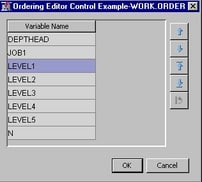
An Ordering Editor provides
a means by which you can display a table to the user and enable the
user to change the order of the variables in the table. A simple example
of an ordering editor's XML
Property configuration
is as follows:
<Property
	description="write your own description here"
	displayName="Ordering Editor Control Example"
	name="OrderingEditor"
	type="String">

	<Control>
		<TableEditor key="ORDER"
			isOrderingEditor="Y">

		<Actions>
			<Open name="OpenOrderTable" />
			<Close name="CloseOrderTable" />
		</Actions>

		<Columns displayAll="Y">
			<Column editable="N"
				name="NAME"
				type="String"/>
		</Columns>
		</TableEditor>
	</Control>
</Property>
Notice the two attributes
of the
TableEditor Control: key and isOrderingEditor. Just as in the other TableEditor Control example, the value of the key attribute must be registered with Enterprise Miner using the %EM_REGISTER
macro in your extension node's server code. The isOrderingEditor attribute tells Enterprise Miner that this table editor is, in fact,
an ordering editor.
As with other table
editors, an ordering editor requires an
Actions element and at least one named action nested within it. However,
the named action need not have any server code associated with it.
You control which variables appear in the table with the Columns element and the nested Column elements. You can have as many columns in the table as you want.
An ordering editor requires
minimal server code to make it functional. All that is really required
is that you have a table and that the table be registered. For example,
you might have server code in the create action that appears as follows:
%em_register(type=data, key=ORDER);

proc contents data=sashelp.company out=&em_user_order(KEEP=NAME);
run;
