Generating and Using Scoring Code
Overview
After deciding on a
model, you often need to use your model to score new or existing observations.
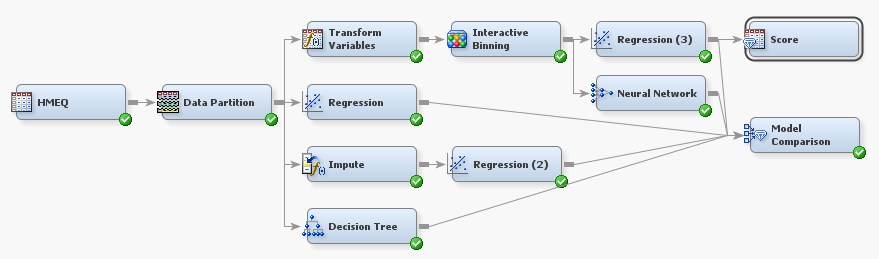
The Score node can be used to evaluate, save, and combine scoring
code from different models. In this example, you want to score a data
set using the Regression (3) model.
On the Assess tab,
drag a Score node to your diagram workspace.
Connect the Regression (3) node to the Score node.
First, set the value
of the Type of Scored Data property to Data.
Right-click the Score node and click Run.
In the Confirmation window, click Yes.
Click Results in the Run Status window.
In the Results window,
maximize the Optimized SAS Code window. This
is the optimized score code for the Regression (3) model.
You can save the optimized
score code by selecting File Save As on the main menu. In Save window,
navigate to an appropriate location for you to save the score code
and enter
Save As on the main menu. In Save window,
navigate to an appropriate location for you to save the score code
and enter
scoreCode.sas in
the File name field. This enables you to
make changes to a model without losing the score code for an accurate
model.

Scoring Using Base SAS
You can use the saved
score code to score a data set by using Base SAS. The program requires
only Base SAS to run. Therefore, you can run the program on any of
the systems in which you have installed Base SAS, regardless of whether
SAS Enterprise Miner is installed.
SAS Enterprise Miner
runs on top of a SAS session, and you can use this SAS session at
any time. Use this SAS session to score the DMAHMEQ data set in the
SAMPSIO library. This data set contains all the same inputs as the
HMEQ data set, but it also contains response information. This enables
you to compare the predicted outcome to the actual outcome.
To score the data set
using Base SAS, complete the following steps:
-
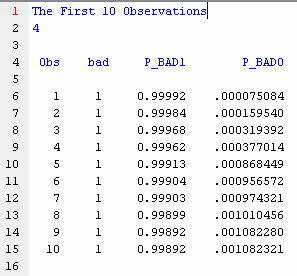
title "The First 10 Observations";
PROC PRINT DATA=myPredicted(obs=10);
	VAR BAD P_BAD1 P_BAD0;
run;
This code prints the value of BAD as well as P_BAD1 and P_BAD0. P_BAD1 is the predicted probability of default, and P_BAD0 is predicted probability of not defaulting.Note: Although it is not necessary, you should consider sorting the observations by one of the variables, such as P_BAD1. To do so, add the code that follows before the PROC PRINT statement. By sorting the observations by descending values of P_BAD1, you arrange the most likely to default observations at the top of the printed results. The example in this book does sort the data.PROC SORT DATA=myPredicted; BY DESCENDING P_BAD1; run;
Scoring with SAS Enterprise Miner
When you attach an input
data set to the Score node, SAS Enterprise
Miner knows to score that data set. However, you have not added the
SAMPSIO.DMAHMEQ data set to your project yet. To do so, complete the
following steps:
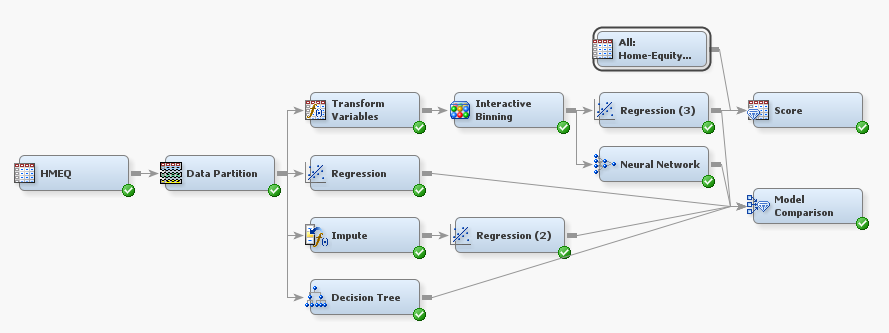
This creates the All:
Home-Equity Loan Scoring Data data source in your Project
Panel. Drag this data source to the diagram workspace. Connect the All:
Home-Equity Loan Scoring Data data source to the Score node.
Set the value of the Type
of Scored Data property to View.
In the Score Data properties subgroup, set
the value of the Validation and Test properties
to Yes.
Right-click the Score node
and click Run. In the Confirmation window,
click Yes. Click OK in
the Run Status window.
On the Utility tab,
drag a SAS Code node to your diagram workspace.
Connect the Score code to the SAS
Code node. Click the ellipsis button next to the Code
Editor property of the SAS Code node.
In the Training Code field, enter the following
code:
PROC SORT DATA=<diagramID>.Score_SCORE out=defaults;
BY DESCENDING P_BAD1;
run;

PROC PRINT DATA=DEFAULTS;
VAR BAD P_BAD1 P_BAD0;
run;
You must replace <diagramID>
with the value of the ID property. This value
is displayed when you select the diagram in the Project Panel. Close
the Training Code window. Click Yes in
the Save Changes window.
Copyright © SAS Institute Inc. All rights reserved.