Cluster-Survive Data
Introduction
The Cluster-Survive
Data directive enables you to use rules to cluster similar records
together and to use survivorship rules to produce a unique surviving
record from that cluster. If you want to do cluster analysis only,
you are not required to run the survivorship processing.
Note: Before running the Cluster-Survive
directive, it is a best practice to use the data quality transformations
available through the Cleanse Data directive. These transformations
standardize or compute match codes from values in the records, which
can improve the clustering results.
Prerequisites
To run Cluster-Survive
Data directives in Hadoop, Apache Spark must be installed and configured
on your Hadoop cluster. For information about the supported versions
of Spark, see SAS 9.4 Supported Hadoop Distributions,
at https://support.sas.com/resources/thirdpartysupport/v94/hadoop/hadoop-distributions.html. See also the Usage Notes for Spark .
The SAS Data Management
Accelerator for Spark must also be deployed on your Hadoop cluster,
as described in the SAS In-Database Products: Administrator’s
Guide.
To learn more about
subjects such as string truncation in Spark, see Usage Notes for Spark.
About Clustering and Survivorship
Clustering
Clustering helps identify
unique entities after you determine which fields can be used to identify
related records.
Using a set of cluster
rules, the clustering process partitions a set of records into related
sets of entities based on the rules. Each set is assigned a unique
cluster ID, which is added as a field to the records. Cluster rules
are expressed as sets of fields that have equal values. If the values
for two records match for the fields specified in the rule, the records
are considered matched and are assigned to the same cluster.
The simplest example
of a cluster rule uses a single column. Rows in the table that have
the same value for a field in this column are gathered into a set.
In the following example, if the cluster rule specifies only the NAME
column, then the result yields two sets:
|
name
|
email1
|
email2
|
|
|---|---|---|---|
|
Alice
|
alice@alice.net
|
alice@alice.com
|
SET 1
|
|
Alice
|
(null)
|
Alice
|
|
|
Bob
|
bob@bob.com
|
SET 2
|
|
|
Bob
|
robert@robert.com
|
To define identity such
that both the NAME and EMAIL1 columns are considered, you can use
the AND Boolean operator to construct a NAME
and EMAIL1 rule, which yields four sets:
|
name
|
email1
|
email2
|
|
|---|---|---|---|
|
Alice
|
alice@alice.net
|
alice@alice.com
|
SET 1
|
|
Alice
|
(null)
|
alice@alice.net
|
SET 2
|
|
Bob
|
bob@bob.com
|
SET 3
|
|
|
Bob
|
robert@robert.com
|
SET 4
|
In the previous example,
the two Alice records are separated into two sets because the values
for EMAIL1 differ. You might want these two records to be identified
as one set because alice@alice.net is a common address for both records,
but it appears in two different columns. If you want to combine these
records together in a set, you must specify an advanced cluster rule
using parentheses and the OR Boolean operator
to construct the rule NAME and (EMAIL1 or EMAIL2):
|
name
|
email1
|
email2
|
|
|---|---|---|---|
|
Alice
|
alice@alice.net
|
alice@alice.com
|
SET 1
|
|
Alice
|
(null)
|
alice@alice.net
|
|
|
Bob
|
bob@bob.com
|
SET 2
|
|
|
Bob
|
robert@robert.com
|
SET 3
|
When you use the OR operator
this way, matching values in the NAME column and matching values in
either the EMAIL1 or EMAIL2 columns cause the records to be grouped
into one set.
It is possible to use
the OR operator without parentheses. For
example, the rule EMAIL1 or EMAIL2 still returns a single set for
the Alice records. However, when the rule uses AND as
well as OR operators, an order of precedence
applies. Without specifying the parentheses, the previous rule would
be evaluated as (NAME and EMAIL1) or EMAIL2, which yields very different
results.
Multiple cluster rules
can be specified, and are all used when grouping records together.
Survivorship
The clustering process
identifies a set of records that are logically related, after which
you can use survivorship rules to create a survivor record. The survivor
record is considered the best single representative of the clustered
data. Survivorship processing uses rules for base record selection
and column selection. For example, after unique records are identified
and clustered, you might find multiple addresses listed for a particular
individual. The rules have identified these records as similar, but
you must determine which address should be used as the standard.
Note: Leading and trailing spaces
are trimmed from fields when evaluating survivorship rules.
Survivor Base Record Rules
Survivor base record
rules are used to select a single record as the template for the surviving
record. The rules apply only to records that share a common identity
as determined by the cluster rules. The template can be further modified
by applying survivor column rules that update individual field values
from the records in the set.
The base record is determined
by applying operators to column values. For example, if your record
contains a date field indicating when it was last updated, you can
use a rule such as Max(UPDATED) to select the most recent update to
use as your base record:
|
Name
|
Street
|
City
|
UPDATED
|
|---|---|---|---|
|
Alice
|
101 Main Street
|
Albuquerque
|
June 26, 2015
|
|
Alice
|
205 North Avenue
|
Tucson
|
May 15, 2012
|
|
Alice
|
PO Box 12081
|
Tucson
|
January 8, 2012
|
Alternatively, you could
use the most frequent value for city. For example, you could use Highest
Occurrence (CITY) in your rule, which would yield two possibilities
for the base record:
|
Name
|
Street
|
CITY
|
Updated
|
|---|---|---|---|
|
Alice
|
Alice
|
Albuquerque
|
June 26, 2015
|
|
Alice
|
205 North Avenue
|
Tucson
|
May 15, 2012
|
|
Alice
|
PO Box 12081
|
Tucson
|
January 8, 2012
|
You can have only one
base record, so you must either refine the first rule or provide another
rule that selects a unique record.
If you want to refine
the results, you can specify another rule that is linked to the first
rule by using the Apply to previous rule output setting.
When this option has been selected, only the records that match the
first rule are provided to the second. For example, if the first rule
is Highest Occurrence(CITY) and the second rule is Max(UPDATED), the
base record represents the last known address for Alice in Tucson:
|
Name
|
Street
|
CITY
|
UPDATED
|
|---|---|---|---|
|
Alice
|
101 Main Street
|
Albuquerque
|
June 26, 2015
|
|
Alice
|
205 North Avenue
|
Tucson
|
May 15, 2012
|
|
Alice
|
PO Box 12081
|
Tucson
|
January 8, 2012
|
Sometimes, chaining
rules can result in no records being selected, even though at some
point in the process a unique record was selected. For example, if
you added another chained rule that required the UPDATED field to
be greater than January 1st, 2013, no records would be selected. Even
though a unique record was selected by the second rule in the chain,
it does not survive the third rule. Use the Stop processing
rules after the first rule yields a single record option
to stop processing when a unique record has been identified.
Alternatively, you can
create another rule, or chain of rules, that uses a different strategy
to select a base record. If the Apply to previous rule
output option is not selected for a rule, then the complete
group of matched records is provided for the rule to process.
Survivor Column Rules
Survivor column rules
apply field-level edits to the survivor base record, where field values
are selected from the clustered group of records. This is useful when
integrating data from different sources where the fields might be
absent or less reliable.
For example, given the
following data, and assuming that the first record has been selected
as the base record, you might want to incorporate the email address
from the second record into the base record:
|
Name
|
Street
|
City
|
Updated
|
Email
|
|---|---|---|---|---|
|
Alice
|
101 Main Street
|
Albuquerque
|
June 26, 2015
|
(null)
|
|
Alice
|
205 North Avenue
|
Tucson
|
May 15, 2012
|
alice@alice.net
|
To do this, you would
build one or more rules that identify the desired field values and
copy them into the base record. In this example, a rule such as Not
Null(EMAIL) selects the second record. Specifying the EMAIL field
as the field selection then causes the (null) value to be updated:
|
Name
|
Street
|
City
|
Updated
|
Email
|
|---|---|---|---|---|
|
Alice
|
101 Main Street
|
Albuquerque
|
June 26, 2015
|
alice@alice.net
|
Note: The survivor column rules
modify a copy of the base record, so that the original record in a
cluster group remains unchanged.
The fields used in the
rule are not required to be related to the fields specified in the
field selection list. For example, you could use the Updated field
to identify the record, and then copy the Street and City field values
to the survivor without including Updated in the field selection list.
Example
Follow these steps to
use the Cluster-Survive directive:
-
On the SAS Data Loader directives page, click Cluster-Survive. The Source Table task is displayed:
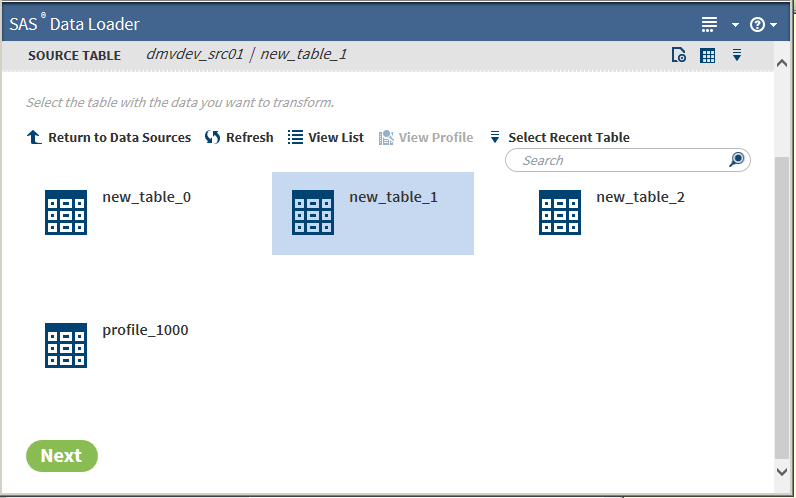 For more information about data sources and tables, see Viewing Data Sources and Tables.
 -
Select a table. To explore the contents of source tables, click
 to open the table viewer or, if available,
  to open the profile.
After selecting a table, click Next. The Cluster Rules task is displayed:
to open the profile.
After selecting a table, click Next. The Cluster Rules task is displayed: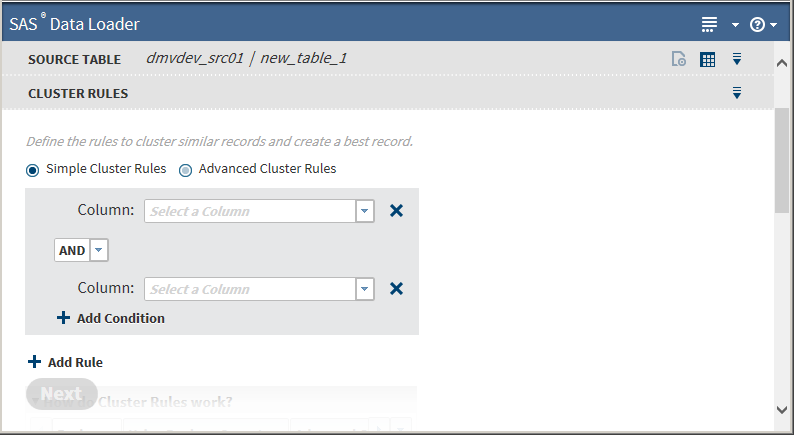
-
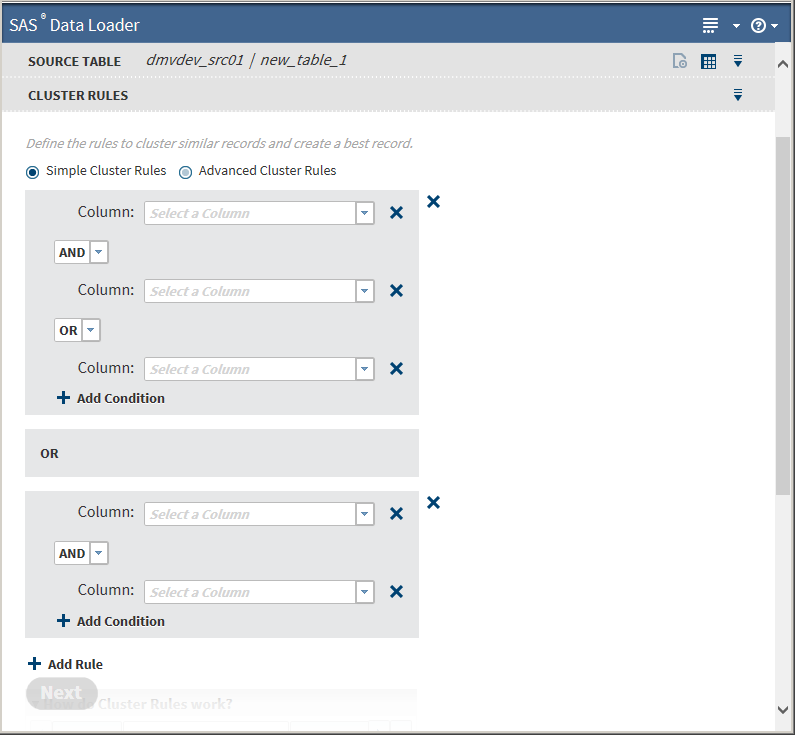
Cluster rules are sets of column names from the source table joined by AND|OR conditions. The initial Cluster Rules task defaults to Simple Cluster Rules, which does not allow the specification of parentheses.You must specify a minimum of one rule (one column). Clicking
 next to a column field removes that field.
-
Select a column from the Column drop-down list.
-
Choose either the AND or the OR Boolean operator from the drop-down list.
-
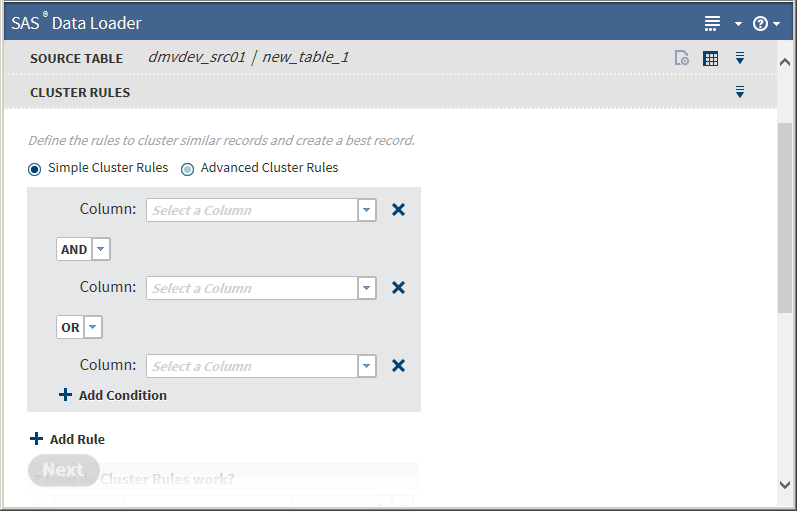
To add another condition, click
 next to Add Condition, which
adds another column field to the same rule:
next to Add Condition, which
adds another column field to the same rule:
-
To add another rule, click next to Add Rule :
-
To remove a rule, click next to the rule pane.
Clicking Advanced Cluster Rules adds fields for entering parentheses: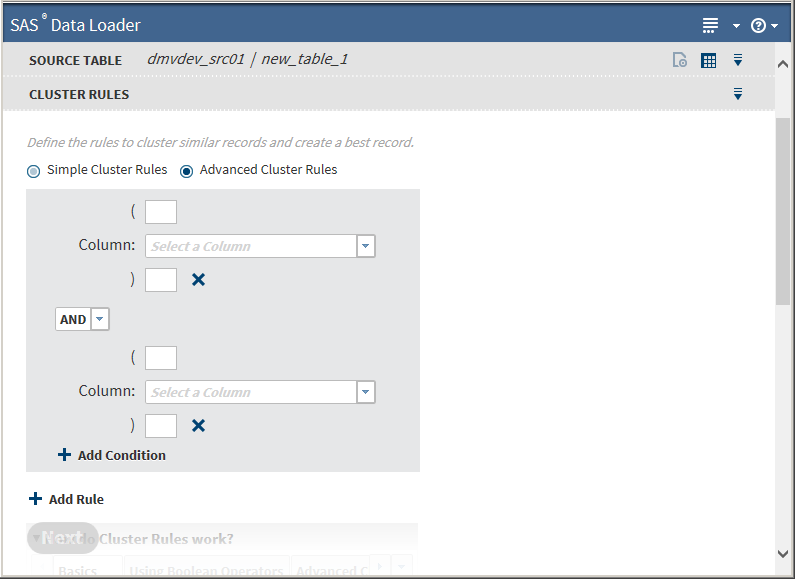 Clicking Simple Cluster Rules removes the fields for entering parentheses.The Advanced Cluster Rules enable you to use parentheses within the rule. Generally, you need to choose advanced rules only if the rules contain a mix of AND and OR clauses. For more information, see Clustering.If you need to build complex rules, you can include multiple parentheses in the field. For example, you might create the following rule:
name and ((phone1 or phone2) or (email1 or email2))
Parentheses must be balanced within a rule, that is, every open parenthesis must have a corresponding close parenthesis.All other operations on the Advanced Cluster Rules task are the same as on the Simple Cluster Rules task.After creating rules, click Next. The Cluster Output Table task appears: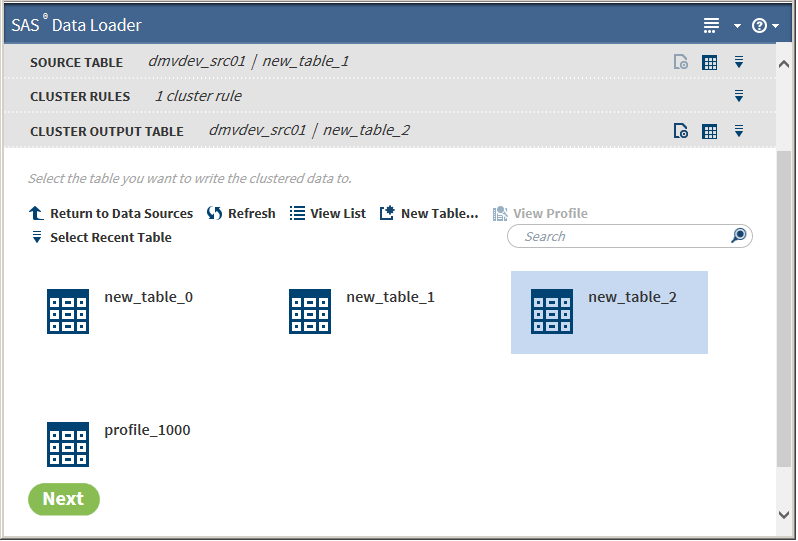
-
-
The Cluster Output Table task is the step at which you can choose to:
-
designate an output table to which to save cluster information. If you choose to save to a table, you have the option of proceeding directly to processing the data without specifying any survivor rules in the following steps. If you want to save to a table:
-
Select a table.Note: If you change your mind, you can click another table to select it or deselect the table. Most browsers use Ctrl-Click to deselect. If necessary, consult your browser help.
-
Click Next. The Survivor Base Record Rules task appears.
-
-
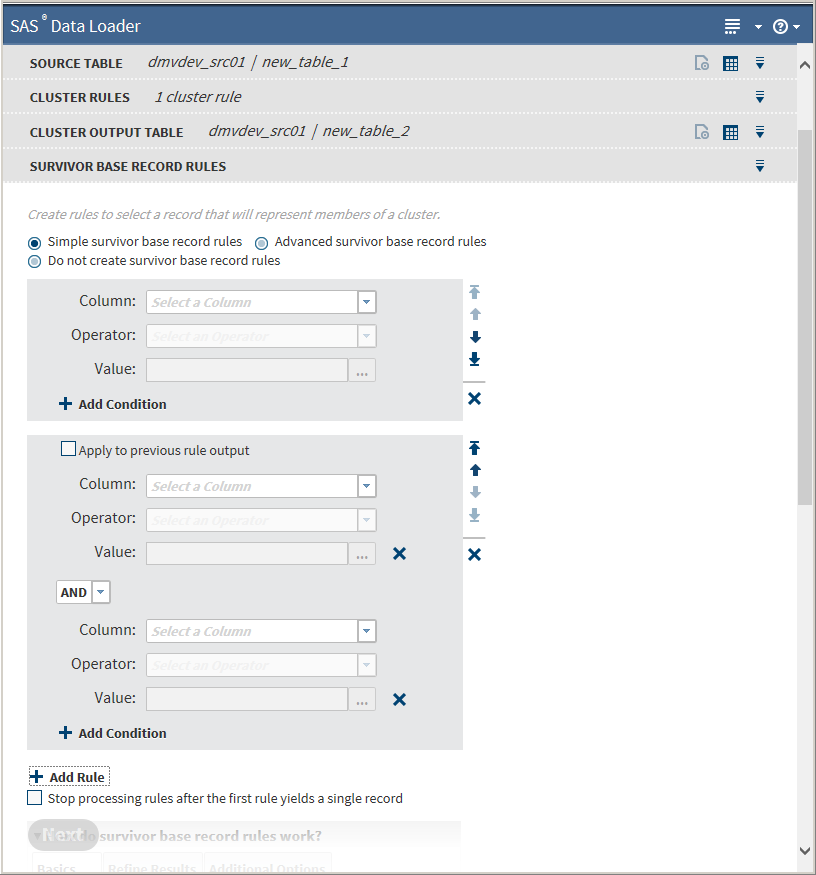
not designate an output table. If you do not designate an output table, you must create at least one survivor base record rule. If you do not want to save to a table, Click Next without selecting a table. The Survivor Base Record Rules task appears:
-
-
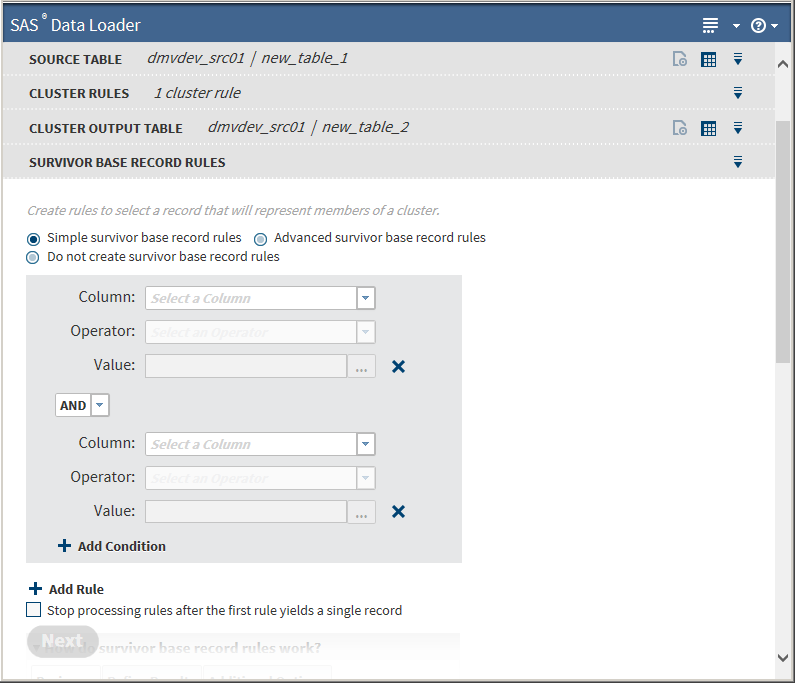
The initial Survivor Base Record Rules task defaults to Simple survivor base record rules, which does not allow the specification of parentheses. If you have previously selected a cluster output table, you can choose to skip Survivor Base Record Rules by selecting Do not create survivor base record rules, and then clicking Next.Basic operations are the same as for Cluster Rules. You must specify a minimum of one rule. Clicking next to a value field removes that rule.
-
Select a column from the Column drop-down list.Note:
-
If the selected column contains string data, the following additional fields appear:
 If appropriate, select one or both of the fields.
 -
If Treat asterisk as a wildcard option is selected, the asterisk must appear either at the beginning or the end of the string, and cannot appear more than once.
After selecting a column, the Operator field is enabled. -
-
Select an operator from the Operator drop-down list. The available values for this field depend on which column was selected.OperatorDescriptionEqual ToNote: For time and date fields, this value becomes On.Field value is
-
equal to another field
-
equal to a literal
-
contained in a list of literal values
Not Equal ToNote: For time and date fields, this value becomes Not On.Field value is not-
equal to another field
-
equal to a literal
-
contained in a list of literal values
Greater ThanNote: For time and date fields, this value becomes After.Field value is greater than-
another field
-
a literal
Less ThanNote: For time and date fields, this value becomes Before.Field value is less than-
another field
-
a literal
Greater Than or Equal ToNote: For time and date fields, this value becomes Before or On or After.Field value is greater than or equal to-
another field
-
a literal
Less Than or Equal ToNote: For time and date fields, this value becomes On or Before.Field value is less than or equal to-
another field
-
a literal
NullField value is null or blank.Not NullField value is not null or blank.MinField value represents the minimal value of all the records in the cluster.MaxField value represents the maximal value of all the records in the cluster.LongestField value is the longest value of all the records in the cluster.Note:-
This value might not be unique as multiple records can have the same length, which would not lead to a single surviving record. Generally, a rule with this operator is followed by another rule to produce a single survivor. For more information, see Step 5h.
-
Applies to string data only.
ShortestField value is the shortest value of all the records in the cluster.Note:-
This value might not be unique as multiple records can have the same length, which would not lead to a single surviving record. Generally, a rule with this operator is followed by another rule to produce a single survivor. For more information, see Step 5h.
-
Applies to string data only.
Highest OccurrenceField value occurs more frequently than other values in the records in the cluster.Note: This value might not be unique as multiple records can have the same frequency, which would not lead to a single surviving record. Generally, a rule with this operator is followed by another rule to produce a single survivor. For more information, see Step 5h.Lowest OccurrenceField value occurs less frequently than other values in the records in the cluster.Note: This value might not be unique as multiple records can have the same frequency, which would not lead to a single surviving record. Generally, a rule with this operator is followed by another rule to produce a single survivor. For more information, see Step 5h.After selecting an operator, the Value field is enabled.Note: Not all operators require values. If a unary operator, such as Max, is selected for the Operator value, the Value field is disabled. -
-
If enabled, click
 to open the following dialog box:
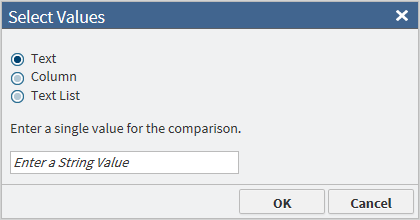 The dialog box presents several options for selecting the appropriate operator value. After selecting a value, click OK.
 -
If you have additional clauses in your rule, choose either the AND or the OR Boolean operator from the drop-down list between the clauses.
-
To add another condition, click next to Add Condition.
-
To add another rule, click next to Add Rule :
-
Survivor base record rules are evaluated sequentially. To change the order in which a rule is processed, click the arrow icons to the right of the rule pane to move the rule up, down, or all the way to the top or bottom of the sequence.
-
To process the output of a previous rule in the current rule, select Apply to previous rule output.Because multiple records can have the same value depending on the operator, the previous rule might not lead to a single surviving record. Use Apply to previous rule output to refine the results further. If Apply to previous rule output is not selected, all the records from the source table are processed in the current rule.Note: This setting is turned off if you move the rule past another rule where the setting is turned off. If you choose to move the rule up or down sequentially, verify that Apply to previous rule output is correctly selected after you move the rule.
-
If you want all rule processing to stop after a single record is produced and you want to use that single record as the survivor record, select Stop processing rules after the first rule yields a single record.
-
To remove a rule, click next to the rule pane.
To use survivor base record rules that allow the specification of parentheses, click Advanced survivor base record rules. Parentheses use is the same as described in Advanced Cluster Rules.Click Next. The Survivor Column Rules task is displayed: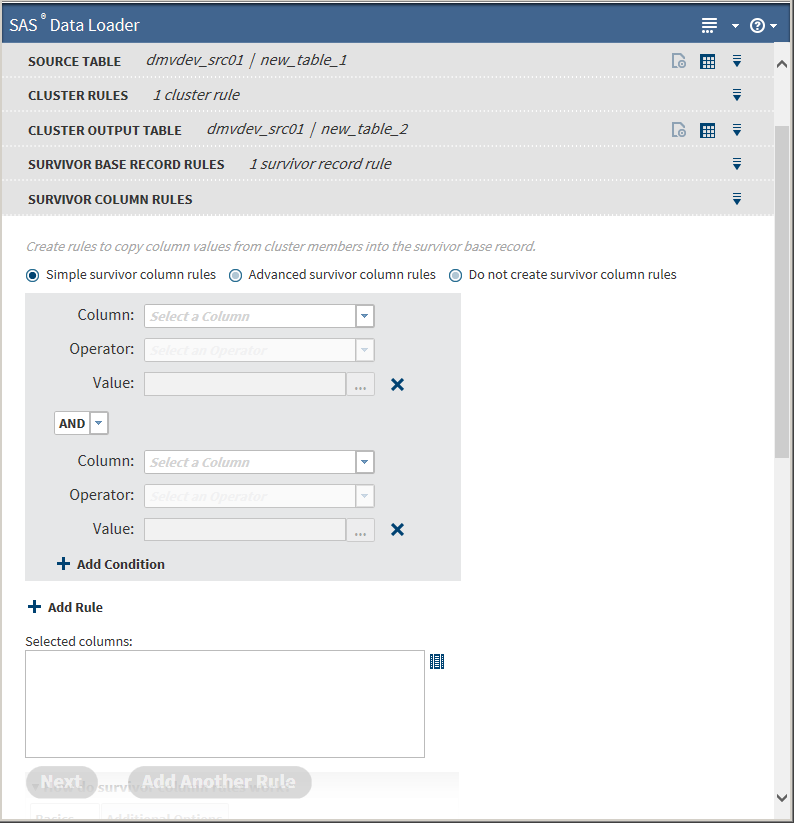
-
-
The initial Survivor Column Rules task defaults to Simple survivor column rules, which does not allow the specification of parentheses. You can choose to skip Survivor Column Rules by selecting Do not create survivor column rules, and then clicking Next.To use survivor column rules that allow the specification of parentheses, click Advanced survivor column rules. Parentheses use is the same as described in Advanced Cluster Rules.Basic operations are the same as for Survivor Base Record Rules. You must specify a minimum of one rule.The only operation additional to those in Survivor Base Record Rules is the specification of a set of columns that are to be copied to the survivor record when the rule matches. Click
 to open the following dialog box:
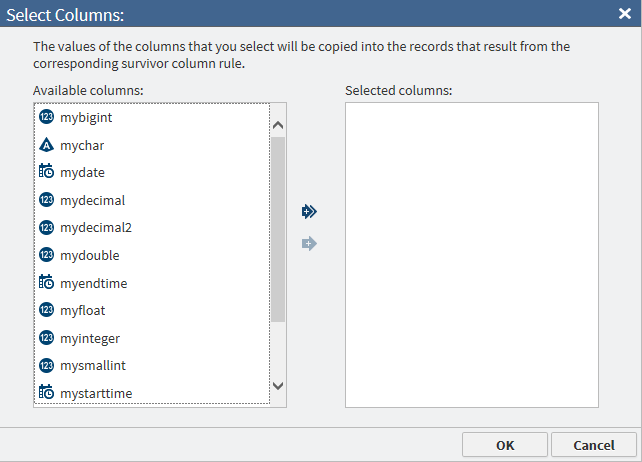 Use the left and right arrow icons to select or remove columns, and then click OK.Because each set of rules can identify its own set of columns, the Survivor Column Rules task can be repeated in the directive. If you want to add another rule identifying its own set of columns, click Add Another Rule, which opens another Survivor Column Rules task.Note:
-
Survivor Column Rules tasks also run sequentially. If multiple tasks select different values for the same field, the value from the last task to run is incorporated into the survivor record.
-
If you want to remove a Survivor Column Rules task after adding it, click
 on that task and select Remove Survivor
Column Rules Step.
on that task and select Remove Survivor
Column Rules Step.
After you have completed adding rules and selecting columns, click Next. The Survivor Output Table task is displayed: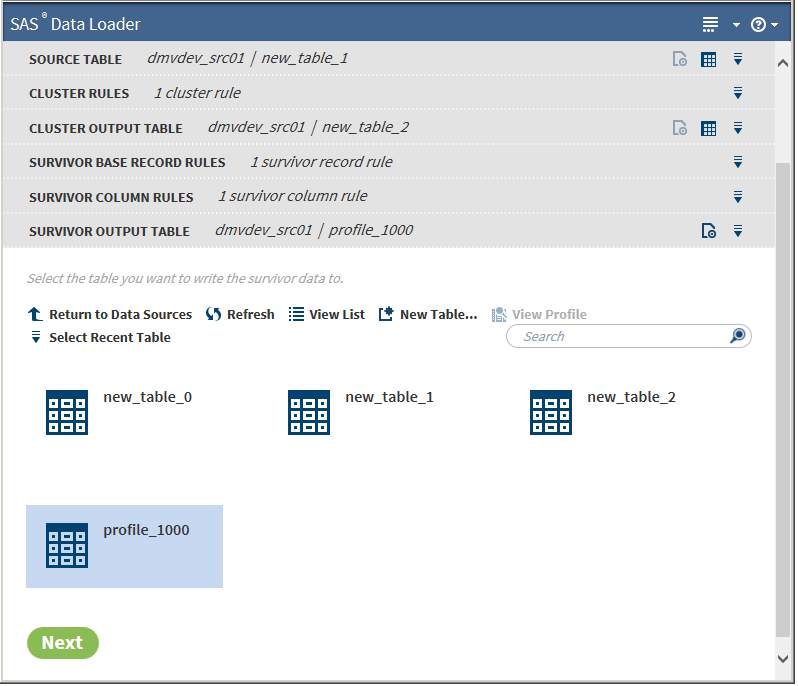
-
-
Select a survivor output table.Note: If you select the same table for both clustering and survivorship output, the results from both steps are stored in this table.Click Next. The Result task is displayed:
 You can return to previous tasks if you need to make changes.
 -
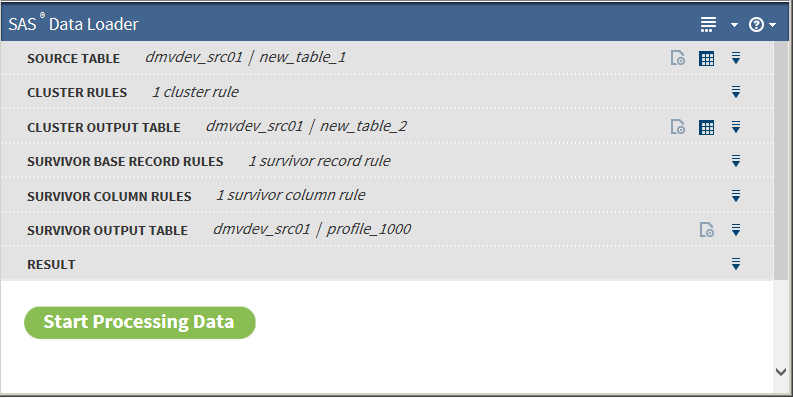
After you are satisfied that all the tasks are correct, click Start Processing Data, after which the results are returned:Note: Leading and trailing spaces are trimmed from fields when evaluating survivorship rules.
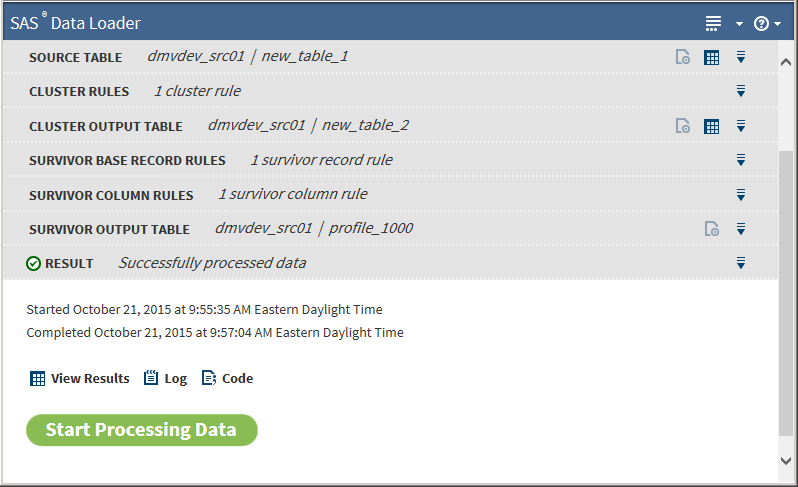 After the job has completed, you can view the results, the log file, and the code that ran in Hadoop.
 -
Click View Results on the Result task to see the table results. If you created two output tables, select one after clicking View Results, which opens the selected table in the Table Viewer. If you created only one table, clicking View Results opens it in the Table Viewer:
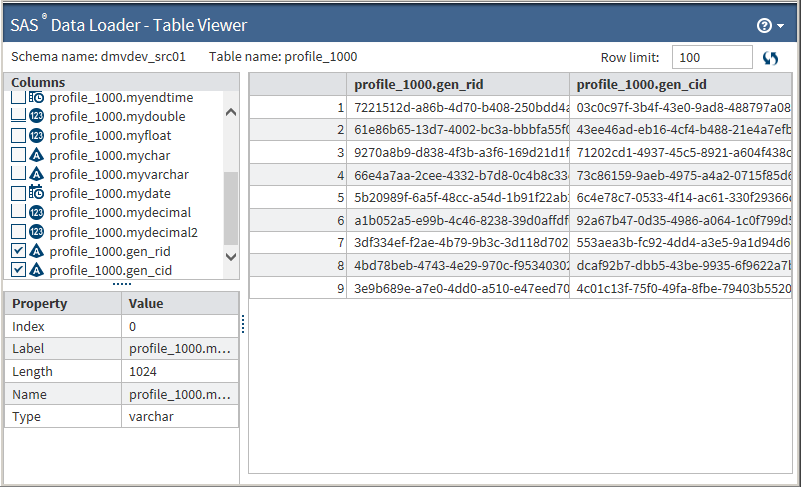 The records in the table are not presented in any particular order. You can select which columns to view in the Columns pane and click the table headers to sort on a column.Two reserved fields are appended to the table: gen_cid and gen_rid. Gen_cid represents the generated cluster ID and gen_rid represents the generated record ID.
-
If you reprocess the output tables through this directive, filter these two fields as desired because they are generated again during the reprocess.
-
Records in the cluster output table that belong to the same cluster have the same gen_cid. Sorting on the gen_cid column in the cluster output table enables you to view records that belong to the same cluster.
-
You can join the cluster output table and survivor output table on the gen_cid field to identify the contributors that correspond to the survivor record.
-
If you need to address a particular record, the gen_rid result is unique across all the records.
-
Copyright © SAS Institute Inc. All Rights Reserved.