Performing SAS Business Data Network Migration
Overview
After you have installed
SAS Business Data Network and reviewed instructions.html,
you are ready to migrate data from the Business Data Network module
of DataFlux Web Studio 2.4 to SAS Business Data Network 3.1. Note
that SAS Business Data Network 3.1 requires the second maintenance
release for SAS 9.4. The migration process includes the following
steps:
Begin Post-Installation Steps
Once SAS Business Data
Network has been installed, you can perform post-installation steps.
You must be an administrator who has the Business Data Network: Administration
role.
Perform the following
tasks to prepare for the migration:
-
Verify that both the DataFlux Authentication Server and the SAS Metadata Server are running.
-
Verify that you are a member of the SAS Administrators group on the SAS Metadata Server and an Administrator on the DataFflux Authentication Server. Ensure that you are logged on to each of these servers with the user ID and password that you specify when you run the ASEXPORT procedure.
-
Stop the SASServer 13 running instance.
-
Move the JDBC driver JAR file for the database that was used with the version of the Business Data Network module of DataFlux Web Studio that you are migrating to the proper location for the SAS Business Data Network installation. (Note that some databases might require more than one JAR file.) This step is necessary because the migration code needs JDBC 4 drivers for the appropriate source database to read the data from the old databases.Typically, the JAR file can be found in the installation of the source database. If you are not sure which JAR files to use, ask your database administrator. You can also search the database vendor’s website. The JAR files must be appropriate for JDBC 4 and Java 6. They must also work with the correct version of your database. You might also need to copy other files, such as license files and ancillary JAR files.After ensuring that SASServer 13 has been stopped, copy the JAR file (and any other files that are needed) to the lib directory under the SASServer13 _1 installation. The path will vary by installation but will be similar to
C:\SAS\Config\Lev1\Web\WebAppServer\SASServer13_1\lib. -
Restart SASServer13_1.
Run the ASEXPORT Procedure
You must run the ASEXPORT
Procedure to move the DataFlux Authentication Server IDs to the SAS
Metadata Server.
The following example
shows this application of the ASEXPORT Procedure:
proc ASEXPORT meta=
              (
                 user='username' password='password'
                 server='host–name'
                 port=port_number
                 repos='repository.name'
                 filter=(DOMAINS "*"
                         USERS   "*"
                         LOGINS  "Login
                         [Domain/AuthenticationDomain[@OutboundOnly='0']]")
              )
              as=
              (
                 server='host–name'
                 user='domain\username'
                 pass='password'
                 port=port_number
                 filter=(DOMAINS "*"
                         USERS   "*"
                         LOGINS  "*")
              )
              verbose
              out=asx
              ;

   /*
    * Auto-match domains by name.
    */
   match DOMAINS;

   /*
    * Add remaining unmatched domains (optional)
    */
   add DOMAINS;

   /*
    * Auto-match users by FQLN.
    */
   match USERS;

   /*
    * Add remaining unmatched users (optional)
    */
   add USERS;

   /*
    * List everything for review
    */
   list;

   /*
    * Create an input file (per noforward) for proc METADATA that we can review.
    * Don't export passwords or their hosting outbound logins.
    */
   export;

quit;
Note: This code sample has optional
add statements that might not apply. If users or domains do not match,
then they are created in SAS Metadata Server unconditionally. A
criteria=option is required on the add statements to prevent the addition of all unmatched domains and users. You can also use an initial filter of something other than
*to prevent unmatched domains and users from being available in the snapshot pulled back from DataFlux Authentication Server and SAS Metadata Server.
For more information
about the ASEXPORT Procedure, see ASEXPORT Procedure.
Prepare for Workflows
For information about
preparing to support workflows in SAS Business Data Network, see Configuring Workflow in SAS Business Data Network. You also must disable the Terminate Tasks capability in
SAS Task Manager for most SAS Business Data Users. Disabling this
capability can prevent the accidental termination of SAS Business
Network workflows due to the termination of a SAS Task Manager task.
-
Log on to SAS Management Console as an administrative user.
-
Select a SAS Business Data Network role that you need to modify.
-
Click the Capabilities tab for that role.
-
Navigate to the Task Lifecycle folder under the Task Manager 2.1 folder.The Capabilities tab is shown in the following display:Capabilities Tab
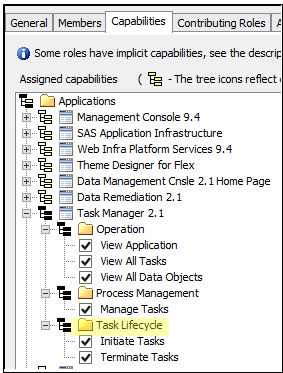
-
Deselect the Terminate Tasks item.
-
Select the next SAS Business Data Network role to modify and perform the modification. Repeat until all the roles have been modified.
Export Relationships and Lineage to the Relationships Service
Overview
You must perform the
following processes to ensure that the Relationships Service contains
the data necessary for SAS Business Data Network to function:
Perform the following
steps:
-
Scheduled Collection and Loading Using SAS Management Console
-
Export Data Management Platform Objects
-
Export Visual Process Orchestration Objects
Scheduled Collection and Loading Using SAS Management Console
SAS Management Console
is used to schedule the collection and loading of information about
resources and their relationships. You must enable the relationship
service collection and loading.
-
Log on to the SAS Management Console as an administrative user.
-
Expand the Configuration Manager under the Application Management node.
-
Expand SAS Application Infrastructure. Then, locate Web Infra Platform Services 9.4 and expand the node.
-
Right-click Select RelationshipContentService.Select Properties from the pop-up menu, as shown in the following display:RelationshipContentService Path
-
On the Settings tab, change the value for Scheduling for Load Task Enabled from false to true.
-
Restart the web application server.
Relationship metadata
is loaded into the relationship database when the web application
server is restarted. The default setting schedules the load operation
to occur every hour. Subsequent runs of the load operation search
for all content that has been changed or created since the last load
and update the relationship database for the changed objects. You
can schedule the load to run hourly, daily, weekly, or you can create
your own custom schedule.
Export Data Management Platform Objects
You must export Data
Management Platform objects to the SAS Web Infrastructure Platform
before clients such as SAS Business Data Network can then use the
data. For instructions, see the “Exporting Lineage Data to
SAS Web Infrastructure Platform” topic in DataFlux
Data Management: User’s Guide.
SAS Business Data Network
enables you to associate Data Management Platform objects such as
rules, tasks, jobs, files, and other content to SAS Business Data
Network objects. This feature can cause complications when you upgrade
SAS Business Data Network at the same time that you upgrade Data Management
Server.
When you do a side-by-side
install of Data Management Server and SAS Business Data Network, the
location of Data Management Platform objects changes from the Data
Management Server 2.5 location. Therefore, the objects associated
with SAS Business Data Network terms have different paths and need
to be reassociated.
When you perform an
upgrade in place of Data Management Server. the object locations stay
the same. Most of the objects, except jobs, remain associated with
SAS Business Data Network terms. You must follow all of the steps
specified in the migration process.
Note: Job objects have changed
pathnames and are not found in the new infrastructure. You must go
into SAS Business Data Network 3.1 and reattach these objects after
refreshing the lineage.
Export SAS Visual Process Orchestration Objects
SAS Visual Process Orchestration
2.2 exports relationship data to the SAS Web Infrastructure Platform
so that clients such as SAS Business Data Network can use the data.
After SAS Visual Process Orchestration 2.2 is shipped, you can find
instructions in the SAS Visual Process Orchestration: User’s
Guide.
Run SAS Business Data Network Migration
You must complete the
fields and select options in the Business Data Network
Migration window and run the migration to complete the
migration process. The window is located at the following location:
yourserver:port/SASBusinessDataNetwork/migration/configure.
Note that you can execute an optional test run to anticipate problems.
The fields are listed
in following table:
|
Field or Option
|
Description
|
|---|---|
|
Connection to BDN 2.x
database server
|
|
|
Type of database server
|
Specifies the databases
that were supported by BDN 2.x: SQL Server, Oracle, and DB2.
|
|
Database server host
|
Specifies the name of
the machine hosting the database server instance.
|
|
Database server port
|
(Optional) Specifies
the port to which the database server instance is listening.
|
|
Database name
|
Specifies the name of
the database within the server instance.
|
|
Override generated JDBC
URL
|
The migration configuration
generates a JDBC URL to connect to the BDN 2.x database. If a correct
URL for the database cannot be generated by the migration code, selecting
this check box enables the user to override the generated JDBC URL.
This is used in case the user cannot resolve a connection problem.
|
|
JDBC URL to database
|
When Override
generated JDBC URL is not selected, specifies the generated
JDBC URL to the database. When Override generated JDBC
URL is selected, the text field is editable so that you
can enter the JDBC URL to the database.
|
|
BDN 2.x database connection
properties
|
Specifies additional
properties needed for connecting to the BDN 2.x database. An example
for SQL Server is the instance name: instanceName=SQLSERVER2008.
|
|
Optional prefix for
BDN 2.x tables
|
Specifies an optional
prefix for the tables that can include catalog and schema prefixes.
An example is Repository1.BDN_.
|
|
User name for database
connection
|
Specifies the user name
for connecting to the database.
|
|
Password for database
connection
|
Specifies the password
for connecting to the database.
|
|
Options
|
|
|
Keep temporary tables
|
When selected, specifies
that the tables copied from the 2.x database to the 3.1 database are
not dropped after running the migration. The copied tables are put
into a schema named SAS_BDN_TEMP.
|
|
Skip copying the tables
from the source BDN database
|
When selected, skips
the step of copying the tables from the source BDN database. If the
temporary tables are kept from a previous migration run, they can
be reused in a subsequent migration run, thereby saving the time required
to copy the tables again. There is no need to connect to the source
BDN database when the copy is skipped. Therefore, the database values
are not needed.
|
|
Test run
|
When selected, executes
a migration run in which none of the SQL statements to create tables
or write to tables are actually executed. Security, lineage, and user
preferences are not updated. The source database tables are read.
|
|
Run
|
Runs the migration.
|
When you run the migration,
an attempt to read one of the source BDN 2.1 tables is made (if the Skip
copying source tables option is not selected). If that
attempt fails, an error message is displayed in the user interface.
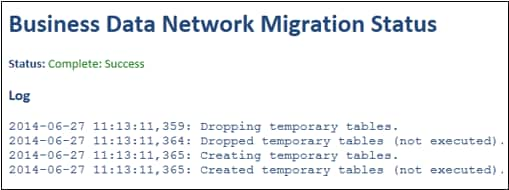
Review Migration Results
If the attempt is successful,
the migration begins and the status page is displayed. The status
page refreshes itself periodically.
When the migration
is complete, the status page scrolls back to the top. The following
display shows a portion status page from a test run:
Migration Run Status
Resolve Any Errors
You must manually resolve
any errors uncovered in the migration run. Note that the following
steps are executed during the migration.
-
If copying the source tables, the following steps are performed:
-
Temporary tables are dropped.
-
Temporary tables are created.
-
Source tables are copied into the temporary tables.
-
-
Users in the source BDN 2.x database are matched to users in SAS Metadata Server by DataFlux Authentication Server IDs. If a matching user is not found in SAS Metadata Server, the user’s name is used as the user ID. This information is logged.
-
Target tables are truncated. Anything existing in the BDN 2.x database is lost. The truncate is required because of the number of foreign keys between tables.
-
The temporary tables are copied to the target table. During the copy, many items are added, updated, or replaced. These processes include the following steps:
-
Fragmented big strings are collapsed to single strings.
-
Account IDs are replaced with user IDs.
-
The template term is updated to a term type.
-
Type IDs are added.
-
Audit records in DG_NOTS are not copied.
-
-
Security ACLs are created for all terms. This process is slow. Therefore, the ACLs are created in batches of one thousand in order to give an indication of progress.
-
Relationships are pushed into the relationships database. This process is slow.
-
Notification settings are copied to the preferences service.
Copyright © SAS Institute Inc. All Rights Reserved.
Last updated: June 7, 2017