| SAS/IntrNet 9.2: Application Dispatcher |
Testing the Installation
If you follow the instructions for Completing the Installation, you should have an Application Server running and the Application Broker should be installed in your Web server CGI directory. Before trying to write applications of your own, perform the following steps to verify that everything is working correctly.
-
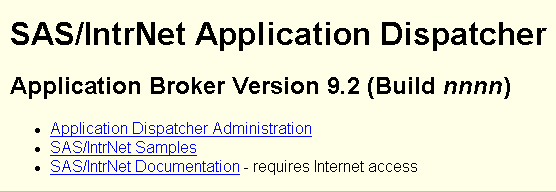
Test the Application Broker by pointing your Web browser to the Application Dispatcher URL. For example,
- Windows:
http://yourserver/scripts/broker.exe?- Other hosts:
http://yourserver/cgi-bin/broker?
Replace yourserver with the name of your Web server. The URL path might also need to be changed if you installed the Application Broker to a different directory.
If the Application Broker is working, you receive a page similar to the following:
Note: If there is a customized Application Broker welcome page, then it will display instead of this default welcome page when you enter the Application Broker URL in your Web browser. If this is the case, and if you want to view the services that are available from the default welcome page, then add _DEBUG=4 to the URL, as follows:
http://yourserver/cgi-bin/broker.exe?_debug=4
-
Click on the Application Dispatcher Administration link to see whether the Application Broker can read the Application Broker configuration file. The response looks like

-
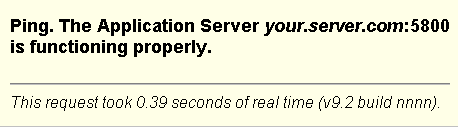
Ping the Application Server by clicking on the ping link in the Application Dispatcher Services page. If the server is working correctly, the response is
- To complete installation testing, return to
the main Application Dispatcher page (see step 1) and select
SAS/IntrNet Samples.
Try some of the Application Dispatcher samples to verify the complete installation.
Note: If the samples fail, stop the Application Server and examine the SAS log file. You can stop the Application Server by clicking on the stop link on the Application Dispatcher Services page (see step 2).
Completing the Application Dispatcher Installation
Congratulations! If you followed all the steps, you now have a working Application Dispatcher. While you should find this setup sufficient for many simple applications, the Application Dispatcher includes additional features that easily handle more complex applications. For details about creating your own Application Dispatcher applications, see The Input Component and The Program Component. For details about additional settings or customization options, see Customizing the Application Dispatcher.
Copyright © 2007 by SAS Institute Inc., Cary, NC, USA. All rights reserved.