Managing Studies and Submissions

Edit the Properties of a Study or Submission

To edit the properties of a study or submission, perform the following steps:
  1. In the Clinical Administration tree, expand Studies or Submissions.
  2. Select the study or submission, right-click, and then select Properties.
    The Study Properties or the Submission Properties dialog box appears.
    Study Properties dialog box
  3. Select the tab that contains the information that you want to edit, edit the information, and then click OK.
    For more information about any tab except the Study tab, see the SAS Data Integration Studio: User's Guide or the SAS Data Integration Studio online Help. The Study tab displays Read-Only information.

Edit Multiple Column Properties in a Study or Submission

To edit multiple column properties in a study or submission, perform the following steps:
  1. In the Folders tree, select a folder that contains one or more domains, right-click, and then select Clinical Column Properties.
    The Clinical Column Properties wizard appears.
    Clinical Column Properties wizard
  2. (Optional) Select one or more tables, and then click Next.
    Note: All tables are selected by default.
    The Property Value Updates page appears.
  3. Select a property.
  4. Select one or more columns.
  5. Click Update.
    The Property Value Update dialog box appears.
  6. Enter or select a value, and then click OK.
  7. Click Finish.

Edit Multiple Table Properties in a Study or Submission

To edit multiple table properties in a study or submission, perform the following steps:
  1. In the Folders tree, select a folder that contains one or more domains, right-click, and then select Clinical Table Properties.
    The Clinical Table Properties wizard appears.
    Clinical Table Properties wizard
  2. (Optional) Select one or more tables, and then click Next.
    Note: All tables are selected by default.
    The Property Value Updates page appears.
  3. Select a property.
  4. Select one or more tables.
  5. Click Update.
    The Property Value Update dialog box appears.
  6. Enter or select a value, and then click OK.
  7. Click Finish.

Delete a Study or Submission

To delete a study or submission, perform the following steps:
  1. In the Clinical Administration tree, expand Studies or Submissions.
  2. Right-click the study or submission, and then select Delete.
  3. Click OK to confirm the deletion.
    The study or submission is deleted, but the associated folder and its contents are not.
  4. To delete the contents of the associated folder, in the Folders tree, right-click the folder, and then select Delete.
    Note: If you do not have the correct permissions, you cannot delete a folder. You cannot delete the root folder of a study or submission in the Folders tree unless you have first deleted the item from the Clinical Administration tree.

Import a Codelist Table into a Study or Submission from a CRT-DDS XML File

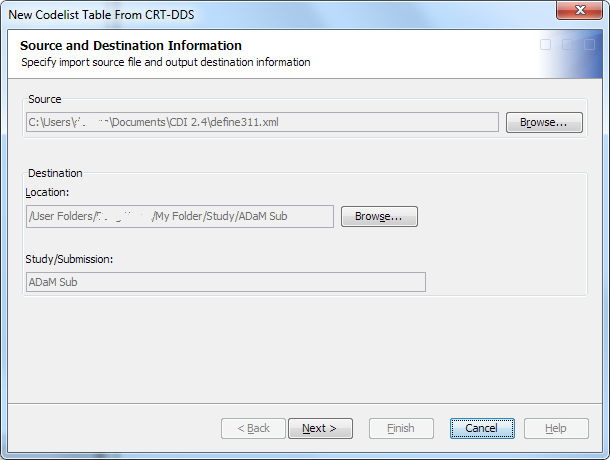
To import a codelist table into a study or submission from a CRT-DDS XML file, perform the following steps:
  1. In the Folders tree, right-click a study or submission, and then select Newthen selectCodelist Table From CRT-DDS.
    The New Codelist Table From CRT-DDS wizard appears.
    New Codelist Table From CRT-DDS wizard
  2. Click Browse adjacent to the Source field, and then select a CRT-DDS XML file.
  3. Click Next.
    The Codelist Selection page appears.
  4. Select one or more codelist tables, and click Next.
    The Table and Library Specification page appears.
  5. Enter a name and optional description.
  6. Select a library, and click Next.
    The Summary page appears.
  7. Review the information, and then click Finish.