Save a Report
Note: In addition to enabling
you to save automatically or manually refreshed reports, the Save
As dialog box is also used to save report templates (see Creating Report Templates) and static content that can be published to a publication
channel (see Publish a Report to Publication Channels).
To save a report, complete
these steps:
-
Select File
 Save.
If you are saving a new report, then the Save As dialog
box is displayed.
How the Save As Dialog Box Appears
-
For new reports, type a Name. Names cannot use these characters:
\
                                 / : * ? “ < > | @ # &
For information about valid names, see Naming Reports, Folders, and Templates.If you are saving an existing report, then the name of that report is listed here. You can either leave the name as it is and overwrite the existing report, or you can change the name to create a new report. -
From the Type drop-down list, select either Data is automatically refreshed or Data can be manually refreshed. Automatically refreshed reports always include the most current data in the underlying data source that the user is authorized to see. Manually refreshed reports can be archived and usually render more quickly than automatically refreshed reports.For more information about these options, see Data Refresh: Manual versus Automatic.
-
Navigate to a Location. The default location is determined by your preference for saving reports. For more information, see Specify Preferences for Opening and Saving Reports.To create a new folder, click
 . For more information
about the folder options, see Overview of Shared Locations.
 -
(Optional) Type a report Description. Report descriptions can be displayed in the Open dialog box and the File Management window. Users can search for reports with specified text in the description. You cannot use these characters:
< > & # -
(Optional) Type Keywords. Users can view the report keywords in the Open dialog box or the File Management window before they view the report. They can also search for reports with specified text in the keywords. Separate multiple keywords with a comma. Keywords cannot use these characters:
< > & # / \Note: Keywords do not apply to report templates.For information about valid keywords, see Naming Reports, Folders, and Templates. -
(Optional for manually refreshed reports) Select the Retain previous instance of output not to exceed check box, and then type the number of archived reports that you want to maintain.Note: The ability to archive reports is an advanced feature. You might be authorized to save reports but not to archive reports. For more information, see Archiving Reports.
-
(Optional) Select the Retain assigned group break values check box if you want to save the currently viewed group break values in the report. For example, say that you have used the table of contents in a report in View mode to navigate to a particular group break. If you navigated to
Canadaand then toShoe Sales, the report opens to that view.This option also enables you to persist the group break when you e-mail the report to other users. -
(Optional) Select the Automatically replace if file already exists check box if you want to replace an existing report without being prompted to confirm this action.
-
(Optional) Select the Make read-only check box to prevent other users (including system administrators) from deleting, modifying, renaming, or moving this report. (You can still perform these actions on your own report.)
-
Click OK.
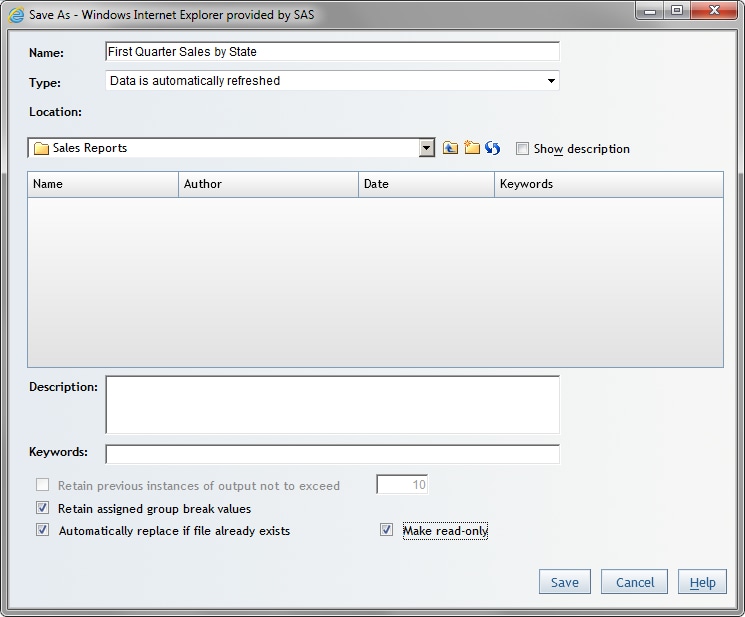
In the following display,
the new report is saved in a folder called Sales Reports.
The Retain assigned group break values check
box is selected because the new report contains group break values.
The Automatically replace if file already exists and Make
read-only check boxes are also selected.
How the Save As Dialog Box Appears with Three Options Selected

Copyright © SAS Institute Inc. All Rights Reserved.