Using Tables to Display Query Results
Overview of the Table Types
About List Tables
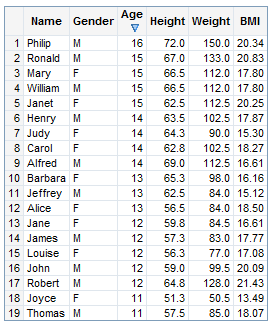
A list table is a two-dimensional representation of data in
which the data values are arranged in unlabeled rows and labeled columns.
List tables are applicable when you select data items from a relational
data source.
A List Table
For more information
about sorting columns, see Sorting Data in a List Table.
About Crosstabulation Tables
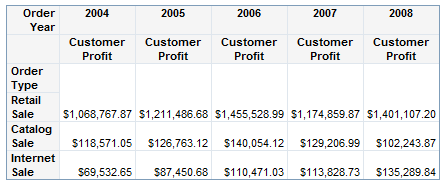
A crosstabulation table shows an aggregate metric for the intersections
of two or more categories. In a crosstabulation table, categories
are typically displayed on both the columns and the rows, and each
cell value represents the aggregated measure from the intersection
of the categories on the specific row and column. This uses less
space than a list table and is easier to read because data is grouped
both horizontally and vertically.
A Crosstabulation Table That Is Based on Data Items from a
Relational Data Source
For crosstabulation
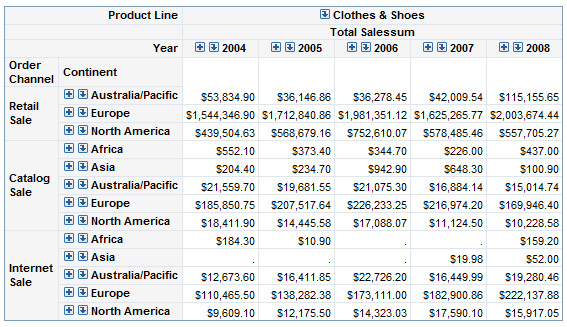
tables that are based on multidimensional data sources, the hierarchy
level names are displayed in the table, rather than the hierarchy
names. In the following display, Year is
a level in a hierarchy named Time and Continent is
a level in a hierarchy named Geography.
A Crosstabulation Table That Is Based on Data Items from a
Multidimensional Data Source, Drilling and Expanding Are Enabled
Insert a Table into a Report Layout
If the section query is based on a relational data source, you can display the query results in a list table or a crosstabulation table. If
the section query is based on a multidimensional data source, you can display the results in a crosstabulation table.
To insert a table into
a report layout, perform one of these tasks:
-
Click the table tool on the horizontal toolbar above the layout grid to insert the table in the next available cell.
-
Drag the table tool from the toolbar into a specific cell.
The following table
lists the available table tools:
|
|
list table
|
|
|
crosstabulation table
|
Data items in the section
query are given the following default assignments in a new table:
-
For list tables, all data items are assigned to the columns.
-
For crosstabulation tables, data items are assigned this way:
-
If multiple categories or hierarchies have been selected from the data source, then the first category or hierarchy and all of the measures are assigned to the columns.
-
If only one category or hierarchy is selected from the data source, then the category or hierarchy is assigned to the rows and the measures are assigned to the columns.
-
You can change the
initial assignments. For example, you might want to make these changes:
-
A list table is displaying values for an
Employee Salarymeasure. You want to hide the salary information. -
A crosstabulation table has gender information about the rows. You want to move the
Gendercategory from the rows to the columns.
For more information,
see Specifying How Data Items Are Used in Tables.
Tables also have default
properties that you can change. For example, by default, tables do
not have titles. To create a title, open the Properties dialog
box and enter text in the Title field on
the General tab. For more information,
see Specify Style Properties for Total and Subtotal Values.
Tip
In general, the defaults for
properties that are related to style (for example, font and color)
depend on the currently applied report style. For more information,
see Modifying Report Properties.For more information
about how to make other table modifications, see the following topics:
The following chapters
contain additional information:
Specifying How Data Items Are Used in Tables
Assign Data Items to List Tables
To assign data items
to a list table, complete these steps:
-
Select Data
 Assign Data or right-click the list table and select Assign
Data to open the Assign Data dialog
box.
-
Perform one of these tasks to assign data items:
-
Use drag and drop features to assign data items either to Columns or to Hidden.
-
Data items that are assigned to Hidden do not appear in the table but can be used in filtering. see For more information, Hiding Data Items. -
-
Click OK.
Assign Data Items in Crosstabulation Tables
To assign data items
in a crosstabulation table, complete these steps:
-
Right-click the crosstabulation table, and then select Assign Data to open the Assign Data dialog box.Note: For crosstabulation tables that use relational data, some data items are not supported and do not appear in the Assign Data dialog box.
-
Perform one of these tasks to assign each data item:
-
Use drag and drop features to assign data items to Rows, Columns, or Hidden.
-
Use the Move Items drop-down list to assign each data item to Rows, Columns, or Hidden.
Assign Data Dialog Box with the Move Items Drop-down List Selected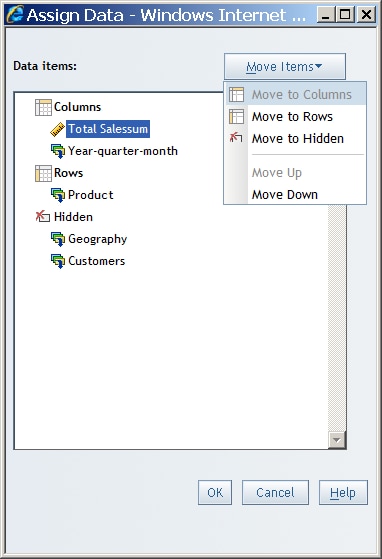 Data items that are assigned to Hidden do not appear in the table but can be used in filtering. For more information, see Hiding Data Items.
 -
-
Click OK.
Here
are some filtering consequences of moving data items to different
data roles in a crosstabulation table:
-
If you add or hide a category or hierarchy column, then any row filters and rankings that are based on a column measure are removed.
-
If you add or hide a category or hierarchy row, then any column filters and rankings that are based on a row measure are removed.
-
Filters are retained if you move all the data items that are currently on rows to the columns and all the data items that are currently on the columns to the rows. In this case, any existing filters remain and are evaluated based on the new positions.
Replace a Category Data Item in a Crosstabulation Table
You can replace a category data item in a crosstabulation table in View mode.
For crosstabulation
tables that use relational or multidimensional data, you can replace
a category data item with another category data item that has been
selected in the Assign Data dialog box, but
does not appear in the table. To replace a category data item in a
table that uses relational or multidimensional data, complete these
steps:
-
Right-click the category data item that you want to replace.
-
In the pop-up menu, select Change <category-data-item-1> to
 <category-data-item-2>, where <category-data-item-1> is the name of the data item that you selected in the table and <category-data-item-2> is
the name of the data item that you want to use as the replacement.
The new data item appears in the same place as the item that you replaced.
Note: The Change menu item affects only the crosstabulation table where you make the selection.
For crosstabulation tables that use multidimensional data, you can replace a category
data item with another category data item from the same dimension in your data set. For example, the cube providing the data might enable you to group geographic items into either regions
or states. The Assign
Data dialog box does not allow more than one of these
data items to be selected at a time. Neither the Change menu
item nor the Assign Data dialog box can replace
one category data item with another from the same dimension.
To replace a category
data item in a table that uses multidimensional data, complete these
steps:
-
Right-click the category data item that you want to replace.
-
In the pop-up menu, select Switch <category-data-item-1> to
 <category-data-item-2>, where <category-data-item-1> is the name of the data item that you selected in the table and <category-data-item-2> is
the name of the data item that you want to use as the replacement.
The new data item appears in the same place as the data item that
you replaced.
Note: The Switch menu item has a global effect on both the data items selected in the Select Data dialog box, as well as on all the tables and graphs in the report section.
Create or Modify a Table Title
By default, new tables
do not have titles. To create a new title or modify an existing title,
complete these steps:
-
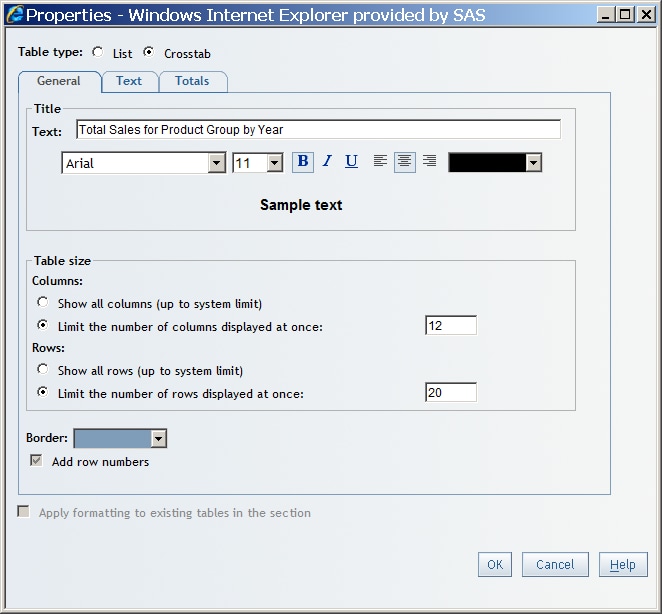
Right-click the table, and then select Properties to open the Properties dialog box.The General tab is displayed by default.
-
Under Title, complete these steps:
-
Type or modify the content in the Text field.You cannot use these characters:
< > & # -
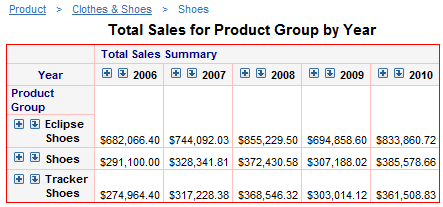
Specify the font, font size, font style, font color, and alignment.A Table Title Specified in the Properties Dialog Box
-
-
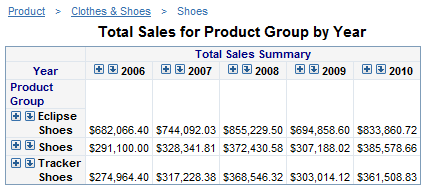
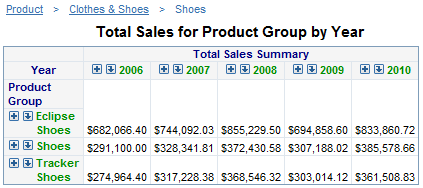
Click OK.In View mode, the formatted title appears above the table. In Edit mode, the title appears in the table object.A Crosstabulation Table with a Title
Specify the Number of Columns and Rows to Display in a Table
To specify how many
columns and rows the table should display, complete these steps:
-
Right-click the table, and then select Properties to open the Properties dialog box.The General tab is displayed by default.
-
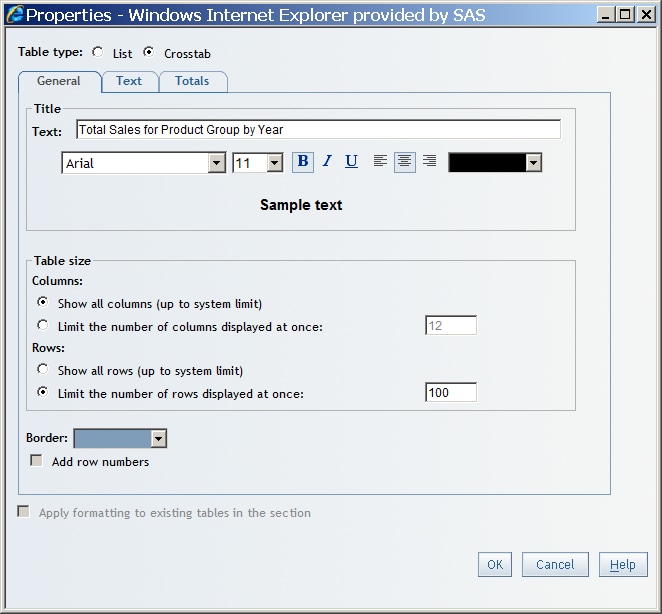
Under Table size, complete these steps:
-
Select one of these options for displaying columns in the table:Show all columns (up to system limit)Select this option to display all columns in the table, up to the system limit (which is managed by your system administrator). If necessary, the table will scroll to the right.Limit the number of columns displayed at onceSelect this option and type a value in the box to specify the number of columns that you want to view before scrolling is enabled. This option is the default.Note: If you type a value that is the same as (or greater than) the current system limit, then the value automatically changes to the system limit. The next time you open the Properties dialog box, the Show all columns (up to system limit) option is selected.TipIn View mode, you can use your mouse to manually resize table columns.
-
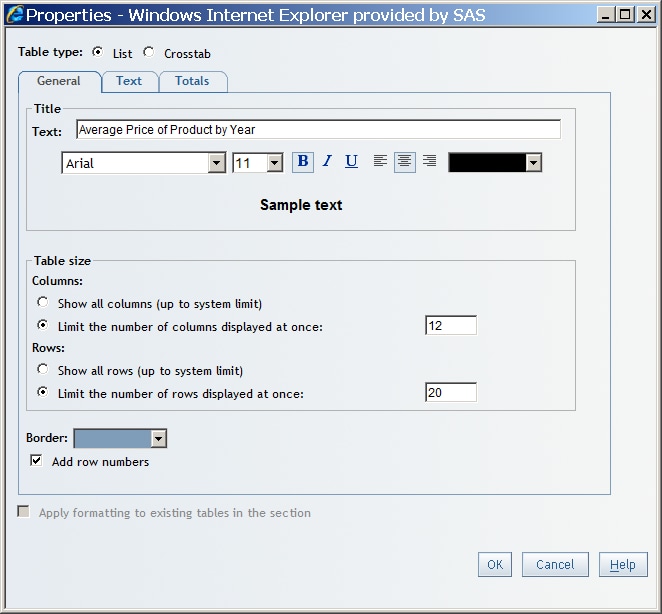
Select one of these options for displaying rows in the table:Show all rows (up to system limit)Select this option to display all rows in the table, up to the system limit (which is managed by your system administrator). If necessary, the table will scroll down.Limit the number of rows displayed at onceSelect this option and type a value in the box to specify the number of rows that you want to view before scrolling is enabled. This option is the default.Note: If you type a value that is the same as (or greater than) the current system limit, then the value automatically changes to the system limit. The next time you open the Properties dialog box, the Show all columns (up to system limit) option is selected.New Table Sizes Specified in the Properties Dialog Box
-
-
Click OK.
Specify the Border Color of a Table
To specify the color
that is used for the border of a table, complete these steps:
-
Right-click the table, and then select Properties to open the Properties dialog box.The General tab is displayed by default.
-
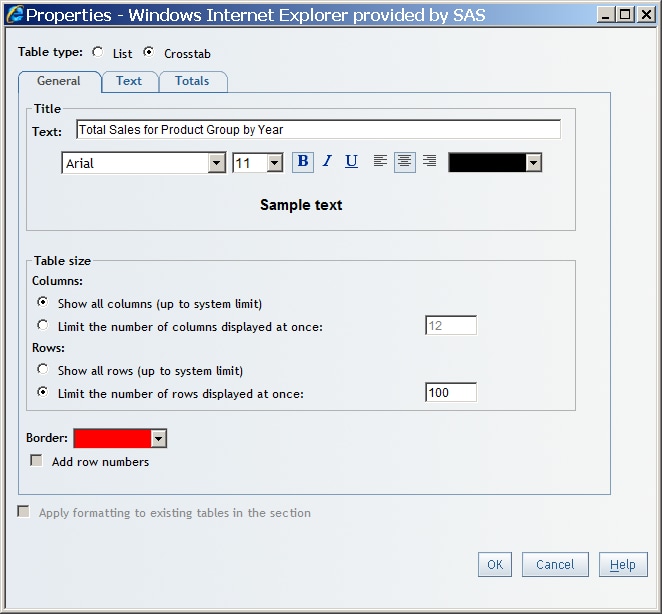
Select the Border drop-down list to open the color palette. Then select a color for the table border. You can customize a color using the Color value field. For more information, see Customizing Colors.New Border Color Specified in the Properties Dialog Box
-
Click OK.
In New Border Color Specified in the Properties Dialog Box, red was selected as the new border color. In View mode,
all of the borders for this table change to red.
A Crosstabulation Table with a Title and Red Borders
Add Row Numbers to a List Table
To add row numbers
to a list table, complete these steps:
-
Right-click the list table, and then select Properties to open the Properties dialog box.The General tab is displayed by default.
-
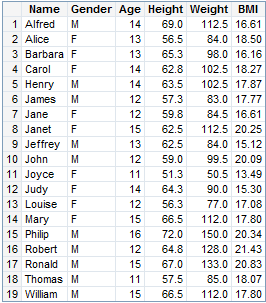
Select the Add row numbers check box.Add Row Numbers Specified in the Properties Dialog Box
-
Click OK. The row numbers appear in the list table.A List Table with Row Numbers
Specify Style Properties for Headings, Subheadings, and Cells
All tables have headings
and cells. Crosstabulation tables also have subheadings.
-
Headings are the category, hierarchy level, and measure labels. Two examples are State and Retail Price.
-
Subheadings are the values of the categories, hierarchy levels, and measures. For example, Alabama and North Carolina might be subheadings for a State heading.
-
Table cells contain data values. For example, $228.88 and $46.43 might be values for a Retail Price measure.
To specify style properties
such as font, alignment, and color for headings, subheadings, and
cells, complete these steps:
-
Right-click the table, and then select Properties to open the Properties dialog box.The General tab is displayed by default.
-
Select the Text tab.
-
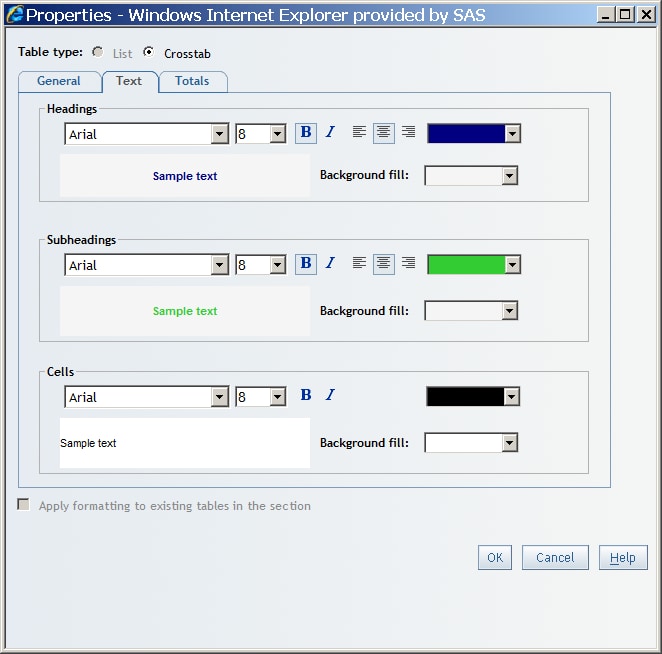
Under Headings, Subheadings (crosstabulation tables only), and Cells, specify a font, font size, font style, and font color. For headings and subheadings, specify an alignment.Select the Background fill drop-down list to open the color palette. Then select a background fill color. You can customize a color using the Color value field. For more information, see Customizing Colors.New Headings and Subheading Colors Specified in the Properties Dialog Box for a Crosstabulation Table
-
Click OK.
In the following display,
navy blue was selected as the new heading color and green was selected
as the new subheading color. In View mode, the headings and subheadings
change to the new colors.
A Crosstabulation Table with a Title and Colored Headings
Specify Style Properties for Total and Subtotal Values
To specify properties
such as the font and the color for total and subtotal values, complete
these steps:
-
Right-click the table, and then select Properties to open the Properties dialog box.The General tab is displayed by default.
-
Select the Totals tab.
-
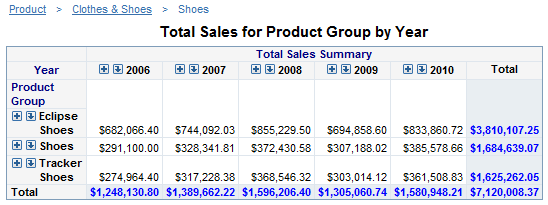
Under Totals and Subtotals (crosstabulation tables only), specify a font, font size, font style, and font color.Select the Background fill drop-down list to open the color palette. Then select a background fill color. You can customize a color using the Color value field. For more information, see Customizing Colors.New Color for Totals Specified in the Properties Dialog Box
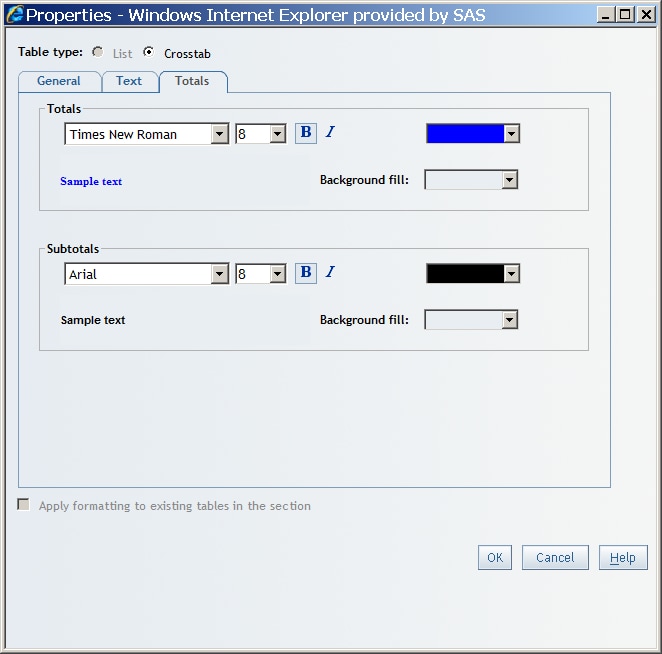 Note: If you selected the Parent totals option in the Total dialog box for a multidimensional crosstabulation table, then you will not see font and color changes. This happens because the parent totals and subtotals come from the cube.
 -
Click OK.
Note: You can choose to show or
hide totals in a table. For more information,
see Show or Hide Totals and Subtotals for Crosstabulation Tables.
A Crosstabulation Table with Totals in Color
Copy the Formatting of a Selected Table
To copy the formatting
of a selected table to other tables in the report section, complete
these steps:
-
Right-click the table, and then select Properties to open the Properties dialog box.The General tab is displayed by default.If the report section has more than one table, the Apply formatting to existing tables in the section check box is available to select no matter which tab is displayed.
-
Select the Apply formatting to existing tables in the section check box.The title, heading, subheading, cell, total, subtotal, and border styles are copied to all of the tables in the section. Only the relevant information is copied. For example, the subheading style does not apply to list tables.
-
Click OK.
Change the Currently Selected Table Type
To change the currently
selected table type, complete these steps:
-
Right-click the table, and then select Properties to open the Properties dialog box.The General tab is displayed by default.The Table type radio buttons are available to use no matter which tab is displayed.
-
For the Table type radio buttons, select either List or Crosstab, depending on the current table type. However, you cannot change the table type if the current table meets either of these conditions:
-
a crosstabulation table that uses multidimensional data cannot be changed to a list table.
-
a list table that does not include at least one category and one measure cannot be changed to a crosstabulation table.
-
-
Click OK.
The data item assignments and properties are changed to match the new table type.
Move Columns and Rows in Tables in View Mode
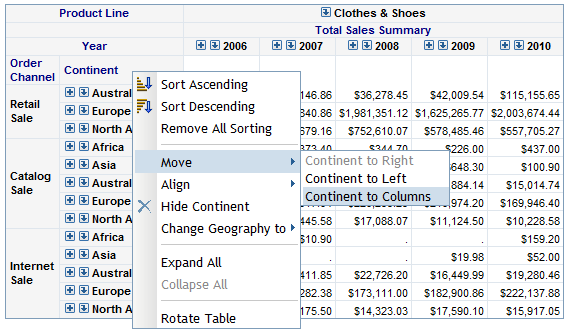
The following tasks
can be performed in View mode:
|
Task
|
Action
|
|---|---|
|
Move measures from rows
to columns or from columns to rows
|
|
|
Move measures up or
down
|
|
|
Rotate a table so that
the columns are moved to the rows and the rows are moved to the columns
|
Right-click a row or
column heading, and then select Rotate Table.
|
|
Move a category or hierarchy level from a column to a row or from a row to a column
|
|
|
Move a column to the left or right in a list table
|
|
|
Move a column to the left or right in a crosstabulation table
|
|
|
Move a row up or down
(in crosstabulation tables that have more than one row)
|
|
Example Menu Selection for Moving Rows to Columns
Resize Columns in a Table
You can use drag and
drop features to make the columns in a table wider or narrower.
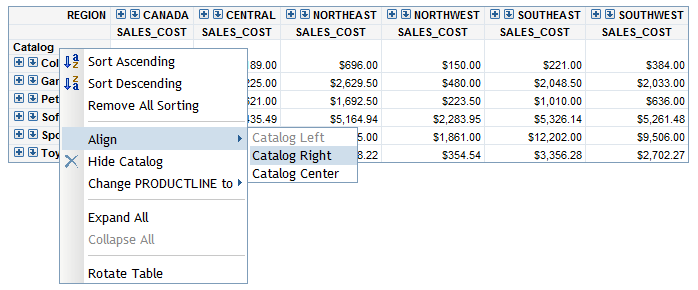
Align Values in Columns or Rows in Tables in View Mode
To align values in columns or rows in tables in View mode, right-click the measure
or the category table heading, and then select Align <heading-name> Left, Align
 <heading-name> Right, or Align
 <heading-name> Center,
where <heading-name> is the name of
the column or row that you selected. For example, in the following
display, the Catalog column was selected,
so you might select Align
 Catalog Right. If the values
in the column or row are already aligned, then the corresponding menu
item is not available.
Example Menu Selection for Aligning Column Values
Copyright © SAS Institute Inc. All Rights Reserved.