Configuring SAS Web Report Studio
Use the Configuration Manager to Configure SAS Web Report Studio Properties
The
Configuration Manager plug-in available in SAS Management Console
enables you to perform various administrative tasks such as configuring
properties and values for SAS Web Report Studio. In previous versions
of SAS software, properties and values were defined in XML files.
Configuration properties and their values for SAS Web Report Studio
are specified on the
Advanced tab within
the Web Report Studio 4.3 Properties. For
information about how to use the Configuration Manager plug-in to
configure properties and values for SAS Web applications, Using Configuration Manager in SAS Intelligence Platform: Middle-Tier Administration Guide.For more information
about SAS Management Console, “State of Your System”
in the SAS Intelligence Platform: System Administration Guide.
Configure the Analysis of SAS Web Report Studio Properties
Set Maximum Values for Report Filters
To configure the maximum number
of filter values that can be displayed when report creators define
a filter, follow these steps:
Report creators can
configure their reports to prompt for filter values that are generated
dynamically when the report is rendered. To enable this feature, report
creators choose the
Prompting users to select values
                     from a list
and the allow users to
query for values options in the Create
New Filter. When the report is rendered, report viewers
click the Get Values button to load the values
that are available for the filter.
You can configure the
maximum number of prompt values that can be loaded when report viewers
click the Get Values button. The default
value is 1,000.
To configure the maximum
number of prompt values, and specify the number that you want, follow
these steps:
Enable Password Management to Provide Access for PUBLIC Users of SAS Web Report Studio
Unregistered (PUBLIC-only)
users can pass through authentication but do not have a user definition
in SAS metadata, and they are denied access to the SAS 9.3 metadata
server. Previously, in SAS Web Report Studio 3.1, PUBLIC users were
allowed access to the metadata server by default.
In order to enable PUBLIC
users to access SAS Web Report Studio 4.3 and later, modify the value
for the Allow Public Users field in the Web
Report Studio 4.3 Properties within Configuration Manager.
When PUBLIC users are given access to SAS Web Report Studio 4.3 and
later, their history and preferences are retained and saved automatically
for future use by SAS Web Report Studio.
Provide DBMS Credentials Interactively in SAS Web Report Studio
Typically, SAS Web Report Studio relies on stored credentials
in the metadata in order to provide access to third-party DBMS data.
The advantage of this approach is that the access is seamless. Users
do not need to know a DBMS account ID and password. The disadvantage
of this approach is that it requires that you store individual or
group DBMS credentials in the metadata. Any change to the users' passwords
in the third-party database (for example, Teradata) must be copied
to the stored credentials in the metadata.
As an alternative to
storing DBMS credentials for use by SAS Web Report Studio, you can
require that users provide DBMS credentials interactively. Each user
must supply additional credentials (for example, an Oracle account
ID and password) one time in each SAS Web Report Studio session in
which the user accesses third-party DBMS data (for example, Oracle
tables).
When users enter their
user IDs and passwords in SAS Web Report Studio, those credentials
are valid for the current session only, because they are stored in
memory and not in metadata.
Note: SAS Web Report Studio users
who schedule and distribute reports must have stored credentials in
the metadata.
-
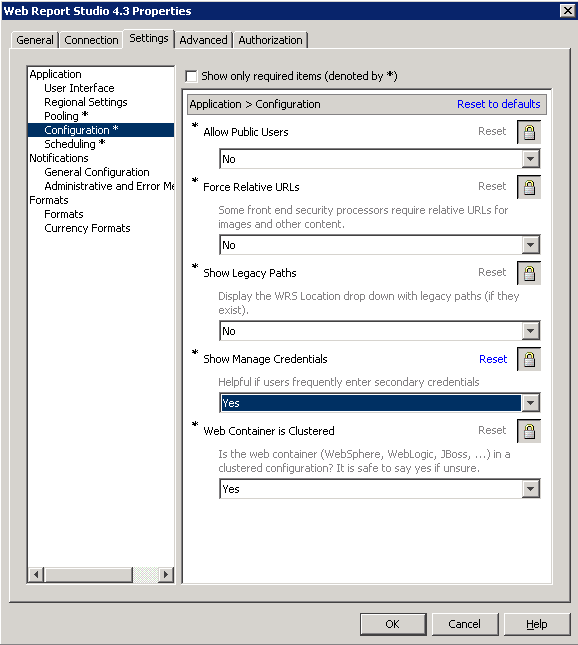
If the administrator configures the Show Manage Credentials option on the Settings tab within Web Report Studio Properties 4.3, SAS Web Report Studio presents users with the Manage Credentials. As a result, users can supply the DBMS credentials preemptively when accessing their third-party databases such as Teradata, Oracle, or DB2. For information about entering credentials in SAS Web Report Studio, the SAS Web Report Studio User's Guide.
The following figure
shows that the administrator has set the value for the Show
Manage Credentials field to Yes.
To allow users to enter
their credentials by selecting File Manage Credentials in SAS Web
Report Studio 4.3 and later, follow these steps in the SAS Management
Console:
Manage Credentials in SAS Web
Report Studio 4.3 and later, follow these steps in the SAS Management
Console:
Hide Banner Properties for SAS Web Report Studio
Pages in SAS Web Report
Studio can be customized, and the product title, report name, and
company logo can be hidden from being displayed in the banner.
To prevent the product
title from being displayed in the banner, specify the following property
name and property value on the
Advanced
tab within the Web Report Studio 4.3 Properties :
Edit LocalProperties.xml File to Set Properties for SAS Web Report Studio
In
previous versions of SAS Web Report Studio, the
LocalProperties.xml file
offered the only practical method to override properties and their
values. Although this file is available and supported in SAS Web Report
Studio 4.3 and later, it is recommended that you use the Configuration
Manager in SAS Management Console to configure and set properties
for SAS Web Report Studio. The Configuration Manager offers a consistent
interface to set properties for all SAS applications.
If a SAS Web Report
studio property and its value are specified in both locations (
LocalProperties.xml file
and in Configuration Manager), the value specified in the LocalProperties.xml file
is used.
Display and Print Bidirectional Content from SAS Web Report Studio
Customize the Product and Browser Window Titles for SAS Web Report Studio
You can replace the default titles
for the banner and the browser window in SAS Web Report Studio by
customizing the properties in the
LocalProperties.xml file.
You cannot use the Configuration Manager in SAS Management Console
to complete this task.
-
Edit the
LocalProperties.xmlfile by locating the following properties, uncommenting them, and specifying the custom values for the custom banner name and window browser title:<webreportstudio.product.logo.text> your custom product title </webreportstudio.product.logo.text> <webreportstudio.page.title.text> your custom title for the browser window </webreportstudio.page.title.text>
Configure the Display of Left Pane in SAS Web Report Studio
When users logged on
to SAS Web Report Studio 4.2, the application's window displayed a
left pane in the view and edit page mode. Users could close or open
the left pane. The left pane stayed open until the user's next logon
session or until it was changed.
Beginning with SAS Web
Report Studio 4.3 and later, you can customize the initial display
of the left pane by specifying a value for the
wrs.ReportViewPrefs.LeftPanelOpenState property.
The value specified for the wrs.ReportViewPrefs.LeftPanelOpenState property
determines the type of initial display of the application's window.
The following table
explains values that can be configured for the
wrs.ReportViewPrefs.LeftPanelOpenState property
in SAS Web Report Studio 4.3:
Property Values for the Display of the Left Pane in SAS Web
Report Studio 4.3 and Later
To specify whether the
left pane in the SAS Web Report Studio 4.3 window should remain open,
closed, or implement the user's preferences during the previous logon
session, follow these steps:
Change the Temporary Workspace Location
SAS Web Report
Studio 4.3 and later includes support for the
wrs.io.tmpdir property.
This property enables you to change the location of the temporary
workspace for SAS Web Report Studio and SAS Web Report Viewer.
You can obtain the default
directory path for the temporary workspace from the
SASWebReportStudio4.3.log in
the SAS-configuration-directory \Lev1\Web\Logs
directory.
To change the location
of the temporary workspace for SAS Web Report Studio 4.3 and later,
follow these steps:
Modify Port Numbers for In-Process Scheduling in a Clustered Environment
SAS Web Report Studio 4.3 has 30 UDP
ports available for use by the application. These ports are in the
range of 7570 to 7599. For in-process scheduling in a clustered environment,
the default ports for Lev1 are:
If you have a multiple-level
environment, the default port numbers are assigned for each set of
three ports. For example, an environment
Lev2 uses
the following port numbers:
If there are port conflicts
or you have a non-clustered environment, you might want to assign
different port numbers. In SAS Management Console, go to thePlug-ins tab
and navigate to Application ManagementSAS Application InfrastructureConfiguration
ManagerWeb Report Studio 4.3. Then, right-click to display the Web
Report Studio 4.3 Properties. For more information about
changing configuration options in a clustered environment, “Setting
Up Scheduling Using SAS In-Process Scheduling” in Scheduling
in SAS.
Manage the Legend for OLAP-based Pie Charts
When a SAS Web Report Studio report displays
a pie chart that uses OLAP data, and the pie chart combines all minimal
values for items into an
Other slice,
the values included in the Other slice
are visible in the legend. Users can view the items in the legend,
but the values for those items are all included in the Other slice
within the pie chart.
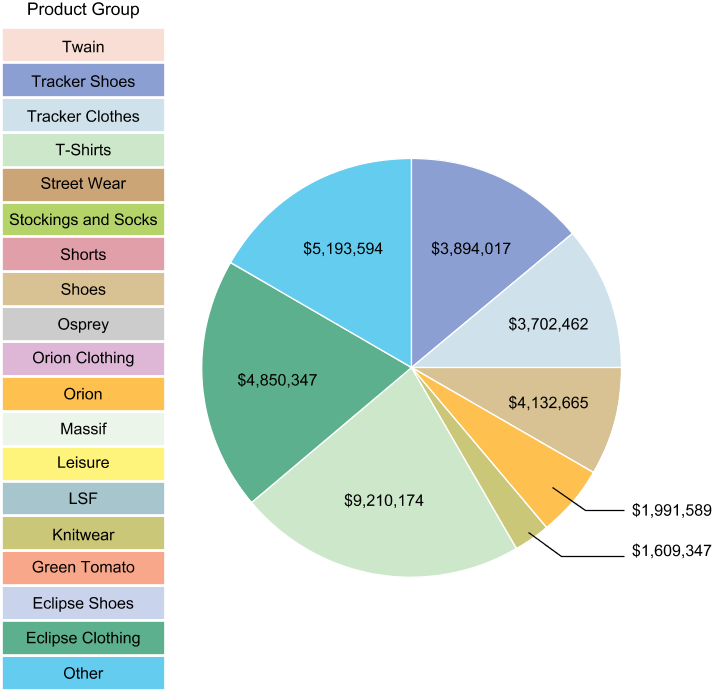
In the following figure,
Street Wear is included in the
Other slice,
and it is not represented separately in the pie chart. However, Street
Wear is visible in the legend on the left, and the user has the option
to drill down on Street Wear.
Example of a Legend for a Pie Chart with OLAP Data That Includes
Values Not Represented in the Chart
By configuring the
.vmwide.sas.graph.piehideothervalues
property, you can prevent values that are included in the Other slice
from appearing in the legend for the pie chart. However, if you hide
the values in the legend, users cannot drill into the values by using
the legend.
To prevent values that
are included in the
Other slice from
appearing in the legend for the pie chart, follow these steps:
Configure the Export of Data from Tables and Graphs
SAS Web Report Studio
users who are assigned with the Output:Export capability
can perform the following tasks:
If you want users with the Output:Export capability
to export data only from tables and graphs, you should configure the
wrs.capabilities.disableExportReport property.
When this property is configured, the Export option
under the File menu and the Export toolbar
button are removed SAS Web Report Studio. As a result, users cannot
export entire reports. This property is available in the second maintenance
release for SAS Web Report Studio 4.31.
To limit SAS Web Report
Studio users to export data only from tables and graphs, follow these
steps:
Configure the Display of Report and Filter Name in Exported Data
When data is exported from a table
or graph, the exported content does not include the name of the report
or information about the filter that was applied. Beginning with the
second maintenance release for SAS Web Report Studio 4.31, you can
configure the
wrs.addReportNametoExport property.
When this property is configured, the exported content includes the
report name. If users select the Display filter information option
in SAS Web Report Studio, information about the applied filter is
included.
For instructions about
how to include the filter information in the exported data, see SAS Web Report Studio: User's Guide.
To enable the display
of report name and information about the filter that was applied in
exported data, follow these steps:
Configure Default Prompt Values for Reports
SAS Web Report Studio enables
you to create reports that contain prompts. Beginning with the second
maintenance release for SAS Web Report Studio 4.31, you can configure
the
wrs.save.promptValues.option property
with any one of three values that determines how prompt values are
saved in reports.
Here is a description
of the values available for this property:
KeepCustomerPromptValuesThis value ensures
that the prompt values that were selected last are retained in the
report. This is the default setting for SAS Web Report Studio, and
the
wrs.save.promptValues.option is
configured with this value as the default.
When a user selects
values for prompts in a report, and then saves that report, the prompts
in that report retain the values selected by that user. When the next
user opens that same report, the values selected by the first user
are displayed. However, one or more values selected by the first user
might be invalid. For example, User A might select
shoes as
the value for a Product prompt, and save that report. Later, shoes is
removed from the data source. When the same report is reopened by
any user, shoes is displayed as a prompt
value, even though it does not return any results.
Here is an example where
either the
ResetPromptValues or the ClearPromptValues option
can be configured. A prompt value that was selected and saved in a
report by User A must not be viewed by other users. An identity-driven
filter is applied to the Country data item. The purpose of this filter
is to enable User A to select only Germany and Canada, and to allow
User B to select only USA and Mexico as the values for the Country
data item.
This report also contains
a prompted filter for Country. If User B views results for Mexico
and saves the report, then User A will view Mexico as a prompt value
when the report is accessed. However, if User A selects Mexico, no
results are displayed because the identity-driven filter is enforced.
In this scenario, you
can configure either the
ResetPromptValues or
the ClearPromptValues option. Because
the identity-driven filter is enforced, the prompt remains blank with
no values.
Note: The
wrs.save.promptValues.option property
is enforced only when a user saves a report. If the user opens the
report and exits without saving the report, the property is not enforced.
Enable Standard Text in E-Mail Messages with Generated URLs for Reports
SAS Web Report Studio
enables users to send e-mails that contain generated URLs for saved
reports. Within the application, when a user selects to e-mail a report,
the URL for the report is automatically added to the e-mail message.
If the report contains sections or prompts, there are additional conditions
that apply to e-mail messages. For more information, see SAS Web Report Studio: User's Guide.
Beginning with the second
maintenance release for SAS Web Report Studio 4.31, you can enable
the display of standard text in an e-mail sent by a user from within
the application. This is useful if you want some standard text message
to precede the URL for the report in the e-mail. Or you can customize
the e-mail message by specifying the location of the URL within the
standard text in the e-mail.
Within SAS Web Report
Studio, there are two different methods for sending e-mails messages.
This standard text is displayed in all e-mails that are sent by users
from within the application.
-
Create a text file with the standard text that should be displayed in all e-mail messages that are sent from within SAS Web Report Studio. Here is an example of a filename for this file:
email_standard_text.txt. You can specify international characters in this text file. If you specify international characters, you must save the file as a UTF-8 file.In e-mails sent by SAS Web Report Studio users, the standard text that is specified in this file is followed by the URL for the saved report. This is the default setting.Here is the latest report for Orion Star Sports. %link%
This is the standard text that is displayed in the e-mail, followed by the URL for the report, and additional standard text.Here is the latest report for Orion Star Sports. http://server02.na.orion.com:8080/SASWebReportStudio/openRVUrl.do?rsRID=SBIP %3A%2F%2FMETASERVER%2FUsers%2FMy+Folder%2FSales+by+Product.srx%28Report %29&rsTS=R_ELMT_060520121721282331140
If you want the URL for the report to be inserted at a specific location within the standard text, insert%link%at the location where you want the URL displayed.
To enable the creation
of standard text in all e-mails that are sent from within SAS Web
Report Studio, follow these steps:
Specify Preferred Locale for SAS Web Report Studio
Beginning with the second maintenance
release for SAS Web Report Studio 4.31, the locale preference that
is specified in SAS Preferences Manager is also applied to SAS Web
Report Studio. The SAS Preferences Manager provides
a common mechanism for managing preferences for all SAS Web applications.
In previous versions of SAS Web Report Studio, the locale preference
specified in the user’s browser was applied to the report.
In the second maintenance
release for SAS Web Report Studio 4.31, if the preferred locale is
not specified in SAS Preferences Manager,
the locale specified in the browser is applied. If a locale is not
specified in the browser, the default locale for the Java environment
is applied.
SAS Information Delivery
Portal users can specify locale preference by selecting OptionsPreferences and accessing the SAS Preferences Manager.
For instructions, see the product Help. SAS Web Report Studio users
can access SAS Preferences Manager directly
and specify their locale preference.
To invoke the SAS Preferences
Manager application and specify preferred locale, use the following
URL:
For more information
about the SAS Preferences Manager, see SAS Intelligence Platform: Middle-Tier Administration Guide.
Note: When scheduling and distributing
reports, the user’s locale preferences is applied. A browser
is not used for scheduling and distributing reports. Therefore, a
locale preference that is specified in a browser is not available
for scheduling and distributing reports. See Locale Specification for Scheduled and Distributed Reports.
Enable the Display of Table Name, Graph Name, and Filter Information in Exported Data
SAS Web Report Studio
enables users to export data from a graph or a table (either a list
table or a crosstabulation table) into a Microsoft Excel spreadsheet
or a Microsoft Word document. To export a graph, users can right-click
in a graph and select Export Graph Data to
open the Export dialog box. Or, they can
right-click in a list or crosstabulation table, and select Export
Table to open the Export dialog
box. For more information, see SAS Web Report Studio: User's Guide.
Beginning with the second
maintenance release for SAS Web Report Studio 4.31, you can configure
the
add.ReportNameToExport property
to enable the following features:
Increase the Limit for the Creation and Storage of Report Definition Snapshots
Beginning with the second
maintenance release for SAS Web Report Studio 4.31, a user can open
a SAS Web Report Studio report, make modifications that are saved
in a report definition snapshot,
and e-mail the URL for the snapshot
to a recipient. The snapshot
is a customized report that is created from an original SAS Web Report
Studio report and e-mailed to a recipient. See Create, E-mail, View, and Delete Report Definition Snapshots.
By default, a maximum
of 50 snapshots
can be created for each SAS Web Report Studio report. When the total
number of snapshots
exceeds 50, the snapshots
that were created first are automatically deleted. You can, however,
increase the limit for the total number of snapshots
that can be created.
Note: Although SAS does not place
limits on the number of snapshots
that you allow at your site, you should exercise some caution when
specifying a very large number as the value for the
wrs.numEmailSnapshotsMax property.
If the number of snapshots
for a SAS Web Report Studio report is excessively high, performance
can be impacted. In addition, when a new snapshot
is created, the snapshots
that were previously created for the SAS Web Report Studio report
are counted.
To specify a custom
value for the number of snapshots
that can be created and stored at your site, follow these steps: