Analyzing and Repairing Metadata

About the Metadata Analyze and Repair Tools

The Metadata Analyze and Repair tools, which can be accessed from the Metadata Manager node in SAS Management Console, enable you to run selected tests on metadata to locate common problems. When possible, the tools also repair problems that the analysis has identified.
The Analyze and Repair tools provide the following options:
  • You can analyze one repository at a time, or you can analyze multiple repositories simultaneously.
  • You can choose to run the repair phase immediately following the analysis, or you can examine the analysis results and then apply the repairs in a separate step. (The latter option is recommended.)
  • Several metadata analysis and repair tools are available, as described in the following topic. You can run either a single tool or multiple tools in a single execution.
When you run the Metadata Analyze and Repair tools, the metadata server is automatically paused to ADMINISTRATION mode. Therefore, you might want to run the tools during times of low metadata server activity. Pausing the server prevents any changes to the repositories from occurring while the analysis process is running. The server is automatically resumed when the analysis and repair processes is completed.

Metadata Analyze and Repair Tool Descriptions

Verify Metadata Files

The Verify Metadata Files tool analyzes key metadata server files to determine whether they are corrupt and, when possible, recommends repairs that can be applied. This tool might be useful if a metadata server failure occurs or if a user experiences unexpected results when accessing the server. For example, it might be useful if a repository cannot be opened, a new repository cannot be registered, or metadata that was previously accessible cannot be accessed. It might also be useful if metadata associations have been broken.
When you run this tool, do not select the option to Repair immediately. When the analysis is finished, select View log to determine whether any repairs are recommended. The metadata server log provides further details. Then proceed as follows:
  • If any errors are reported, do not proceed with the repair process. Instead, contact SAS Technical Support for assistance.
  • If warnings are reported, but no errors, then you can proceed with the repair process.
You can then proceed with the repairs, if necessary.

Verify Associations

The Verify Associations tool checks the metadata repository for associations in which one or the other associated object does not exist. This tool might be useful if a user experiences unexpected results when accessing the server.
When you run this tool, do not select the option to Repair immediately. 
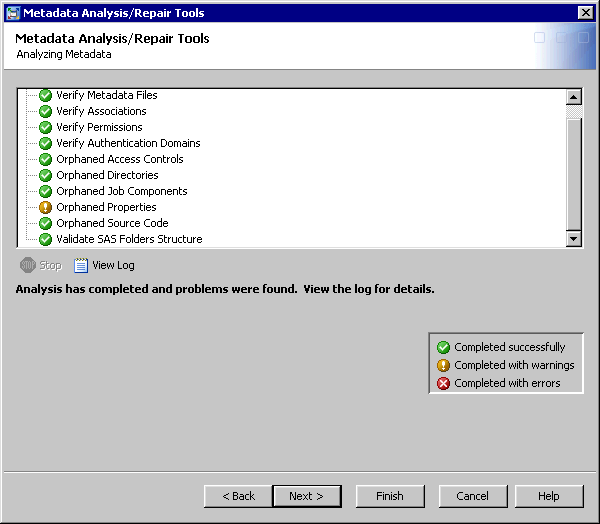
When the analysis is finished, select View log. The log provides the following information:
  • The total number of associations in the repository.
  • The number of broken associations in the repository. These are associations within the same repository that involve at least one metadata object that does not exist. Broken associations are candidates for removal by the repair tool.
    To see details about each broken association, access the metadata server log and search for the string AnalyzeAssociations. You can then remove the broken associations by proceeding with the repair step.
  • The number of suspect associations in the repository. These are associations between objects in different repositories that involve at least one metadata object that cannot be located. The Verify Associations tool cannot determine whether the missing object is actually missing or whether it resides in a repository that is currently offline. Therefore, suspect associations cannot be repaired.

Verify Permissions

The Verify Permissions tool verifies that permission objects exist only in the Foundation repository and recommends repairs that can be applied.

Verify Authentication Domains

The Verify Authentication Domains tool checks authentication domain objects to ensure that the object names are valid and unique. It also checks to ensure the valid usage of these objects. When possible, the tool recommends repairs that can be applied.

Orphaned Objects

The orphaned objects tools locate metadata objects that are no longer being referenced. Metadata can become orphaned when an application deletes a metadata object but does not delete metadata that is associated with the deleted object. Orphaned objects are candidates for removal by the repair tool.
It can be helpful to run the orphaned metadata tools after migrating or promoting your metadata from a previous SAS release. In particular, deleting orphaned objects after upgrading from SAS 9.1.3 can free up a significant amount of disk space. After you run one of these tools with the repair option, be sure to back up the metadata server with the Reorganize Repositories option to reclaim the unused disk space.
You can choose from the following orphaned metadata tools:
  • Orphaned Access Controls
  • Orphaned Directories
  • Orphaned Job Components
  • Orphaned Directories
  • Orphaned Properties
  • Orphaned Source Code

Validate SAS Folders

The Validate SAS Folders tool analyzes the integrity of objects contained in the SAS Folders tree and, when possible, recommends repairs that can be applied. This tool identifies issues such as duplicate, missing, or invalid object names; objects that are present in more than one folder; and objects that are stored in a different repository than their parent folders.

Running the Metadata Analyze and Repair Tools

CAUTION:
Be sure to back up the metadata server before you perform the repair phase of the Metadata Analyze and Repair Tool.
To run the Metadata Analyze and Repair Tool:
  1. Log on to SAS Management Console as a user with the appropriate credentials. See Who Can Do What in the Metadata Manager Plug-in.
  2. Expand the Environment Management and Metadata Manager nodes. Then right-click the Active Server node, and select Analyze/Repair Metadata. (You can also start the process by right-clicking one of the repositories that appears under the Active Server node.)
  3. The following message is displayed: The metadata server will be paused in administration mode to run the analyze and repair tools. Only administrative users will be able to access the metadata server while the process is running. Do you wish to proceed? Click Yes if you are ready to begin the analysis. The server will be paused after you complete the next two wizard pages.
  4. On the first wizard page, select one or more repositories to analyze and repair. Click Next.
  5. The next wizard page lists the analysis tools that are available:
    Tools selection page in Metadata Analyze and Repair wizard
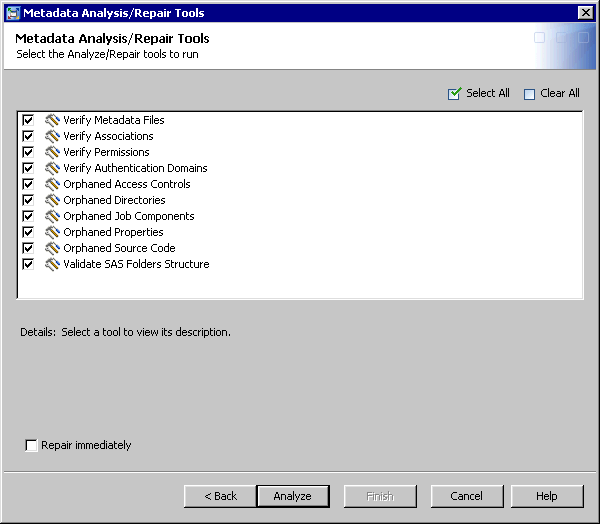
    Select or deselect the check boxes to specify the analyses to perform. For descriptions of each tool, see Metadata Analyze and Repair Tool Descriptions. You can also click the check box to Repair immediately, but it is usually recommended that you perform the repairs in a separate step.
    Click Analyze.
    Note: If you select Repair immediately, the Analyze button is replaced by the Repair button. You can then click this button and proceed as described in steps 9 and 10.
  6. A message is displayed stating that the server is being paused to Administration mode. The analysis is then performed. When it is finished, the results are displayed as shown in the following example:
    Analysis results page in Metadata Analyze and Repair wizard
  7. If no problems are found, the following message is displayed: Analysis has completed with no problems found. You can then click Finish to exit the wizard.
    If problems are found, the following message is displayed: Analysis has completed and problems were found. View the log for details. Click View Log to see information about the errors. Additional details might also be available in the metadata server log.
  8. The next wizard page displays a list of the analysis tools that found problem situations. Select one or more tools to run in repair mode, and click Repair.
    CAUTION:
    If the Verify Metadata Files tool reports errors (as compared to warnings), do not run the repair for that tool. Instead, contact SAS Technical Support for assistance.
  9. A message reminds you to back up your metadata before running the repairs. Click Yes to continue; or if you have not taken a backup, click No, run the backup, and then restart the Analyze and Repair process from the beginning.
  10. If you click Yes, the repairs are executed. A dialog box indicates whether each repair was completed successfully.
    You can click View Log to see details about the repairs. Then click Finish to exit the wizard.