Configuring Client-side Pooling

Plan the Metadata Identities and Logins for Puddle Access

To plan the client-side pooling security, you must determine the user metadata identities, and the logins for the group metadata identities, that can access the puddles in the pool. Your user, group, and login definitions for the users and groups that will access the pool should already be set up when SAS was installed. However, before you determine which identities and logins to use, do the following:
  1. Review the access controls on the server. For more information, see Permissions on Servers in SAS Intelligence Platform: Security Administration Guide.
  2. Review access control for data on the server. The puddle login requires operating system access to any data sets that the server will retrieve.
For puddle access to the pool, there are two types of logins that you can define:
  • a login that is used to launch the workspace server for the puddle users. All users of the puddle use this login when connecting to the SAS server. This login must be accessible to client-side pool administrators. (Pool users are not required to have access to this login).
  • logins for the client-side pool administrator in the metadata configuration file that is used with the Windows Object Manager. Important Note: Do not specify an unrestricted user for the user ID of the client-side pool administrator.

Plan the Puddles for the Client-side Logical Pooled Server

To plan a client-side pooled logical server, you need to determine how many puddles you want to use and which groups will be used to access each of the puddles. When you convert the logical server to a client-side pooled logical server, you can then divide the pool into one or more puddles that associate the appropriate login definition and group metadata identity to use for access to the puddle. The login for each puddle is used to launch the server.
Note: Multiple puddles are not required. It is very common to have only a single puddle.
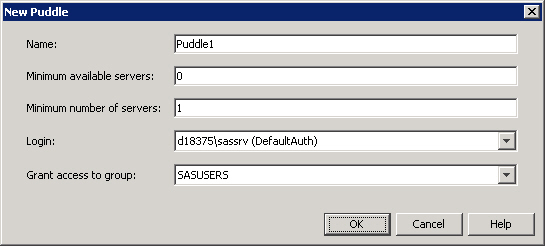
Determine the following parameters for each puddle that is associated with the client-side pooled logical server definition. Retain this information because you will need it later in Convert a Logical Workspace Server to Client-side Pooling.
New Puddle Information
Field
Explanation
Name
Specifies the name of the puddle (for example, Puddle1).
Minimum available servers
Specifies the minimum number of servers that should be idle and available in the pool at any time. The number of running servers never exceeds the Maximum Clients value specified on the server. If the number of available servers falls below the value specified in this field, additional server connections are created.
Minimum number of servers
Specifies the minimum number of servers (both idle and active) that should be present in the pool at any time. This value also specifies how many servers should be started when the pool is first created.
Login
Specifies the user ID under which connections to the server are made. The SAS server only sees this login when a connection is made, rather than the user ID of the user who is actually using the pool. The menu on this field lets you select from the three most recently used logins or the More Logins option. Selecting More Logins displays the Login Search window, which you can use to search for a defined login.
Grant access to group
Specifies the logon group whose members are allowed to access the puddle. Users who are not members of the group are not allowed access. When a user requests a connection to a server pool, the software searches for a puddle whose access group contains that user.
If you want to allow all users to access the system, you should change this value to PUBLIC.
Note: If you do not want members of PUBLIC to be able to use SAS Web Report Studio, and you want to present such users with a clear and user-friendly error message, follow these directions. First, set the value of the Grant Access To Group field to SASUSERS (to control access to the pool). Then, edit the properties file WEB-INF\WebReportStudioProperties.xml, and change the value of the wrs.pfs.allowPublicUsers element to false (to provide useful application-level feedback to members of PUBLIC).

Convert a Logical Workspace Server to Client-side Pooling

To convert your workspace server to client-side pooling and to define a puddle, follow these steps:
Note: You are setting up client-side pooling for a specified client and certain types of requests. This logical workspace server also supports standard workspace servers for other clients.
  1. Log on to SAS Management Console as the SAS Administrator (sasadm@saspw).
  2. In SAS Management Console, expand the Server Manager tree node and the node for the SASApp application server. One of the tree nodes under SASApp is SASApp - Logical Workspace Server.
  3. Right-click the icon for the logical workspace server, and select Convert Tothen selectPooling. The Information dialog box asks whether you want to continue with the conversion. Click Yes. The Pooling Options dialog box appears.
  4. In the Pooling Options dialog box, click New to indicate that you want to define a puddle.
    The New Puddle dialog box appears.
    New Puddle dialog box
  5. Note: If you are not logged on to SAS Management Console as the SAS Administrator (sasadm@saspw), you might not see sassrv in the Login drop-down list box. In this case, click Cancel in the New Puddle dialog box. Then, reconnect to the metadata server by using the metadata profile for the SAS Administrator.
  6. Click OK in the New Puddle dialog box.
  7. Click OK in the Pooling Options dialog box.

Configure Client-side Pooling Properties for Each Server

To set the configuration options for the client-side pool, follow these steps:
  1. In SAS Management Console, expand the SASApp - Logical Workspace Server to reveal the icon for the workspace server.
  2. Right-click the workspace server icon, and select Properties from the pop-up menu. A Workspace Server Properties dialog box appears.
  3. In the Workspace Server Properties dialog box, select the Options tab.
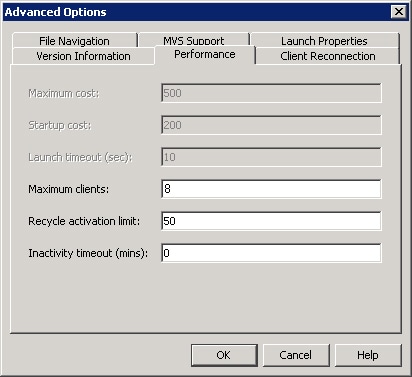
    Note: If the workspace server is converted to use client-side pooling, information about this tab might not accurately reflect behavior for connections that use this server as a standard workspace server. For a logical workspace server that offers client-side pooling, the Options tab is disabled and always indicates that credential-based host authentication is configured. However, if you selected some other setting before configuring client-side pooling, that selection is persisted in metadata and is honored when the server is used as a standard workspace server. To avoid confusion, do not use a workspace server for both client-side pooling and standard use. Instead, if you choose to use client-side pooling, create a dedicated workspace server for that purpose, in a separate server context.
  4. On the Options tab, click Advanced Options. The Advanced Options dialog box appears.
  5. In the Advanced Options dialog box, select the Performance tab.
    Advanced Options dialog box
  6. Fill the fields in the dialog box as shown in the preceding display. The following table explains the meaning of each value.
    Pooling Properties
    Field
    Explanation
    Maximum clients
    Each client requires a workspace server process on the workspace server host. These processes constitute the pool that will be available to SAS Web Report Studio and SAS Information Delivery Portal. Each process requires approximately 150 MB for efficient operation. As a guide, we recommend two processes per CPU. If the server is not also acting as the metadata server, you can add one or two to this maximum. If you have long-running queries, you can add one or two servers. This will make the system seem more responsive to short-running queries, at the expense of total throughput. A typical setting is between 8 and 10. Applications should not share the same pooled workspace configuration as this creates duplicate pools, one for each application, and an unexpectedly high workload for the server host.
    Recycle activation limit
    Places a limit on how often workspace server processes are reused to satisfy puddle connections.
    Inactivity timeout
    A workspace server process can have an inactivity time-out. Having a short time-out reduces the workload on the server host, but might reduce response time for client connection requests.
  7. Click OK in the Advanced Options dialog box.
  8. Click OK in the Workspace Server Properties dialog box.

Setting Client-side Pooling Application Properties

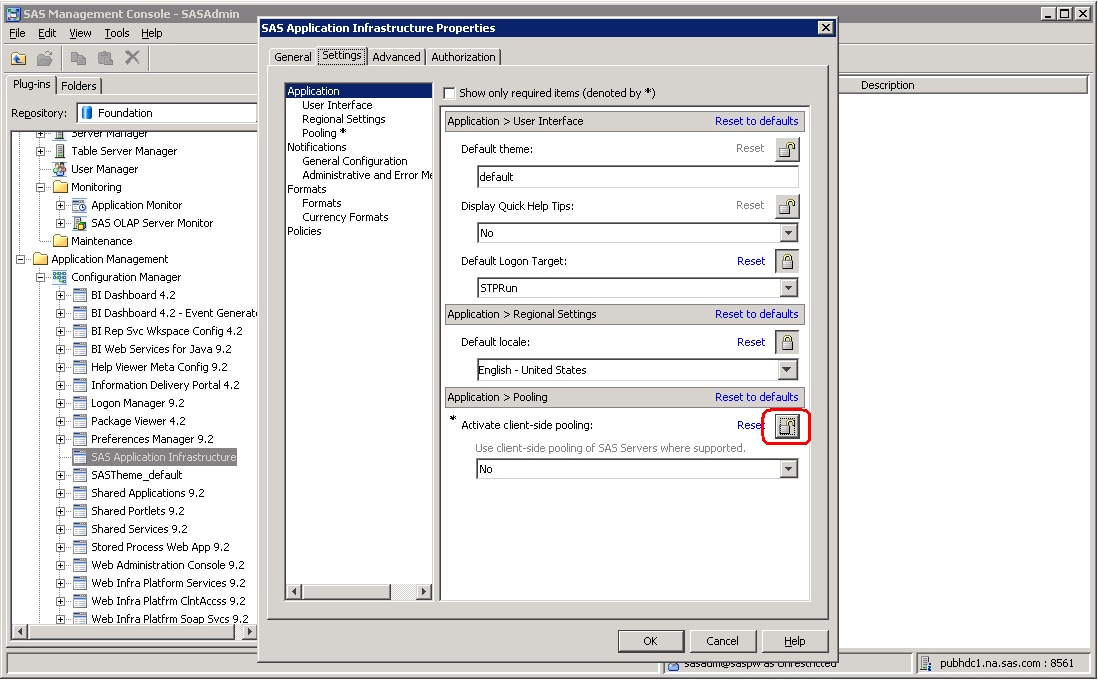
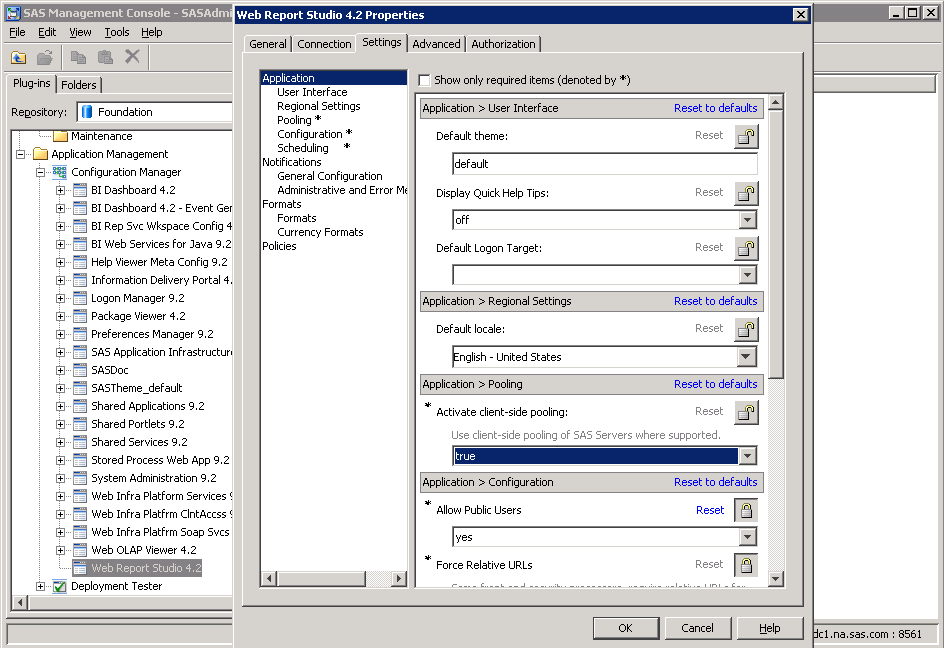
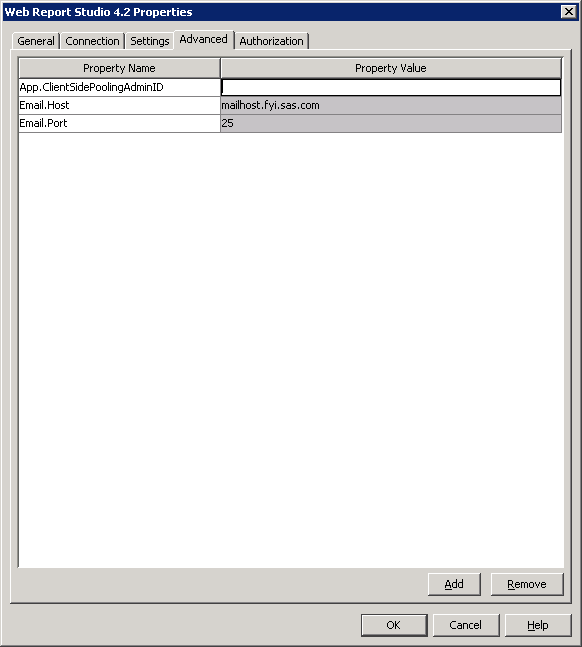
To turn on client-side pooling properties for SAS applications such as SAS Web Report Studio, the SAS Information Delivery Portal, and SAS BI Dashboard, follow these steps:
  1. Using SAS Management Console, access the SAS Configuration Manager plug-in (Plug-insthen selectApplication Managementthen selectConfiguration Manager).
  2. Make sure that client-side pooling is not locked at the application infrastructure level, by following these steps:
    1. Expand the Configuration Manager icon, right-click on Application Infrastructure, and in the pop-up menu choose Properties.
    2. In the Properties dialog box, choose the Settings tab.
    3. In the right pane of the Settings tab, under Application > Pooling, click the lock icon. It should toggle to an unlocked state, and then click OK.
      SAS Application Infrastructure Properties dialog box
  3. In the left pane of the SAS Management Console under Configuration Manager, right-click on Web Report Studio 4.2, and in the pop-up menu choose Properties.
  4. In the Properties dialog box, choose the Settings tab.
  5. In the right pane of the Settings tab, under Application > Pooling, choose true from the drop-down list box.
    Web Report Studio 4.2 Properties dialog box
  6. Click the Advanced tab, and in the Property Value column for App.ClinetSidePoolingAdminID, enter the login for the client-side pooling administrator, and then click OK.
    Web Report Studio 4.2 Properties
  7. Restart your Web application server for these changes to take effect.
    For more information, see Starting and Stopping Web Application Servers in SAS Intelligence Platform: System Administration Guide.

Verify That Client-side Connection Pooling Is Working for SAS Web Report Studio

If you have not configured client-side connection pooling correctly, SAS Web Report Studio will continue to work. However, it will not be able to take advantage of a connection pool. Therefore, it is important that you verify that your system is configured correctly. You can verify this by temporarily changing the logging level for connections, viewing a SAS Web Report Studio report, and then checking the contents of the SAS Web Report Studio log file.
To verify that your system is configured correctly, follow these steps:
  1. Using SAS Management Console, add a new logging context (com.sas.services.connections) and set its logging level to DEBUG.
    For more information, see Configuring Logging for SAS Web Report Studio in SAS Intelligence Platform: Web Application Administration Guide.
  2. Start SAS Web Report Studio and log on.
  3. View a report that accesses relational data (for example, a SAS table).
  4. View the SAS Web Report Studio log file (path-to-config-dir\Web\Logs\WebReportStudio.log). If pooling is working, you will see information that is similar to this message about the connection to the workspace server:
    privileged user name: D9588\sastrust@saspw
    pd#0: putting cx#8 on the available queue
    rq#0 routed to pd#0
    If pooling is not working correctly, you will see a message similar to this message:
    request served by unshared connection #9
After you have confirmed that connection pooling is working, you can undo the changes that you made in step 1.