Build the Start_menu Frame

Creating a Navigation System

The final frame to build is the navigation system for the other two frames. When complete, the Start_menu frame enables a user to call either the Display_report frame or the Create_report frame with the click of a button.
Finished Start_menu Frame

Build the Graphical User Interface for the Start_menu Frame

Create the Start_menu frame by entering the following command at the SAS command line:
build sasuser.example.Start_menu.frame
Resize the frame so that it is about half the default size.
Drag the following controls to the frame:
  • one Text Label Control
  • three Push Button Controls
You should now have a frame that looks something like this:
Preliminary Start_menu Frame

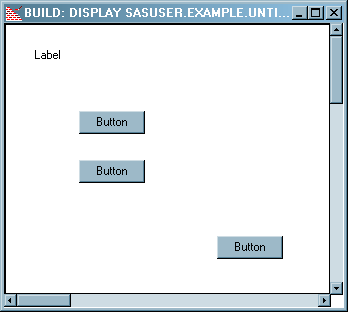
Set the Attribute Values for the Start_menu Controls

For the Textlabel1 object, set the following:
  • label attribute to Sales Viewer
  • font attribute to Arial, Regular, 14
Resize the Textlabel1 control so that the text displays properly.
For Pushbutton1, set the following:
  • buttonStyle attribute to Icon with Text Under
  • height attribute to 60
  • icon attribute to 212
  • iconStyle attribute to Large Icons
  • label attribute to Display Sales Data
  • name attribute to DisplayDataButton
  • width attribute to 120
For Pushbutton2, set the following:
  • buttonStyle attribute to Icon with Text Under
  • height attribute to 60
  • icon attribute to 335
  • iconStyle attribute to Large Icons
  • label attribute to Create Sales Report
  • name attribute to CreateRptButton
  • width attribute to 120
For Pushbutton3, set the following:
  • label attribute to Exit Application
  • name attribute to ExitButton
  • width attribute to 100
Lastly, set the bannerType attribute of the frame to None.
Arrange the controls 
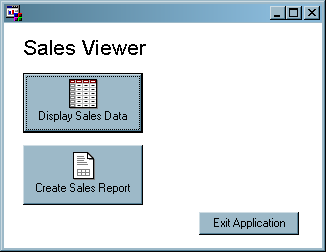
so that they resemble Finished Start_menu Frame.

Add SCL Code to the Start_menu Frame

Add the following code to the Start_menu frame SCL. When complete, save the SCL and then close the Frame SCL window.
DisplayDataButton:
   call display('Display_data.frame');
 return;
                                                                                                                                        
CreateRptButton:
   call display('Create_report.frame');
 return;   

ExitButton:
   /* This code displays a confirmation dialog box */
   /* when a user clicks the ExitButton.           */

   /* Create a list that contains the text of the message. */
   dcl list message={'Are you sure you want to exit?', 'Be honest.'};

   /*Use the SCL MESSAGEBOX function to display a YES/NO dialog box. */
   response=messagebox(message, '!', 'YN', 'Confirm Exit');
   if response='YES' then call execcmd('end;');

   /*Delete the list 'message'. */
   message=dellist(message);
return;

Test the Start_menu Frame

Test the Start_menu frame by selecting Buildthen selectTest. Ensure that the Display Sales Data and Create Sales Report buttons call the appropriate frame, and that the Exit Application button performs as expected.

Test the Entire Application

To test the entire application, each frame must be compiled individually. And because the Create_report frame uses a SUBMIT statement, you must test the application from outside the build environment (recall the limitation of the testing environment in Testing Applications).
To test the entire application, follow these steps:
  1. Close the Start_menu frame (and any other open frames).
  2. Run the Start_menu frame from a SAS Explorer window.
  3. Test the functionality of each control on each frame.
If you encounter a frame or control that does not function properly, exit the application, compile the offending frame, and then test, diagnose, and fix the problem separately from the larger application.