Build the Display_data Frame
Build the User Interface for the Display_data Frame
To create the graphical
user interface for the frame, drag the following controls from the
Components window onto the frame and position them as you see in Preliminary Display_data Frame:
Alternatively, you can
select each type of control and then double-click on the frame where
you want to place it.
On some UNIX platforms,
you might need to press two buttons on your mouse to activate a drag
action (consult your host documentation).
If you run out of room
while dropping controls on the frame, make the frame bigger by resizing
it the way you would resize any other window. You can make it smaller
later, after positioning the controls.
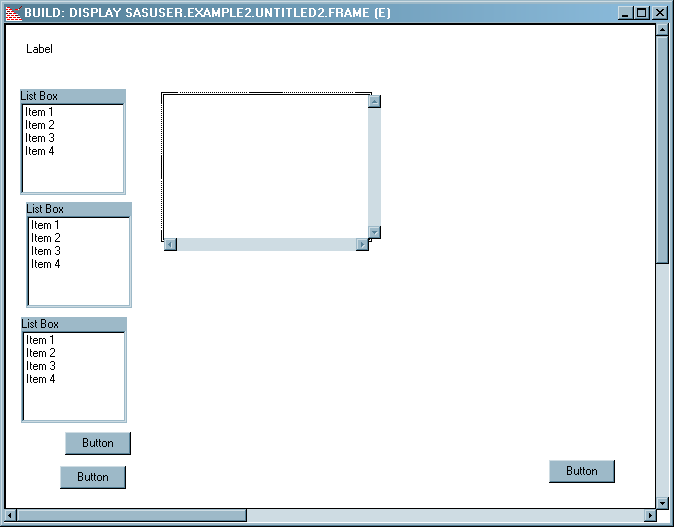
After dragging all the
controls to the frame, you should now have a frame that resembles
the following:
If
you accidentally drop one control inside another so that the larger
control completely surrounds the smaller, you might not be able to
select the smaller control. To access the smaller control, select
the larger control and move it out of the way so that you can select
and move the smaller control to its proper position.
Move and Resize the Controls
After you
place the controls on the frame, position them like the controls in Finished Display_data Frame by clicking on a control and then placing the mouse pointer
on a portion of the light gray border around the control. When the
pointer changes into a hand, you can drag the control to a new position.
At this point, the only
control that you need to resize is the Table Viewer. To resize a control,
select the control and then place the mouse pointer on the dark handles
around the control. When the pointer changes into an arrow, you can
resize the control.

You can also resize
controls with pixel-level accuracy using attributes. Resizing controls
using attributes is as simple as entering height and width values.
Using attributes to size controls is examined later in this document
(see Set the Attributes That Control the Interface).
Align the Controls
Although you might have aligned the
controls by hand already, there are layout tools available that can
help you do the job precisely.
To align the left edges
of the three List Box controls, select all three controls by either
holding the SHIFT key and clicking each List Box, or by using the
mouse to draw a box around all three (controls are selected when their
borders turn thick and gray). Now select Layout AlignLefts.
Align the remainder
of the components so that your frame resembles Finished Display_data Frame.
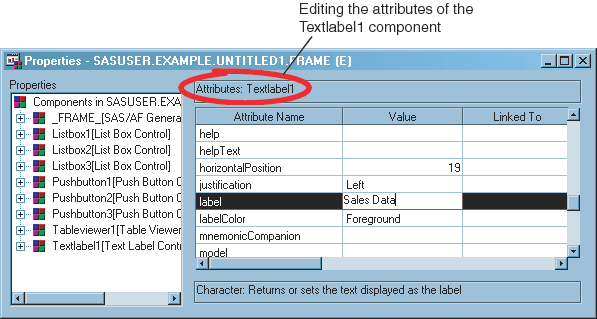
Set the Attribute Values for the Display_data Controls
Set the First Attribute
Set the Control Names
Set the Attributes That Control the Interface
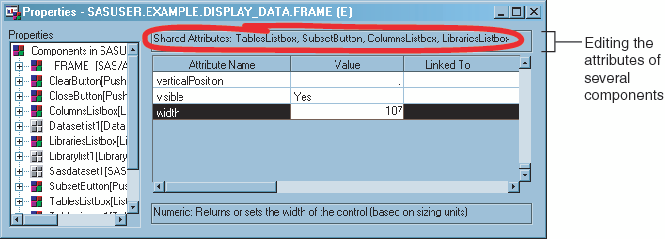
Set Attribute Values for Multiple Controls
Attributes that are
common between two or more controls can be set simultaneously, which
can save time. To set the width of the three List Boxes and the SubsetButton,
select all three list boxes and the SubsetButton. To select multiple
controls on a frame, either hold down the SHIFT key while you click
each control, or drag the mouse pointer across each control.
Attach Models to the Display_data Frame Controls
Notice that the List
Boxes all display a generic list of four items. This is because they,
and the Table Viewer on the right side of the frame, have no access
to data. To provide all the controls with data, you need to associate
them with models. Dropping a model onto a control sets the model attribute on the control, which is all you need
to do to associate a control and a model.
To associate the correct
model with the proper control, drag the indicated model onto the control
on the frame:
You should now see a
list of libraries in the LibrariesListbox. By default the Library
List model references the currently defined SAS libraries, even at
build time. This is why the first List Box displays the current libraries.
The other controls don't display any data because, although they are
associated with models, those models have not been told where to look
for data. You add SCL code to define those data sources in the next
section.

Add SCL Code to the Display_data Frame
To add the SCL code,
making the frame fully functional, open the frame SCL for the Display_data
frame (right-click anywhere in the frame and select Frame
SCL). Insert the following code:
/* This is the frame SCL for the Display_data frame.       */
/*                                                         */
/* The user selects a library from the LibrariesListbox.   */
/* The TablesListbox is then populated.                    */
/* The user selects a table from the TablesListbox.        */
/* The ColumnsListbox and Tableviewer1 are then populated. */

dcl num rc;   /* Numerical variable used as a return code. */
dcl char(30) displayTable;   /* A character variable.  */
dcl list emptyList={};       /* Creates an empty list. */

/* Executes before the frame is displayed to the user. */
Init:
    /* Disable the SubsetButton and the ClearSubset buttons  */
    /* by setting the 'enabled' attribute on each.           */
    /* There is nothing yet to subset or clear.              */
    subsetButton.enabled='no';
    clearButton.enabled='no';

    /*Set how the table is displayed in TablesListBox. */
    datasetlist1.levelCount=1;
return;

/*Executes when a selection is made from the LibrariesListbox. */
LibrariesListbox:
   if LibrariesListbox.selectedItem ne ' ' then
   do;
      /* Set the Data Set List model to point to the library selected. */
      /* Because the Data Set List model is associated with the        */
      /* TablesListbox, the TablesListbox is populated.                */
      datasetList1.library=librariesListbox.selectedItem;
      variableList1.dataSet=' ';
      sasdataset1.table=' ';

      /* Enable the SubsetButton now that there is data to subset. */
      subsetButton.enabled='yes';
   end;
 return;

/* Executes when a selection is made from the TablesListbox. */
TablesListbox:
   if TablesListbox.selectedItem ne ' ' then
   do;
      /* Concatenate the selected library and the selected table */
      /* and give the result to the sasdataset model, the model  */
      /* supplying the Table Viewer with data.                   */
      displayTable=librariesListbox.selectedItem || '.' ||
                   TablesListbox.selectedItem;
      sasdataset1.table=displayTable;
      variableList1.dataSet=displayTable;
      SubsetButton.enabled='yes';
   end;
 return;

/* Executes when a selection is made from the ColumnsListbox. */
ColumnsListbox:
   if listlen(columnsListbox.selectedItems) gt 0 then
      /* Copy the list of selected columns to the sasdataset1 model, */
      /* the model supplying the Table Viewer with data.            */
      sasdataset1.columnOrder=copylist(ColumnsListbox.selectedItems);
 return;

/* Executes when the 'Subset with WHERE' button is pressed. */
SubsetButton:
   if sasdataset1.table ne ' ' then
      /* Call the WHERE subset window. */
      rc = sasdataset1._setWhere(0, 'y');

      /* If a WHERE expression is in effect, enable the 'Clear Subset' button. */
      if rc=0 then ClearButton.enabled ='yes';
 return;

/* Executes when the 'Clear Subset' button is pressed. */
ClearButton:
      if sasdataset1.table ne ' ' then
          sasdataset1._setWhere(emptyList); /* Clear the WHERE expression. */
          ClearButton.enabled ='no'; /* Disable the 'Clear Subset' button. */
return;

term:
    /* Delete the list when quitting. */
    rc=dellist(emptyList);
return; Because the frame
entry was already named Display_data.frame, the SCL entry that is
associated with the frame is automatically named Display_data.scl.
If you change the name of the frame later, the frame assumes that
the frame SCL name was also changed, so you must either change the
name of the SCL entry to match the frame, or edit the frame's SCLEntry
attribute to reference the original SCL entry.
Compile the Display_data Frame
With the graphical user
interface and the SCL finished, you can now compile the Display_data
frame. To compile the frame, make sure it is the active window, and
then select BuildCompile.
If the frame and frame
SCL compiled successfully, you should see in the Log window a message
similar to the following: Log.
NOTE: Compiling DISPLAY_DATA.FRAME (SASUSER.EXAMPLE.DISPLAY_DATA.SCL).
NOTE: Code generated for DISPLAY_DATA.FRAME. Code size=4095.
To view the Log window, select View
You should correct all
errors and warnings before testing the frame (see Compiling Applications).
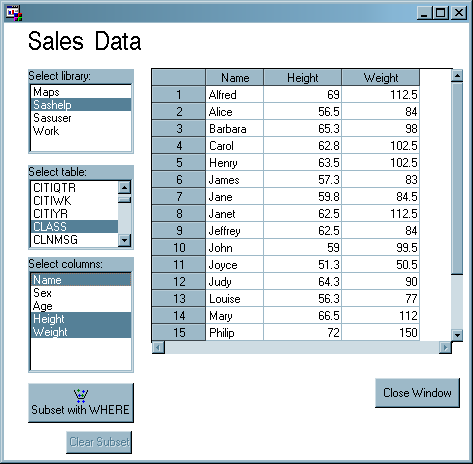
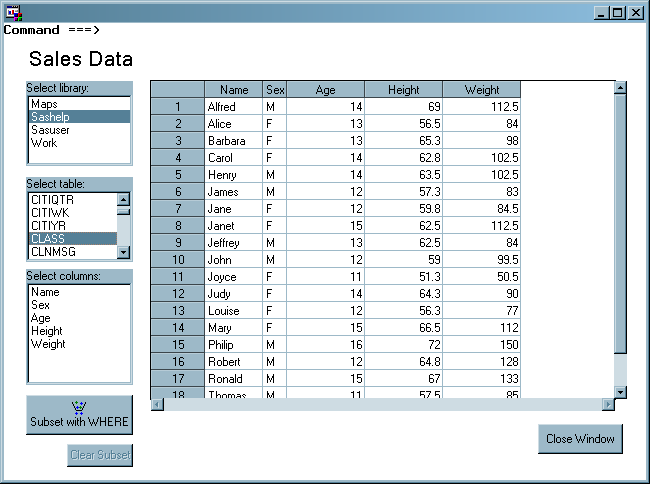
Testing
Test the Display_data Frame
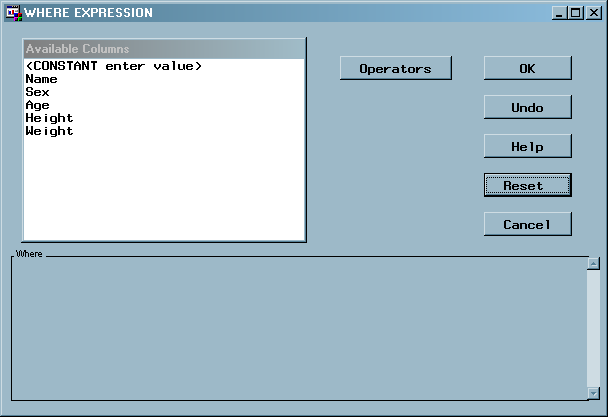
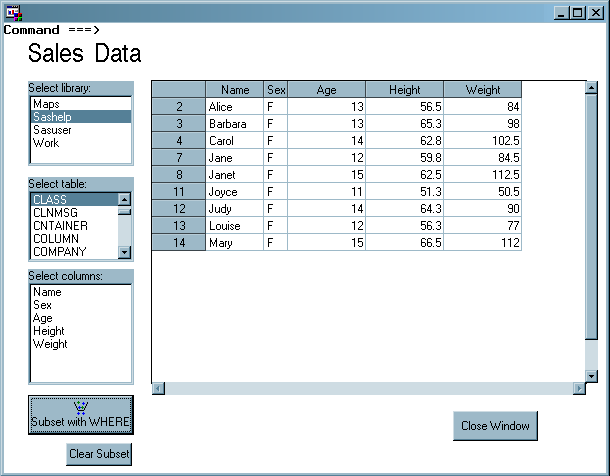
Test the WHERE Subsetting
Removing the Frame Command Line
You might have noticed the command
prompt at the top of the frame (Command ===>). By default all frames have a command line where users can type
SAS commands. To remove the command line at the top of a frame, set
the bannerType attribute on the frame to None. The frame is listed
in the Properties window as _FRAME_.
Copyright © SAS Institute Inc. All rights reserved.