Usage Note 58371: Perform a sample-project test within SAS® Enterprise Miner(tm)
 |  |  |
When working with SAS Technical Support, you might be asked to perform a sample-project test using SAS Enterprise Miner. There are two common purposes for such a test:
- to validate the deployment of SAS Enterprise Miner
- to serve as a performance benchmark for SAS Enterprise Miner
The following steps describe how to perform a sample-project test for these two purposes. These steps apply to SAS Enterprise Miner 7.1 and later, and these steps can be used for all three varieties of SAS Enterprise Miner:
- SAS Enterprise Miner Workstation
- SAS Enterprise Miner Client
- SAS Enterprise Miner via Java Web Start
While the process of performing a sample-project test for these purposes, versions, and varieties is similar, there are some differences that are noted below. Be sure to complete the appropriate steps for your specific scenario.
- Prerequisites (performance benchmark only)
- Launch, log on, create a project
- Add Project Start Code (performance benchmark only)
- Create a diagram, generate sample data, construct a flow
- Run flow, view results
- Next steps
1. Prerequisites (performance benchmark only)
- If your sample-project test is for a performance benchmark, then use the following SAS Note, which serves as the entry point for diagnosing and resolving performance issues within SAS Enterprise Miner:
SAS Note 58339: "Diagnosing and resolving performance issues within SAS Enterprise Miner"
- If you perform a sample-project test to serve as a performance benchmark, then it is critical to make note of how long each individual action takes to complete. The resulting list of specific actions and the time it takes to complete each of those actions is critical to the diagnostic process.
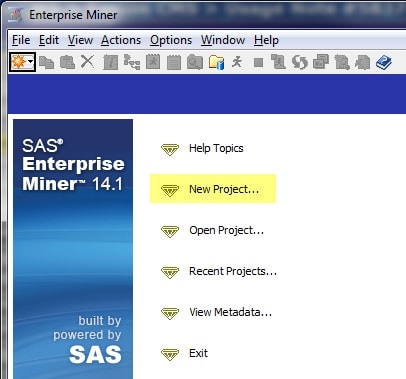
2. Launch, log on, create a project
- Launch SAS Enterprise Miner.
- If you are using either SAS Enterprise Miner Client or SAS Enterprise Miner via Java Web Start, then log on when prompted.
- Within SAS Enterprise Miner, click the New Project icon.
- If you are using SAS Enterprise Miner Workstation, then complete the following steps:
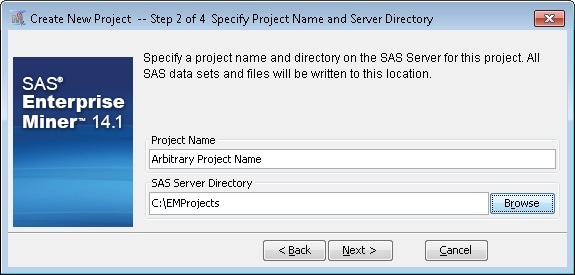
- In Step 1 of 2, enter an arbitrary name for the project and choose the location in which you want to save the project. Note that the location is labeled 'SAS Server Directory'. The value of this field should be the location on your machine in which you want to save your project.
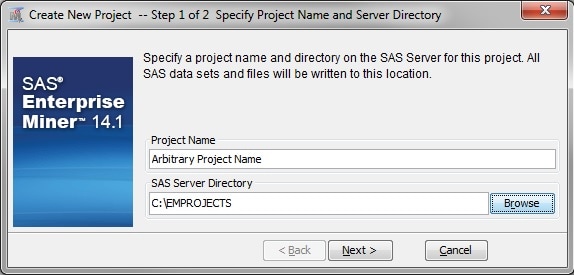
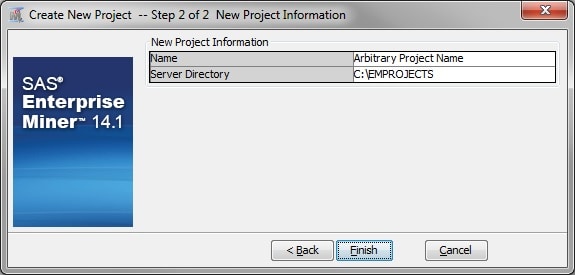
- In Step 2 of 2, review the values chosen in Step 1 and click Finish.
- In Step 1 of 2, enter an arbitrary name for the project and choose the location in which you want to save the project. Note that the location is labeled 'SAS Server Directory'. The value of this field should be the location on your machine in which you want to save your project.
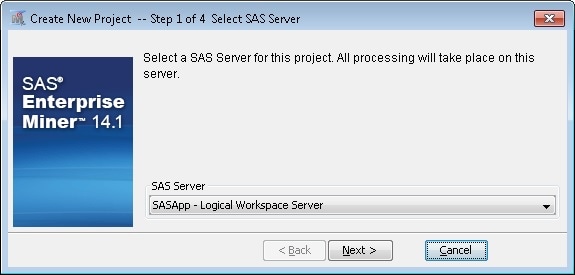
- If you are using SAS Enterprise Miner Client or SAS Enterprise Miner via Java Web Start, then complete the following steps:
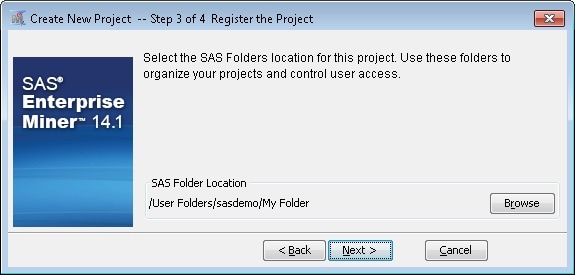
- In Step 1 of 4, select the logical workspace server with which you want to associate the SAS Enterprise Miner project.
- In Step 2 of 4, enter an arbitrary name for the project and choose a location for the filesystem portion of the project.
- In Step 3 of 4, choose a location for the metadata portion of the project.
- In Step 4 of 4, review the values chosen and click Finish.

- In Step 1 of 4, select the logical workspace server with which you want to associate the SAS Enterprise Miner project.
- After clicking the Finish button, project creation is complete.
3. Add Project Start Code (performance benchmark only)
This section of steps is necessary only if you are performing a sample-project test to serve as a performance benchmark. If you are performing a sample-project test to validate the deployment of SAS Enterprise Miner, then this step is not necessary and you can skip to the next section.
- In the new project, click the project name in the properties panel. Click the Project Start Code ellipsis button (...) in the properties panel.
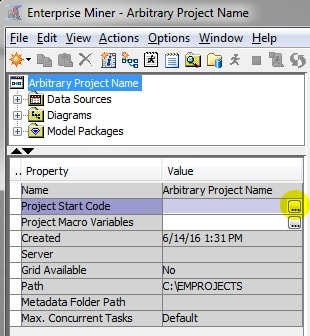
- Enter the following code in the Code tab in the Project Start Code window.
options fullstimer source source2 msglevel=i mprint notes; options sastrace=",,,d" sastraceloc=saslog nostsuffix; proc options; run; libname _all_ list; %let EM_DEBUG=SOURCE;

- Click OK.
4. Create a diagram, generate sample data, construct a flow
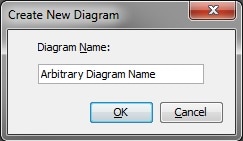
- Create a new diagram using the following menu selection: File ► New ► Diagram

- Enter an arbitrary name for the new diagram in the Create New Diagram dialog box and then click OK.
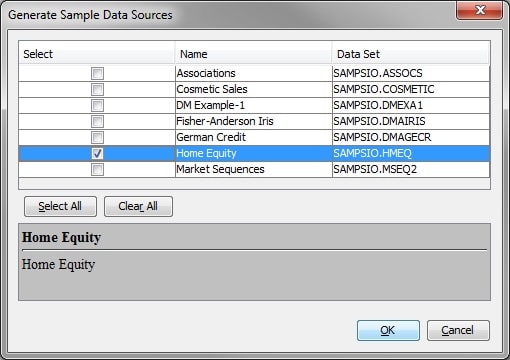
- Open the Generate Sample Data Source dialog box using the following menu selection: Help ► Generate Sample Data Sources...

- In the Generate Sample Data Sources dialog box, uncheck everything except for Home Equity and then click OK.
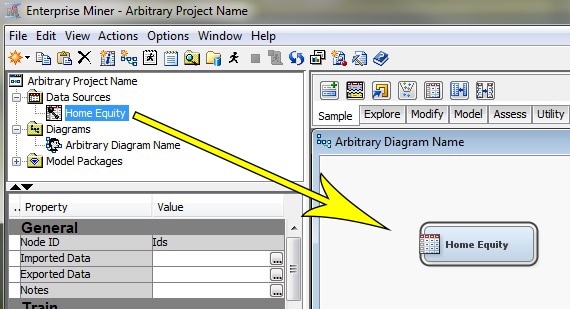
- Drag the Home Equity Data Source from the Project panel to the diagram.
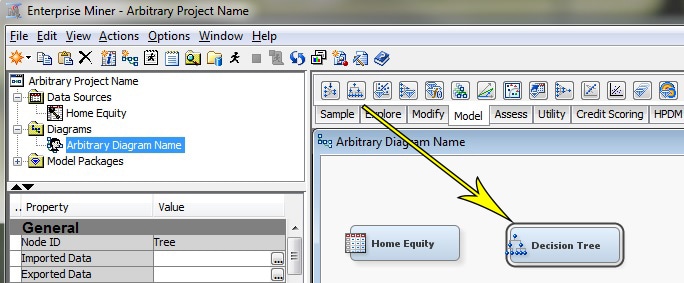
- Drag a Decision Tree node from the Model tab to the diagram.
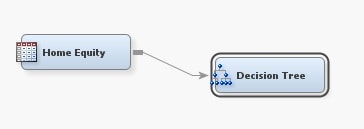
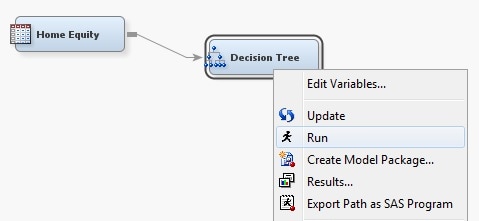
- Within the diagram, connect the right edge of the Input Data (Home Equity) node to the left edge of the Decision Tree node by clicking and dragging.
5. Run flow, view results
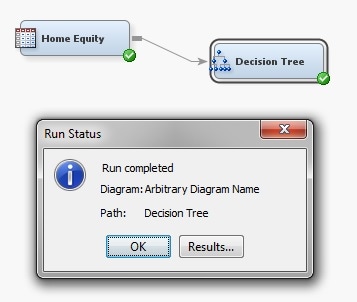
- Run the flow by right-clicking the Decision Tree node and choosing Run.
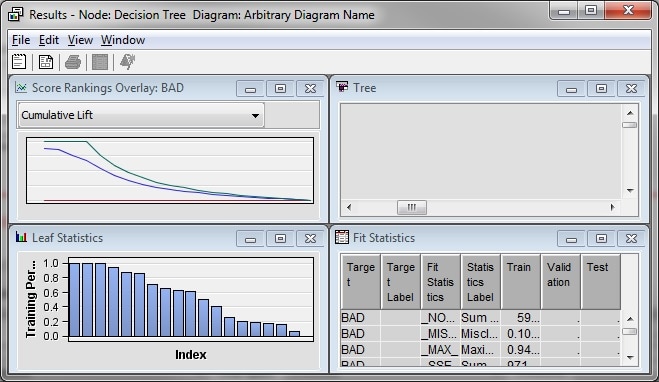
- When the run completes, the Run Status window is displayed. Click the Results... button to view the results.
- Confirm that the Results window is displayed.
6. Next steps
If you successfully completed this test to validate the deployment of SAS Enterprise Miner, then collect and submit a screenshot to illustrate that the test was successfully completed.
If you successfully completed this test to serve as a performance benchmark and are engaged with SAS Technical Support, then collect and submit the following items:
- The list of specific actions that you created and the time that it took to complete each of those actions, as discussed in the Prerequisites section above.
- The run.log file that was generated during the test. Default location: projects\projectName\Workspaces\EMWS1\System\run.log
- If you are using SAS Enterprise Miner Client or SAS Enterprise Miner Workstation, then include the
em.inifile. Default location: SASHome\SASEnterpriseMiner*\version\em.ini - All of the other items requested in the 'Initial Diagnostics' section of SAS Note 58339: "Diagnosing and resolving performance issues within SAS Enterprise Miner".
Operating System and Release Information
| Product Family | Product | System | Product Release | SAS Release | ||
| Reported | Fixed* | Reported | Fixed* | |||
| SAS System | SAS Enterprise Miner | Microsoft Windows Server 2003 Datacenter Edition | 7.1 | 9.3 TS1M0 | ||
| Microsoft Windows Server 2003 Enterprise Edition | 7.1 | 9.3 TS1M0 | ||||
| Microsoft Windows Server 2003 Standard Edition | 7.1 | 9.3 TS1M0 | ||||
| Microsoft Windows Server 2003 for x64 | 7.1 | 9.3 TS1M0 | ||||
| Microsoft Windows Server 2008 | 7.1 | 9.3 TS1M0 | ||||
| Microsoft Windows Server 2008 R2 | 7.1 | 9.3 TS1M0 | ||||
| Microsoft Windows Server 2008 for x64 | 7.1 | 9.3 TS1M0 | ||||
| Microsoft Windows XP Professional | 7.1 | 9.3 TS1M0 | ||||
| Windows 7 Enterprise 32 bit | 7.1 | 9.3 TS1M0 | ||||
| Windows 7 Enterprise x64 | 7.1 | 9.3 TS1M0 | ||||
| Windows 7 Home Premium 32 bit | 7.1 | 9.3 TS1M0 | ||||
| Windows 7 Home Premium x64 | 7.1 | 9.3 TS1M0 | ||||
| Windows 7 Professional 32 bit | 7.1 | 9.3 TS1M0 | ||||
| Windows 7 Professional x64 | 7.1 | 9.3 TS1M0 | ||||
| Windows 7 Ultimate 32 bit | 7.1 | 9.3 TS1M0 | ||||
| 64-bit Enabled Solaris | 7.1 | 9.3 TS1M0 | ||||
| 64-bit Enabled HP-UX | 7.1 | 9.3 TS1M0 | ||||
| 64-bit Enabled AIX | 7.1 | 9.3 TS1M0 | ||||
| Windows Vista for x64 | 7.1 | 9.3 TS1M0 | ||||
| Windows Vista | 7.1 | 9.3 TS1M0 | ||||
| Windows 7 Ultimate x64 | 7.1 | 9.3 TS1M0 | ||||
| HP-UX IPF | 7.1 | 9.3 TS1M0 | ||||
| Linux | 7.1 | 9.3 TS1M0 | ||||
| Linux for x64 | 7.1 | 9.3 TS1M0 | ||||
| Solaris for x64 | 7.1 | 9.3 TS1M0 | ||||
| Microsoft® Windows® for x64 | 7.1 | 9.3 TS1M0 | ||||
| Type: | Usage Note |
| Priority: |
| Date Modified: | 2018-09-28 13:15:11 |
| Date Created: | 2016-06-10 09:38:48 |