Installation Note 44376: Removing SAS® 9.3 in Windows operating environments (for planned installations/deployments only)
 |  |  |
NOTE: Use this SAS note to manually uninstall SAS 9.3 from your machine only if SAS 9.3 is the only release of SAS on your machine. If you have more than one release of SAS on your machine, different steps are required.
These steps pertain only to a planned installation. They do not pertain to a basic installation. For information about uninstalling a basic installation, see SAS Note 44362.
WARNING: Do not uninstall the Java Runtime Environment (JRE) from your system before uninstalling all of your SAS components. The JRE is the component that the installation wizards use. If the JRE is uninstalled before the other SAS pieces, problems are likely to occur during uninstalling, or the process might not work at all.
Steps to Follow for a Planned Installation
- Log in as the Administrator of the machine (the account that was used to perform the original installation) or as a group Administrator. See SAS Note 5055.
- Back up any necessary metadata before you start uninstalling.
For SAS 9.3, see Best Practices for Backing Up and Restoring Your SAS Content. - Before you begin uninstalling the SAS software, ensure that there are no SAS services or processes running on the machine. Use Windows services and the Task Manager to verify that there are no services or processes on the machine.
- For Services, select Start ► Run and type services.msc. For Windows 7 and later operating systems, type services.msc in the Search programs and files search box.
Look for any SAS services (for example: SAS PC Files Server) and if the service is started, select the item and click Stop.
Here are some examples of SAS services:
- SAS [Config-Lev1] Object Spawner
- SAS [Config-Lev1] Remote Services
- SAS [Config-Lev1] SASApp - OLAP Server
- SAS [Config-Lev1] SASMeta - Metadata Server
- SAS [Config-Lev1] FrameworkServer - SAS Framework Data Server
- To access the Task Manager, right-click an empty space on the taskbar and then select Task Manager (alternatively, you can press and hold the CTRL+ALT+DELETE keys to start the Task Manager). If any of the following processes are running, select and stop them:
- sas.exe
- spawner.exe
- objspawn.exe
- For Services, select Start ► Run and type services.msc. For Windows 7 and later operating systems, type services.msc in the Search programs and files search box.
- Launch the SAS® Deployment Manager (new with SAS 9.3). There are three ways to do this:
- Click Start ► All Programs ► SAS ► SAS Deployment Manager.
- Or click Start ► Programs ► SAS ► SAS Deployment Manager.
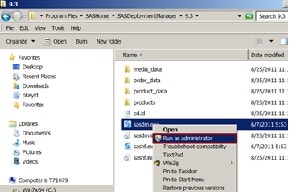
- Or start the sasdm.exe file: Start Windows Explorer. Using the navigation panel, locate the sasdm.exe file in the !SASHOME\SASDeploymentManager\9.3 directory. The default location is C:\Program Files\SASHome\SASDeploymentManager\9.3\sasdm.exe
If you are on a Windows 7, Windows 8, Windows 8.1, Windows Server 2008, Windows Server 2012, or Windows Vista operating system, right-click the sasdm.exe file and select Run as administrator. If you are on any other system, double-click sasdm.exe.

- Choose the language in which you want to view the SAS Deployment Manager and click OK. The default is English.

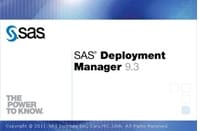
The SAS® Deployment Manager 9.3 logo screen appears.

- The Select SAS Deployment Manager Task dialog box appears. Select Remove Existing Configuration and check Remove user content for SAS Information Delivery Portal. Click Next.

- Click Yes to continue.

- On the Select Configuration Directory/Level, your configuration should be listed. Click Next.

- Finish the removal of the configuration. See Removing a SAS Configuration for more details.
- Reboot your PC.
- Select Start ► Run and type services.msc. For Windows 7 and later operating systems, type services.msc in the Search programs and files search box.
Ensure that there are no SAS services running on the machine. - Launch the SAS Deployment Manager a second time:
If you are on a Windows 7, Windows 8, Windows 8.1, Windows Server 2008, Windows Server 2012, or Windows Vista operating system, right-click the sasdm.exe file and select Run as administrator. If you are on any other system, double-click sasdm.exe.

- Choose the language in which you want to view the SAS Deployment Manager and click OK. The default is English.

- The SAS Deployment Manager 9.3 logo screen appears.

- The Select SAS Deployment Manager Task dialog box appears. Select Uninstall SAS Software from the tasks that are available. Click Next.

- In the Select SAS Products to Uninstall dialog box, click Select All to uninstall everything, and then click Next.

- In the Checking System dialog box, you do not click Next. Once the installation runs through the loading installation package, it proceeds to the next Checking System dialog box automatically.


- Here, the system verifies the amount of free disk space and verifies that the files and directories have the correct permissions. Click Next.

- In the Summary dialog box, click Start to begin the process of uninstalling.

- The Removing Software in Progress dialog box appears.

- In the Deployment Complete dialog box, click Finish.

- Choose the language in which you want to view the SAS Deployment Manager and click OK. The default is English.
- Reboot the PC one more time.
- Select Start ► Settings ► Control Panel ► Add or Remove Programs. For Windows 7 and later operating systems, select Start ► Settings ► Control Panel ► Programs and Features. If there is any SAS product listed here, uninstall it.
- Delete the following directories based on your Windows operating system:
Windows XP or Windows 2003 (32-bit operating systems)
Start Windows Explorer: Right-click Start and select Explore. Delete the following directories (note that these are the default locations):
- C:\Documents and Settings\userid\Local Settings\Application Data\SAS\
- C:\Documents and Settings\userid\Local Settings\Temp\SAS Temporary Files
- C:\Program Files\SASHome
- C:\SAS
Start Windows Explorer: Right-click Start and select Open Windows Explorer. Delete the following directories (note that these are the default locations):
- C:\SAS
- C:\Users\userid\AppData\Local\SAS
- C:\Users\userid\AppData\Roaming\SAS
- C:\ProgramData\SAS
- C:\Program Files\SASHome
- C:\Program Files (x86)\SAS
- C:\Documents and Settings\userid\Local Settings\Application Data\SAS\
- C:\Documents and Settings\userid\Local Settings\Temp\SAS Temporary Files
- C:\Program Files\SASHome
- C:\Program Files (x86)\SAS
- C:\SAS
- C:\SAS
- C:\Users\userid\AppData\Local\SAS
- C:\Users\userid\AppData\Roaming\SAS
- C:\ProgramData\SAS
- C:\Program Files\SASHome
Start Windows Explorer: Right-click Start and select Explore. Delete the following directories (note that these are the default locations):
Open Windows Explorer: Right-click Start and select Open Windows Explorer. Delete the following directories (note that these are the default locations):
- Delete the following registries if they exist.
Warning: SAS is not responsible when you edit the Windows registry: Changes in the Windows registry can render your system unusable and require that you reinstall the operating system. Always back up your registry before you make any registry changes. For assistance, see Windows Help, Microsoft documentation, or the Microsoft Windows website.
Open the Registry Editor dialog box: Click Start and type regedit on the Run line or in the Search programs and files search box.
- HKEY_LOCAL_MACHINE\SOFTWARE\SAS Institute Inc.
- HKEY_LOCAL_MACHINE\SOFTWARE\Wow6432Node\SAS Institute Inc.
- HKEY_LOCAL_MACHINE\SYSTEM\CurrentControlSet\services\SAS [Config-Lev1] Connect Spawner
- HKEY_LOCAL_MACHINE\SYSTEM\CurrentControlSet\services\SAS [Config-Lev1] Deployment Tester Server
- HKEY_LOCAL_MACHINE\SYSTEM\CurrentControlSet\services\SAS [Config-Lev1] FrameworkServer - SAS Framework Data Server
- HKEY_LOCAL_MACHINE\SYSTEM\CurrentControlSet\services\SAS [Config-Lev1] Object Spawner
- HKEY_LOCAL_MACHINE\SYSTEM\CurrentControlSet\services\SAS [Config-Lev1] Remote Services
- HKEY_LOCAL_MACHINE\SYSTEM\CurrentControlSet\services\SAS [Config-Lev1] SASApp - OLAP Server
- HKEY_LOCAL_MACHINE\SYSTEM\CurrentControlSet\services\SAS [Config-Lev1] SASMeta - Metadata Server
- HKEY_LOCAL_MACHINE\SYSTEM\CurrentControlSet\services\SAS [Config-Lev1] Share Server
- Delete any remaining SAS shortcuts from the Start menu. To do this, right-click the SAS shortcut and select Delete. Click Yes to confirm.
For more details about the Graphical User Interface Uninstall Tool, see the "SAS Deployment Wizard and SAS Deployment Manager 9.3: User's Guide."
Operating System and Release Information
| Product Family | Product | System | Product Release | SAS Release | ||
| Reported | Fixed* | Reported | Fixed* | |||
| SAS System | Base SAS | Microsoft® Windows® for x64 | 9.3 | 9.3 TS1M0 | ||
| Microsoft Windows Server 2003 Datacenter Edition | 9.3 | 9.3 TS1M0 | ||||
| Microsoft Windows Server 2003 Enterprise Edition | 9.3 | 9.3 TS1M0 | ||||
| Microsoft Windows Server 2003 Standard Edition | 9.3 | 9.3 TS1M0 | ||||
| Microsoft Windows Server 2003 for x64 | 9.3 | 9.3 TS1M0 | ||||
| Microsoft Windows Server 2008 | 9.3 | 9.3 TS1M0 | ||||
| Microsoft Windows Server 2008 for x64 | 9.3 | 9.3 TS1M0 | ||||
| Microsoft Windows XP Professional | 9.3 | 9.3 TS1M0 | ||||
| Windows 7 Enterprise 32 bit | 9.3 | 9.3 TS1M0 | ||||
| Windows 7 Enterprise x64 | 9.3 | 9.3 TS1M0 | ||||
| Windows 7 Home Premium 32 bit | 9.3 | 9.3 TS1M0 | ||||
| Windows 7 Home Premium x64 | 9.3 | 9.3 TS1M0 | ||||
| Windows 7 Professional 32 bit | 9.3 | 9.3 TS1M0 | ||||
| Windows 7 Professional x64 | 9.3 | 9.3 TS1M0 | ||||
| Windows 7 Ultimate 32 bit | 9.3 | 9.3 TS1M0 | ||||
| Windows 7 Ultimate x64 | 9.3 | 9.3 TS1M0 | ||||
| Windows Vista | 9.3 | 9.3 TS1M0 | ||||
| Windows Vista for x64 | 9.3 | 9.3 TS1M0 | ||||
| Type: | Installation Note |
| Priority: | high |
| Date Modified: | 2012-01-30 20:49:20 |
| Date Created: | 2011-09-21 15:59:47 |