You are here: Folders Riser Bar>Maintaining Profiles>Excluding Records from a Table Included in a Profile

DataFlux Data Management Studio 2.7: User Guide

Excluding Records from a Table Included in a Profile

Overview

You can create a filtered table that would filter all records in a table that have a particular value in a field. For example, the DataFlux Sample connection includes a table called NC_Customer. You could create a filtered table that selects all records in the NC_Customer table where the City field contains a value of "Raleigh." Perform the following tasks:

Create a Filtered Table

You can create a filtered table based on a rule or on an SQL query. Perform the following steps to create a filtered table that is based on a rule:

  1. Open a profile and click the Properties tab.
  2. Expand the connection in the connection tree that contains the table that you want to filter. For example, you could expand the DataFlux Sample connection.
  3. Right-click the table that you want to filter, such as NC_Customer. Click New Filtered Table.
  4. Enter a name for the filter, such as Raleigh_Customer_Filter. Skip the SQL Query field.
  5. Click OK to access the Filter on Table dialog. This filter for this example is designed to filter out all rows that do not contain Raleigh or another city that contains the text string ral* from the output. The following display shows a sample filter configuration:

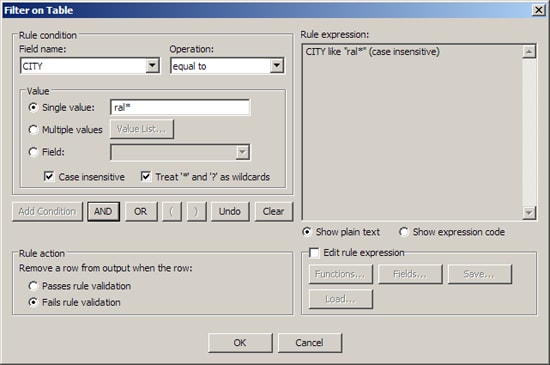
    Note that the filter is set on the CITY field. It looks for values equal to the text string ral*. Options are set to support the case-insensitive string and its wildcard. Also, note that any rows that fail the filter validation are removed from the output.

  6. Click Add Condition.
  7. Click OK to save the filter settings. The new filtered table will appear in the tree with the other tables in a connection. You can now use the filtered table as the input for analysis in your data profile.

Edit the Expression in a Filtered Table

You can edit a filtered table if necessary. Perform the following steps:

  1. Right-click the filtered table in the tables tree in the Properties tab and click Edit. The Filter on Table dialog opens in an edit mode.
  2. Click the Edit rule expression check box.
  3. Edit the filter manually in the Rule expression field.
  4. Click OK to save the edited filter.

You can also delete the original deleted filter table and use the Filter on Table dialog to create a new filtered table. This approach enables you to use the filtering expression tools in the dialog to create the table. In many cases, using this interface can be easier than manually editing the filter text.

Documentation Feedback: yourturn@sas.com
Note: Always include the Doc ID when providing documentation feedback.

Doc ID: dfU_T_ProfileFiltered.html