Creating a Rule that Compares Two Fields
Overview
You can create a business rule that compares the values of two numeric fields in a profile or data job. For example, you could create a rule that compared the value in the Profits per Employee field to the value in the Assets field for each row in a table. You could associate a task with the rule so that rows in which the value of Profits per Employee is less than Assets would be logged to a SAS repository.
To create a rule, perform the following steps:
- Plan the New Rule
- Add Aliases for Fields That Will Be Specified in the Rule
- Create a Rule That Compares Two Fields
- Create a New Task and Associate it With the Rule
- Apply the Rule
Plan the New Rule
Before you create a new rule, consider the following questions:
Q: Why do you want to create this rule? What is the business purpose for this rule? A: This rule will be one of a set of rules that measure profit. For data monitoring purposes, it will be part of a dimension called Profit, in a dashboard called Fiscal. For more information about this scenario, see Example: Using Rules to Monitor Finances.
Q: What do you want the rule to do? A: Identify all records in a table where the profits per employee are less than the assets. Log these records to a SAS repository.
Q: What fields will you specify in this rule? A: The Assets field and Profit Per Employee field are required by the rule. An ID field (key field) could be used to identify the rows that trigger an exception in the log.
Q: What expression is needed for his rule? A: Something like: Profit Per Employee is less than Assets.
Q: Should the rule act on each row in a table; on all values in the field, or on a group of related values in a field? A: Each row in a table.
Add Aliases for Fields That Will Be Specified in the Rule
A business rule specifies one or more fields. Rather than specify a particular field in a physical table, the Business Rule Manager enables you to specify an alias for the kind of fields that are specified in the rule. Later, when you apply the rule to a particular table in a profile or data job, you will map the field aliases to fields in a physical table.
In the current example, you would create an alias for a Profit Per Employee field and an Assets field. If you have not done so already, you would also specify an alias for a key field, such as ID. Key field aliases are useful if you specify output for a rule.
- From the Folders tree in the main DataFlux Data Management Studio window, select Tools > Business Rule Manager > repository_name from the main menu. The Business Rules Manager will display.
- Expand the Fields folder on the left and check to see that the fields you need for the current rule have not already been added. For this example, assume that none of the fields that you need have been created.
- Right-click the Fields folder and select New Field. The New Field dialog displays.
- Enter a name for the field, such as Profit Per Employee. Then enter a description for the field, such as "Similar to profit/emp field in CompanyNumeric table." Click OK. The new field alias is added to the Fields folder.
- Repeat for other fields that will be specified by the new rule, such as Assets and ID.
You now have aliases for all fields will be specified by this rule. You are ready to create the rule.
Create a Rule That Compares Two Fields
- Display the Business Rule Manager if it is not already displayed. From the Folders tree, select Tools > Business Rule Manager > repository_name from the main menu.
- Right-click the Rules folder and select New Rule. The New Rule dialog displays. For the current example, you would specify the following values in this dialog:
Name for the rule: ProfitEmp_LessThan_Assets
Type of rule: Row - You are prompted to click the Builder button to add a check (a SAS expression) to the new rule. Click Builder. The Expression Builder displays.
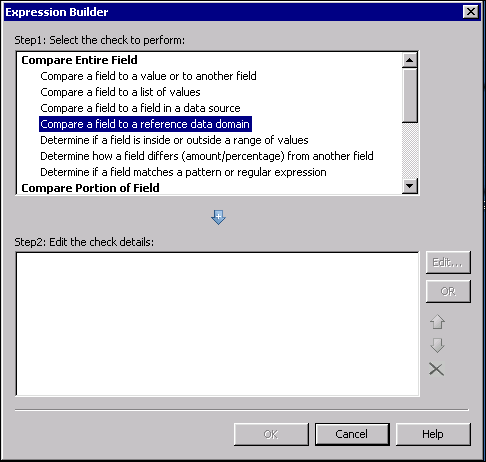
- For the current example, you would double-click the item Compare a field to a value or to another field. A template for that kind of expression will be added to the lower pane of the dialog.
- Double-click the expression template that was just added to the lower pane of the dialog. The Compare to Value or Field dialog displays.
- For the current example, you would specify the following value in the Compare to Value or Field dialog:
Field: Profit Per Employee
Operator: less than
Field: Assets
After entering the values above, the Compare to Value or Field dialog would look similar to the following display.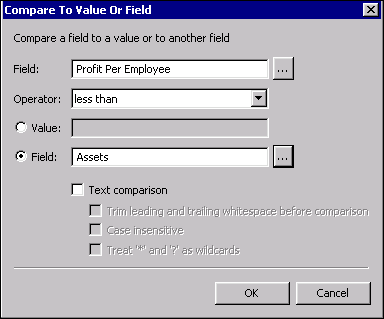
- In the New Rule dialog, click the Fields tab. The next display shows what this tab might look like.
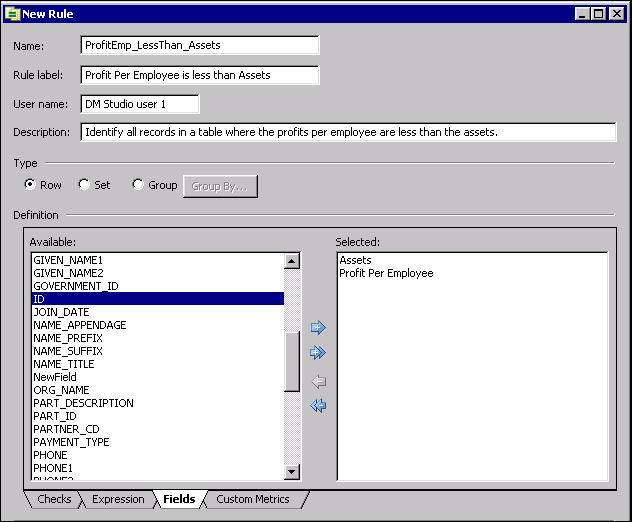
- For the current example, select the ID field, and then click the right arrow to move this field to the Selected pane. Then click OK. The New Rule dialog closes. The Business Rule Manager displays.
The new rule will be selected in the tree on the left, and information about the new rule will be displayed on the right. For example, the information for the ProfitEmp_LessThan_Assets rule would look similar to the next display.
When you are satisfied with the Compare to Value or Field dialog, click OK. The Expression Builder displays. Click OK again. The New Rule dialog displays.
You have created the check for the rule. The next step is to verify that you have specified aliases for all fields that are used in the expression and for any additional fields (such as ID) that will be used to write output from the rule.
In the previous display, the Available pane lists the field aliases that have been defined in the current repository and are available for use in the current rule. The ID field is among the fields that are available for use in this rule. The Selected pane lists any fields that have already been selected and are part of the current rule. Fields that are specified in the expression, such as the Assets field and Profit Per Employee field, are automatically moved to the Selected pane.
You have specified the check for the rule and the fields for the rule. If the rule will be specified in an Execute Business Rule node, see Using the Execute Business Rule Node. If the rule will be used in a profile or a data monitoring job, then you must specify some events for the rule, as described in the next section.
Create a New Task and Associate it With the Rule
A task specifies one or more rules and one or more events that can be triggered based on the results that are returned by a rule. For the current example, assume that you want to create a new task that will log the result of a rule to a SAS repository.
- In the Business Rules Manager, right-click the Tasks folder and select New Task. The New Task dialog displays.
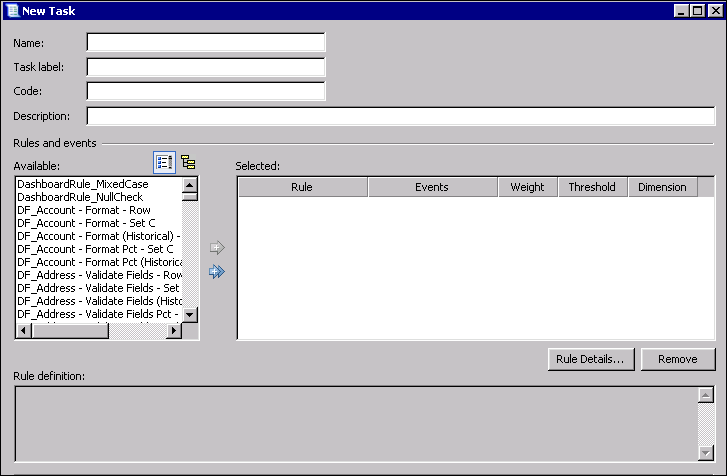
- Enter a Name for the task, such as Fiscal_Profit_Log_to_Repos.
- Enter a label for the task, such as "Log Fiscal Profit checks to repository."
- Skip the Code field; an identification code will be generated when you save the task.
- The Available pane on the left lists any rules that have been defined in the current repository. Select one or more rules that you want to associate with the current task, and then click the right arrow to move the rules to the Selected pane. For the current example, you would move the ProfitEmp_LessThan_Assets rule to the Selected pane. This associates the task with the rule.
- Double-click a selected rule. The Rule Details dialog displays, as shown in the next figure.
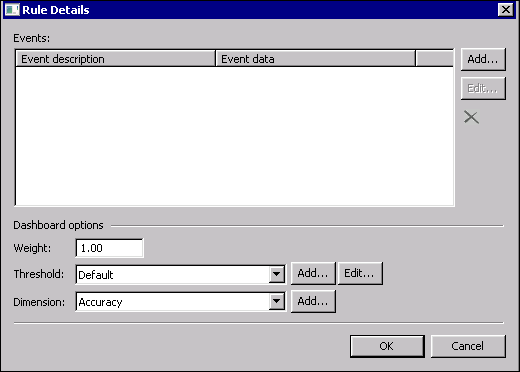
- To add an event to the rule, click Add at upper right. The Select Events dialog displays.
- Select an event, such as Log error to repository, and then click Continue. For a description of the events, see Overview of Monitoring Events.
- After you click Continue, a properties dialog for that event displays. For the current example, the Log Error to Repository Event Properties dialog displays. The next display shows an example of this dialog.
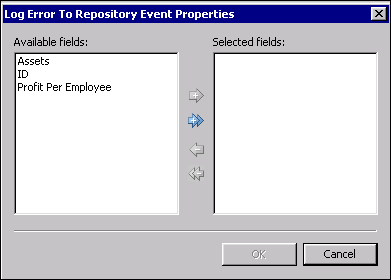
- For the current example, you would select the fields that should be included in the log when records meet the criteria specified in the rule. Then you would click the right arrow to move the fields into the Selected fields column. You would select the same fields that were specified in the rule's expression (Assets and Profits Per Employee). You would also select the ID field, which is a key field that will help you identify which records triggered exceptions in the log.
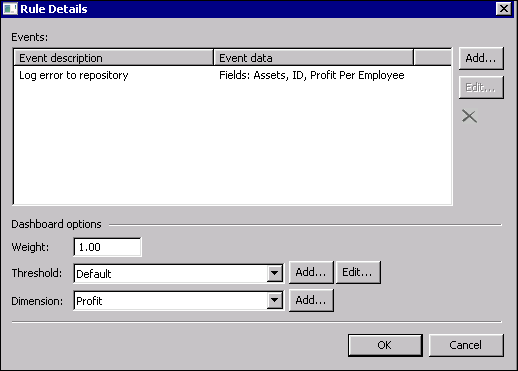
- After you specified properties for the event, click OK. You will return to the Rule Details dialog. The next task is to specify Dashboard options for the rule, such as Weight, Threshold, and Dimension.
Dashboard options are used for data monitoring purposes. For the current example, as described in Plan the New Rule, this rule will be part of a dimension called Profit. If the Profit dimension does not exist, you could click the Add button to add it now. Typically you would not add a dimension unless it was part of a data monitoring plan.
At this point, you may or may not know what values you want to specify for Weight or Threshold. You might want to see the impact of the defaults in these fields in a data monitoring display, and then adjust them later if necessary. Weight is a number that can be used to increase or decrease the impact of a rule on an exception score. A Threshold is used to classify the status of an exception score. For example, you could have three thresholds, Low, Medium, and High, that would add meaning to certain ranges of values. - For the current example, you would select the Profit dimension for the rule. As a result of the updates that were described above, the Rule Details dialog would look like the following display.
- Click OK to save the Rule Details. The New Task dialog displays.
- Click OK to save the new task.
You have created a new task and associated that task with the desired rule (ProfitEmp_LessThan_Assets). You are now ready to use the rule in a profile or data job.
Apply the Rule
For information about using the example rule in a profile, see Apply Business Rules. For information about using this rule in a data monitoring job, see Creating a Data Monitoring Job. For information about using this rule in a data job that is not used for data monitoring, see Using the Execute Business Rule Node.