SAS® AppDev Studio™ 3.0 Developer's Site
Testing Applets With RSA Signing
Deploying [RSA] signed applets normally requires purchasing a certificate from a well-known Certificate Authority (CA). This document describes how to test RSA applet signing on a development machine, without (prior to) purchasing a commercial certificate. Another paper contains more general information on RSA-Signing Applets.
Note: This document assumes Java 1.4 (and was written with Java 1.4.2 tools in mind), but should apply to Java 1.3.0_01 and later
The RSA signing approach uses a third party to validate a signer's identity. The need to pre-configure a browser to accept a particular signature is avoided by requesting the user to choose at runtime whether or not to grant a signed applet extra privileges. This choice is presented only if a known third party can confirm the signer's identity. Thus, deploying an RSA-signed applet typically requires the purchase of a certificate from a well-known certificate authority (CA), such as VeriSign or Thawte. The certificate is used during the signing process and allows a browser to verify that, according to the CA, the signer is whom they claim to be. It is then possible for the user to make a decision to trust the applet code based on their trust of the signer (a person or organization).
For the developer who wishes to use RSA signing, this may present a problem. They might not have a suitable certificate, and obtaining one takes time. Or they might not be ready to incur the expense, or simply might not have chosen a particular CA to purchase from. Even if a company certificate is available, access to it may be restricted, making its use impractical for iterative testing. It would also be unwise to use your company's signature (and thereby its reputation) on test code!
A Test Certificate
The normal preparation for RSA signing is as follows:
- Generate a key pair.
- Generate a certificate request file which is sent to the CA. The CA will verify your identity and issue you a certificate.
- Import the certificate.
- Sign things.
Our procedure for testing is as follows:
- Generate a testing key pair
- Export a self-signed certificate.
- On test machines, import the test certificate into the Java Plugin's trusted certificates list
- Sign things.
An Example
As an example, here is a small applet which attempts to display system properties (something applets normally have restricted access to) : PropsApplet.java. We'll be testing it with this HTML source code, which launches PropsApplet using the Java Plug-in. The files used in this example may be downloaded here: RsaTestingExample.zip.
Compile it.
javac -g PropsApplet.java
Jar it.
jar -cvf PropsApplet.jar PropsApplet*.class
Copy the jar and HTML somewhere on your Web server and run it. You can try it by running PropsApplet.html example file.
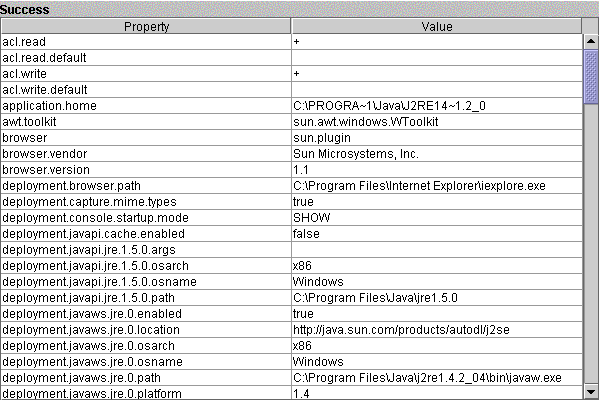
The applet reports that it encountered a SecurityException, and the table is empty.
Signing the example
keytool is a utility included with the Java 2 development kit for managing a database of signing information called a keystore. The default keystore is a file named .keystore in your home directory. You may want to store your testing key in a different keystore file. This is shown in the example, but is not required.
Warning: Like a signet ring or an official seal, the signing information in a keystore allows jars to be signed as a particular person or corporate identity. Even though the keystore itself is encrypted, giving someone access to a keystore file may allow them to eventually access its contents and sign things as any signing identity it contains.
Step 1: Generating a Key Pair
We specifically want to generate an RSA key pair. Use keytool's -genkey command to create a key pair. The public key in a key pair is always associated with a certificate. When a key pair is first created, keytool prompts you for identifying information and then creates a self-signed certificate for the key pair. The self-signed certificate contains the identifying information you entered, encrypted using the private key of the key pair. See RSA-Signing Applets and the documentation on keytool for more information. The alias is a short name for referring to the key pair and certificate. We'll use the alias "rsatest".
keytool -genkey -keyalg RSA -keystore test_store -alias rsatest
keytool will prompt you for a password to encrypt the new keystore with. Using the jdk tools, a keystore always has a password. Each key pair within the keystore can optionally have a password of its own.
After entering a password, keytool will prompt you for the following information, which together makes an X.509 certificate or identity:
- First and last name
- Name of your organizational unit
- Name of your organization
- Your city or locality
- Your state or province
- A two-letter country code
You might leave some items blank. If we planned to use this key pair publicly, the identifying information would be verified by the CA and would need to be legally accurate. Since we just want to test RSA signing on a single development machine, this doesn't matter as much. Note that this identity information is displayed by the Java Plug-in to the user when querying whether a signed applet should be given extra privileges. You will want to enter enough information to easily pick the testing certificate out of a list of certificates when you wish to delete it from your browser.
For this test, enter the following: RSA Testing Certificate as the name and testing as the organizational unit, leaving all other entries blank.
keytool now prompts you for the optional password for the key pair itself. Hitting return will default the key pair password to be the same as the keystore password. We'll use the default to save some typing, so just hit return.
keytool now creates the key pair in the keystore file, creating the keystore if necessary.
Note: By default new key pairs expire in 90 days. To create a key
pair that is valid for a longer duration, use the -validity <number of
days> option on the keytool command line.
Step 2: Exporting a Self-Signed Certificate
In order for our applet to be trust-able, it must be signed using a certificate chain which ends with a known and trusted certificate. For testing purposes, we will import a self-signed certificate (a chain with only one entry) directly into a browser (or the Plug-in) as a trusted certificate. In order to do that, we need a certificate file.
Recall that keytool automatically generates a self-signed certificate during key pair creation. keytool's export command can output to a file whatever certificate (or certificate chain) is associated with a public key.
keytool -export -alias rsatest -file rsatest.cer -keystore test_store
Your browser may more easily recognize the format of the certificate file if it is named with the .cer extension.
Step 3: Importing the Certificate into the Java Plug-in
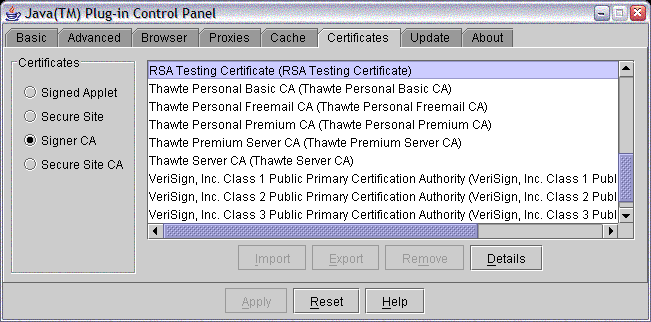
Run the Java Plug-in Control Panel. On Windows machines, it appears in the regular control panel list. The certificates tab allows one to import certificates. Import the certificate as a "Signed Applet" certificate.

The "Signed Applet" list is where the Plug-in records which signed applet certificates you've chosen "grant always" for. Importing the certificate into this list means that applets signed with the test certificate will automatically be trusted (without displaying any dialogs). If you wish to see the trust dialog similar to what might be normally displayed for regular certificates, you will need to use keytool to import the certificate into the JRE's cacerts file instead of using the Plug-in Control panel to import the certificate.
The cacerts file stores certificates (which include the public keys) for known and trusted Certificate Authorities. The default location for this file is <jre location>/lib/security/cacerts. According to the keytool documentation, the default keystore password for the cacerts file is "changeit". While the documentation recommends that system administrators change the access rights and the password for the cacerts file, this password will probably work on developer or testing machines.
On win32 machines the location of the cacerts file is usually C:\Program Files\Java\j2re<version>\lib\security\cacerts. The following command, run in the directory containing the cacerts file, will import our test certificate as a trusted CA certificate.
keytool -import -alias rsatest -file <path>rsatest.cer -keystore cacerts
Note: if your machine has the Java development kit installed, you may have two cacerts files -- one for the jdk (which contains a JRE) and one for the Plug-in JRE. It is the Plug-in cacerts file which must be updated.
After importing the certificate, its presence in the cacerts file can be verified from the Plug-in control panel.
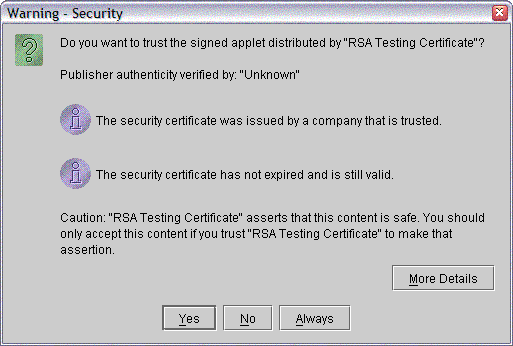
When the test certificate is imported into the cacerts file (and is not in the Plug-in's "Signed Applet" list), the Plug-in will display the following trust dialog when running the applet.
Step 4: Signing the Example Applet
Now that the browser (or Plug-in) knows about the test certificate, we can use things signed by the test identity. When running an RSA-signed applet, the Java Plug-in reads the certificate chain contained in the signed jar. If the last certificate in the chain is (or is issued by) a trusted certificate in the cacerts file, the Java Plug-in will present the user with the choice of running the applet as a signed applet with privileges. If anything goes wrong (or the user so chooses), the applet will run as a normal applet.
jarsigner is Sun Microsystem's tool for signing jars. To sign our applet jar, PropsApplet.jar, we can now use the following command line:
jarsigner -keystore test_store PropsApplet.jar rsatest
If you don't want to overwrite the unsigned jar, you can use jarsigner's -signedjar
<name for signed jar> option.
Copy this version of PropsApplet.jar to your Web server and run the applet. (You may need to clear your browser's cache.) If you are using the example files, you can import the rsatest.cer file into your browser and try the signed version by running PropsAppletSigned.html.
When run with privileges, the PropsApplet displays the Java system properties: