SAS® AppDev Studio™ 3.0 Developer's Site
| DataBeanForm: Using the DataBean Wizard |
|
|
Data Source: Other (Data is embedded within the example)
Customizations:
- Change the page amount of the navigation bar page scrollers
- Make the DataBean editable
- Change the DataBeanForm navigation bar
- Add a validator to a DataBeanForm form element
- Add a display transform to a DataBeanForm form element
Please install the latest webAF template updates prior to building this example. For more information about the server-side example templates used by this example, see Web Application Example Templates and Built-in Web Application Templates and Options.
The following example is not meant to be a complete Web application, rather it is to show how to use a particular component(s). The example does not address the issue of immediately freeing up resources when the user navigates off the Web application or closes the Web browser. Any necessary resources created in the example will stay around until the associated HTTPSession times out. If this example is used in a multi-user environment, it is possible to exhaust the available resources until HTTPSessions time out and free up their associated resources.
Step 1: Create a project in webAF
- Create a new project named
DataBeanForm. - Select Web Application from the webAF Projects list.
- Accept the defaults as you go through the Web App wizard until you have reached step #3 of the wizard. Select the SAS Taglib and TBeans (Version 2) option in the Options list. Leave the SAS Runtime Classes and SAS Taglib and TBeans (Version 3) selected. Proceed to step #4 of the wizard. At this step you will need to select Examples in the radio box titled Display list for. Choose Model 2 Servlet from the list box titled Type of initial content.
- Continue accepting defaults as you complete the Web App wizard.
Step 2: Set up access to the data source
Create a databean using the DataBean Wizard
The DataBean Wizard generates a databean that contains a property for each column in the data set and enables users to access the data on a row-by-row basis. In this example, the databean will be used to scroll through the rows of the data source when it is used as a model for the DataBeanForm.
- Follow these steps to create a databean that accesses the sashelp.prdsale
data:
- Start the IOM Spawner by selecting Start Menu
![[arrow]](../images/arrow.gif) SAS AppDev Studio
Services
SAS V9.1
Start SAS V9.1 IOM Spawner.
SAS AppDev Studio
Services
SAS V9.1
Start SAS V9.1 IOM Spawner. - Start the DataBean Wizard by selecting Tools
Wizards
DataBean Wizard from the webAF menu bar.
- Wizard Step 1: Leave the default JDBC data source selected and click Next.
- Wizard Step 2: Select the SAS IOM JDBC driver.
Enter
select * from sashelp.prdsalefor the query statement and click Next. - Accept the defaults for Steps 3 and 4. On Step 5 enter
databeans.PrdsaleDataBeanas the class name and click Next. - Accept the defaults for Step 6, and click Finish for Step 7.
- Start the IOM Spawner by selecting Start Menu
- Add the following import statements to the Model2ExampleControllerServlet.java source
file:
import com.sas.actionprovider.HttpActionProvider;
import com.sas.storage.jdbc.JDBCConnection;
import databeans.PrdsaleDataBean;
- Replace the code in the doGet method with the following code to create
instances of the ActionProvider, the JDBCConnection, and the PrdsaleDataBean
in the Model2ExampleControllerServlet.java source file:
// Note: Add User DO_GET code here
HttpSession session = request.getSession();

// Setup the ActionProvider
HttpActionProvider actionProvider = null;
synchronized (session)
{
   if (session != null)
   {
      actionProvider = (HttpActionProvider)session.getAttribute("actionProvider");
   }
   //if ActionProvider is null, create one and put it on the session
   if (actionProvider == null)
   {
      actionProvider = new com.sas.actionprovider.HttpActionProvider();
      actionProvider.setLocale(request.getLocale());
      actionProvider.setControllerURL(request.getContextPath() + "/Model2Example");
      actionProvider.setName("actionProvider");
      // store object in its scope
      if (session != null)
      {
         session.setAttribute("actionProvider", actionProvider);
      }
   }
   //else execute the ActionProvider command
   else
   {
      actionProvider.executeCommand(request, response, response.getWriter());
   }
}

synchronized (session)
{
   try
   {
      //Setup the JDBC connection
      JDBCConnection sas_JDBCConnection = null;
      PrdsaleDataBean dataBean = null;
      if (session != null)
      {
         sas_JDBCConnection = (JDBCConnection)session.getAttribute("sas_JDBCConnection");
         dataBean = (PrdsaleDataBean)session.getAttribute("dataBean");
      }
      if (sas_JDBCConnection == null)
      {
         sas_JDBCConnection = new JDBCConnection();
         sas_JDBCConnection.setDriverName("com.sas.rio.MVADriver");
         sas_JDBCConnection.setDatabaseURL("jdbc:sasiom://localhost:5310");
         session.setAttribute("sas_JDBCConnection", sas_JDBCConnection);
      }
      //Setup the DataBean
      if (dataBean == null)
      {
         dataBean = new PrdsaleDataBean();
         dataBean.setDataSource(sas_JDBCConnection);
         session.setAttribute("dataBean", dataBean);
      }
   }
   catch(Exception e)
   {
       throw new RuntimeException(e);
   }
}

RequestDispatcher rd = getServletContext().getRequestDispatcher("/Model2ExampleViewer.jsp");
rd.forward(request, response);
Step 3: Add components to the JSP file
- Add the following imports to the Model2ExampleViewer.jsp file, just below
the taglib directives:
<%@page import="com.sas.servlet.tbeans.util.validators.NumericInputValidator" %>
<%@page import="com.sas.util.transforms.BaseFormatTransform" %>
<%@page import="com.sas.util.transforms.FormatTransform" %>
<%@page import="com.sas.servlet.tbeans.navigationbar.html.NavigationBarEditingElement" %>
<%@page import="com.sas.servlet.tbeans.navigationbar.html.NavigationBarRowScrollingElement" %>
- Add the title between the <head> tags of the Model2ExampleViewer.jsp
page as shown below:
<head>
  <link href="styles/sasComponents.css" rel="STYLESHEET" type="text/css">
	<title>Product Sales Data</title>
</head>
- Add the code shown below between the <body> html tags in the Model2ExampleViewer.jsp
file. Note that the <sas:TextEntry> tags contained within the
<sasads:DataBeanForm>
tag have their name attribute set to the PrdsaleDataBean
property of which they are going to display row values.
<Center><B>Product Sales Data</B>
<hr>
<sasads:DataBeanForm id="dataBeanForm1" name="myForm"
model="dataBean" actionProvider="actionProvider">
<tr>
        <td>Division:</td>
        <td><sas:TextEntry name="division"/></td>
    </tr>
    <tr>
        <td>Product Type:</td>
        <td><sas:TextEntry name="prodtype" /></td>
    </tr>
    <tr>
        <td>Product:</td>
        <td><sas:TextEntry name="product"/></td>
    </tr>
    <tr>
        <td>Year:</td>
        <td><sas:TextEntry name="year"/></td>
    </tr>
    <tr>
        <td>Predicted Sales:</td>
        <td><sas:TextEntry name="predict"/>
      </td>
    </tr>
    <tr>
        <td>Actual Sales:</td>
        <td><sas:TextEntry name="actual"/>
       </td>
   </tr>
</sasads:DataBeanForm>
</Center>
(Optional) At this point you can finish the project and run the example to view a DataBeanForm that enables you to scroll through the rows of data in the sashelp.prdsale data set.
- Start your Web server by selecting
Tools
Services
Start Java Web Server from the webAF menu bar.
- Start the project by selecting
Build
Execute. The image below shows how the example will display in your browser
when you run it:
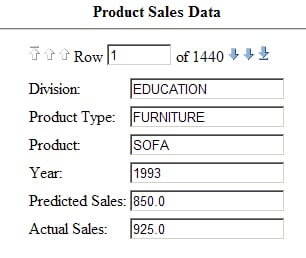
Continue on to see other customizations you can do with the DataBeanForm.
Customization: Change the page amount of the navigation bar page scrollers
By default the navigation bar displays three sets of buttons for navigating. The first and last buttons take you to first or last row in the data. The next/previous buttons move one record forward or backward. The page forward/backward buttons move either forward or backward a specified amount of rows. This amount is the page amount, and the default amount is 10.
The page amount can be changed by modifying the pageSize property of the PrdsaleDataBean. Add the following line of code to the doGet method after the dataBean has been created to set the page size to 50 rows:
dataBean.setPageSize(50);
Customization: Make the DataBean editable
Note: The available editing functionality depends on your
JDBC driver requirements for producing updatable ResultSets. In SAS 9.1,
the IOM JDBC driver (MVADriver) requires a query statement that is of the
form "select * from lib.table", where
lib is your library and
table is your data set to create a ResultSet that can be updated via the
DataBean. Other drivers might have different requirements for producing
editable ResultSets. Refer to your JDBC driver documentation for details.
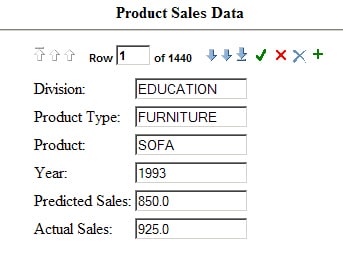
Modify the PrdsaleDataBean's resultSetConcurrency property to make the databean editable. Add the following line of code to the doGet method after the dataBean has been created:
dataBean.setResultSetConcurrency(java.sql.ResultSet.CONCUR_UPDATABLE);
When the above change is added, the DataBeanForm navigation bar will have edit controls as shown below. This enables you to modify values, as well as to insert and delete rows.
Customization: Change the DataBeanForm navigation bar
The code below shows you how to remove the insert, delete, and row paging buttons from the DataBeanForm's navigation bar.
Replace the following portion of the <sasads:DataBeanForm> tag in the Model2ExampleViewer.jsp page:
<sasads:DataBeanForm id="dataBeanForm1" name="myForm" model="dataBean" actionProvider="actionProvider">
with the code shown below:
<sasads:DataBeanForm id="dataBeanForm1" name="myForm" model="dataBean" actionProvider="actionProvider"
 render="false" />

<%
  //Get the editing element from the DataBeanForm navigation bar
   NavigationBarEditingElement editElement =
   (NavigationBarEditingElement)dataBeanForm1.getNavigationBar().getComponent("NAVIGATIONBAR_EDIT_ELEMENT");
   //Hide the insert and delete buttons
   editElement.setInsertVisible(false);
   editElement.setDeleteVisible(false);

  //Get the scrolling element from the DataBeanForm navigation bar
  NavigationBarRowScrollingElement scrollingElement =
  (NavigationBarRowScrollingElement)dataBeanForm1.getNavigationBar().getComponent("NAVIGATIONBAR_ROW_ELEMENT");
  //Hide the page scrolling buttons
  scrollingElement.setPageBackwardVisible(false);
  scrollingElement.setPageForwardVisible(false);
%>


<sasads:DataBeanForm ref="dataBeanForm1" render="true" >
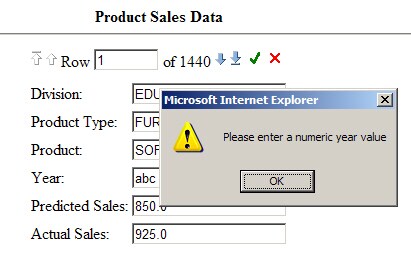
Customization: Add a validator to a DataBeanForm form element
In this customization, a numeric validator is set on the year TextEntry. This causes a message to be displayed when a user enters a non-numeric value into the year text field, as shown in the image below. The validation is performed when the DataBeanForm navigation bar is used, such as by clicking on one of the navigation bar scroll buttons.
- Place the following code above the <sasads:DataBeanForm> tag in
the Model2ExampleViewer.jsp file:
<sas:TextEntry id="yearValue" render="false"/> <% NumericInputValidator validator = new NumericInputValidator(); validator.setValidationMessage(new com.sas.text.Message("Please enter a numeric year value")); yearValue.setValidator(validator); %> - Replace the year <sas:TextEntry> tag contained within the <sasads:DataBeanForm>
tag with the following:
<td><sas:TextEntry ref="yearValue" name="year" render="true"/>
  <% dataBeanForm1.addComponent(yearValue); //add to form for validation %>
</td>
- Set the validationEnabled property on the <DataBeanForm> tag to true.
This property should be set on the first <DataBeanForm> tag found in the
Model2ExampleViewer.jsp. This is the <DataBeanForm> tag that has the render
property set to false. Modify this <DataBeanForm> tag to
include
validationEnabled="true"as shown below:sasads:DataBeanForm id="dataBeanForm1" name="myForm" model="dataBean" actionProvider="actionProvider" validationEnabled="true" render="false" />
Customization: Add a display transform to a DataBeanForm form element
The code below shows you how to add a transform to the actual sales value TextEntry form element used in the DataBeanForm. The transform used in this example will display the actual sales values with a dollar sign.
- Add the following code above the <sasads:DataBeanForm> tag in the
Model2ExampleViewer.jsp file:
<sas:TextEntry id="actualValue" render="false"/> <% BaseFormatTransform transform = new FormatTransform(); transform.setSASFormat("dollar12.2"); actualValue.setInputTransform(transform); %> - Replace the <sas:TextEntry> tag for the dataBean "actual" property
contained within the <sasads:DataBeanForm> tag with the following:
<td><sas:TextEntry ref="actualValue" name="actual" render="true"/></td>
Reviewing all of the customizations
The following code is what the Model2ExampleViewer.jsp file should look like with all of the customizations in this example applied:
<%@ taglib uri="http://www.sas.com/taglib/sas" prefix="sas" %>
<%@ taglib uri="http://www.sas.com/taglib/sasads" prefix="sasads" %>
<%@ page pageEncoding="UTF-8"%>

<%@page import="com.sas.servlet.tbeans.util.validators.NumericInputValidator" %>
<%@page import="com.sas.util.transforms.BaseFormatTransform" %>
<%@page import="com.sas.util.transforms.FormatTransform" %>
<%@page import="com.sas.servlet.tbeans.navigationbar.html.NavigationBarEditingElement" %>
<%@page import="com.sas.servlet.tbeans.navigationbar.html.NavigationBarRowScrollingElement" %>

<html>
<head>
<link href="styles/sasComponents.css" rel="STYLESHEET" type="text/css">
<title>Product Sales Data</title>
</head>

<body>
<Center><B>Product Sales Data</B>
<hr>

<sas:TextEntry id="yearValue" render="false"/>
<%
   NumericInputValidator validator =
      new com.sas.servlet.tbeans.util.validators.NumericInputValidator();
   validator.setValidationMessage(new com.sas.text.Message(
      "Please enter a numeric year value"));
   yearValue.setValidator(validator);
%>

<sas:TextEntry id="actualValue" render="false"/>
<%
   BaseFormatTransform transform = new FormatTransform();
   transform.setSASFormat("dollar12.2");
   actualValue.setInputTransform(transform);
%>

<sasads:DataBeanForm id="dataBeanForm1" name="myForm" model="dataBean"
 actionProvider="actionProvider" validationEnabled="true" render="false" />

<%
  //Get the editing element from the DataBeanForm navigation bar
   NavigationBarEditingElement editElement =
   (NavigationBarEditingElement)dataBeanForm1.getNavigationBar().getComponent(
   "NAVIGATIONBAR_EDIT_ELEMENT");
   //Hide the insert and delete buttons
   editElement.setInsertVisible(false);
   editElement.setDeleteVisible(false);

  //Get the scrolling element from the DataBeanForm navigation bar
  NavigationBarRowScrollingElement scrollingElement =
  (NavigationBarRowScrollingElement)dataBeanForm1.getNavigationBar().getComponent(
  "NAVIGATIONBAR_ROW_ELEMENT");
  //Hide the page scrolling buttons
  scrollingElement.setPageBackwardVisible(false);
  scrollingElement.setPageForwardVisible(false);
%>


<sasads:DataBeanForm ref="dataBeanForm1" render="true" ><tr>
        <td>Division:</td>
        <td><sas:TextEntry name="division"/></td>
    </tr>
    <tr>
        <td>Product Type:</td>
        <td><sas:TextEntry name="prodtype" /></td>
    </tr>
    <tr>
        <td>Product:</td>
        <td><sas:TextEntry name="product"/></td>
    </tr>
    <tr>
        <td>Year:</td>
        <td><sas:TextEntry ref="yearValue" name="year" render="true"/>
            <% dataBeanForm1.addComponent(yearValue); //add to form for validation %>
        </td>
    </tr>
    <tr>
        <td>Predicted Sales:</td>
        <td><sas:TextEntry name="predict"/>
      </td>
    </tr>
    <tr>
        <td>Actual Sales:</td>
        <td><sas:TextEntry ref="actualValue" name="actual" render="true"/>
       </td>
   </tr>
</sasads:DataBeanForm>
</Center>
</body>
</html>