Using Timers
Overview of Timers
Defining Timer-Triggered Actions
There are two ways
to define timer-triggered actions:
-
by defining a timer tool. A timer tool enables you to start or stop a task or workflow based on its position in the template. See Adding Timer Tools to a Workflow and Timer Tool Placement and Execution for more information.
-
by defining a policy that is triggered by a timer. A policy can execute any of the actions described in Policy Actions. To define a policy that starts when a timer fires, define a policy that is triggered by a Timer Expired event. See Policy Events and Timer Expired and Tool Policy Example for more information. Policy-based timers start when the task that contains the timer starts.
Adding Timer Tools to a Workflow
To add a timer to a workflow, click  in the toolbar, and then click in the workflow diagram. SAS Workflow Studio automatically
adds a Timer Tool policy to the associated task in the workflow tree.
in the toolbar, and then click in the workflow diagram. SAS Workflow Studio automatically
adds a Timer Tool policy to the associated task in the workflow tree.
in the toolbar, and then click in the workflow diagram. SAS Workflow Studio automatically
adds a Timer Tool policy to the associated task in the workflow tree.
Note: To define a policy that starts
when a timer fires, define a policy that is triggered by a Timer Expired
event.
Controlling When Timers Start and Stop
Timers start when the task that contains the timer is started or, in the case of stand-alone
timers (Outside a Task (Stand-alone Timer Tools)), when the workflow containing the timer is started.
The timer expression
that you enter in the Timer Settings dialog box controls when the timer fires (stops). You can enter fire times using
Date data objects, relative offsets, or cron expressions. With Date data objects,
the fire times can be defined at run time. You can specify both a Date data object and a relative offset. For the Start
date firing time, you can specify either a positive or
negative offset. For the End date firing
time, you can specify positive offsets. See Specifying Timer Settings (Schedule Expressions) for more information.
All outgoing connections
from a timer are traversed each time the timer fires.
Timer execution varies depending on its placement in the workflow diagram. See Timer Tool Placement and Execution for more information.
Note: Policy-based timers start
when the task that contains the timer starts.
Timer Tool Placement and Execution
Timer Tool on the Border of a Task
A timer tool that is placed on the border of a task stops the task when the timer
fires.
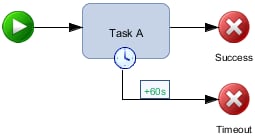
In the following example,
the timer starts when Task A starts. The timer expression is +60s,
which means that the timer is set to fire 60 seconds after it starts.
If Task A completes
before the timer fires, then the timer is stopped, and the transition
to the Success Stop node is traversed. The workflow instance is stopped with a status of Success.
If Task A has not completed
before the timer fires, then Task A is stopped, and the transition
to the Timeout Stop node is traversed. The workflow instance is terminated with a status of Timeout.
Timer Tool inside the Border of a Task
A timer tool that is placed inside the border of a task executes an associated action
while the task remains active.
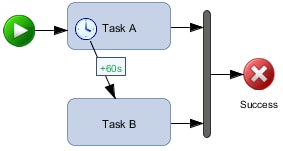
In the following example,
the timer starts when Task A starts. The timer expression is +60s,
which means that the timer is set to fire 60 seconds after it starts.
Task A triggers Task
B 60 seconds after Task A starts. Because the timer is inside the
border of Task A, Task A continues to be active after the timer is
triggered. Therefore, both Task A and Task B are active after the
timer has fired (timer-controlled parallel processing).
Outside a Task (Stand-alone Timer Tools)
A timer tool that is placed outside a task executes an associated action.
All transitions leading
from a stand-alone timer share the same timer interval. You cannot
specify different timer intervals for different transitions from the
timer. If this behavior is desired, then a separate timer is required
for each interval.
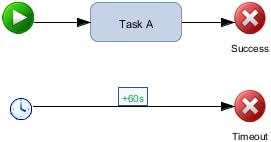
In the following example, the timer is placed in the main workflow, so it starts when
the workflow instance starts. The timer expression is +60s, which means that the timer
is set to fire 60
seconds after it starts.
The timer fires 60 seconds after the workflow instance starts. If Task A has not completed
when the timer fires, then the transition to
the
Timeout Stop node is traversed. The workflow instance to be stopped with a status of Timeout.
If Task A completes
before the timer fires, then the timer is stopped, and the transition
to the Success Stop node is traversed. The workflow instance is stopped with a status of Success.
Specifying Timer Settings (Schedule Expressions)
The settings in the
Start date section of the Timer Settings dialog box are used to specify the initial time at which the timer fires. The time
value can be a Date data object, relative expression, or a cron expression. The End
date settings specify when a
recurring timer stops firing.
To edit a timer’s settings, double-click on the timer element in the workflow diagram.
Alternatively, right-click the Timer Tool policy in the workflow diagram, and select
Edit. For policy-based timers, right-click
on the policy in the workflow tree, and select Edit.
Note: If the schedule expression
has already passed, the timer fires immediately when the associated
task or workflow starts.
|
Timer Setting
|
Description
|
|
|---|---|---|
|
Start Date
Settings
|
||
|
Date
|
Specifies a Date data object for initial date and time at which the timer fires. Click
 to select the data object or to define a new one. to select the data object or to define a new one.
You can also specify a relative offset in addition to Date data object. With Date
data objects, after the timer has started, changes to the data object
do not have any effect. Date data objects are not evaluated until the task or workflow
containing the timer has started.
|
|
|
Time value
|
Specifies a relative time offset for initial time at which the timer fires. The offset
is based on when the task that contains the timer starts. Specify the offset with
either a plus or minus sign
followed by an integer (for example
+30 or –5). A negative offset (minus expression) means that the timer fires earlier than the
value specified in the Date data object in the Date field.
Note: You can enter a negative
offset only if you have specified a Date data object.
|
|
|
Time unit
|
Specifies a time unit
for the offset specified in the Time value field.
Select Seconds, Minutes, Hours, Days,
or Weeks.
|
|
|
Specify
cron expression
|
Specifies a cron expression for initial time at which the timer fires. Relative expressions
are based on when the task that contains the timer starts. Cron expressions are especially
convenient if you
want the timer to expire based on calendar information instead of exact dates or intervals.
See the
org.quartz.CronExpressiondocumentation at http://quartz-scheduler.org/documentation for information about specifying cron expressions. Note: If you specify a cron expression,
all other fields are ignored except for the end date in the Specify
date and/or offset field. The syntax for cron expressions
implicitly supports repeated firings (recurrence) of the timer object.
|
|
|
This event
occurs only one time
|
Specifies that the timer
fires only once.
|
|
|
Recurrence
Settings
|
||
|
Recurrence
interval
|
Is a relative expression
for the time interval between repeated executions. By default, timers
fire only once. Specify an integer (for example
30).
|
|
|
Time unit
|
Specifies a time unit
for the Recurrence interval. Select Seconds, Minutes, Hours, Days,
or Weeks.
|
|
|
End date
|
Specifies when a recurring
timer stops firing.
|
|
|
No end date
|
Repeats until the associated task or subflow stops.
|
|
|
End after
|
Repeats until the specified
the number of occurrences has elapsed.
|
|
|
Specify
date and/or offset
|
Repeats until the associated date or offset occurs (or both). You can specify a Date
data object, a time offset, or both.
|
|
See Timer Examples for examples
of defining timer expressions, including cron syntax.
Copyright © SAS Institute Inc. All Rights Reserved.
Last updated: March 5, 2020