Distributing Reports
Overview of Distributing Reports
If you have the Distribute Reports capability, then you can distribute reports using the designer. Distributing reports automates
the process of delivering updated content to report users. You can distribute reports
once or at recurring intervals, such as daily, multiple times daily, weekly, or monthly.
In addition, distributing reports gives you the ability to create a time event to
generate reports during non-peak hours.
CAUTION:
Use only
the designer to schedule and distribute SAS Visual Analytics reports.
If you try to use the Schedule Manager plug-in to SAS Management Console and set an option that is not available in the designer,
the report job might be incompatible with the designer.
When you distribute
a report, you are considered the report job owner.
Distributing reports
requires two steps. First, you define a report job, which contains a list of one or more reports, a list of one or more recipients,
and an optional e-mail message. Both the report job owner and the recipient must be registered and have e-mail addresses stored in metadata because the report generates using the recipients’ data access rights. Second, you create a distribution,
which contains a report job and a time event. The time event specifies
when and how often the distribution occurs. When a distribution runs,
a history record is created. After you create a distribution, you
can schedule, unschedule, run, delete, and show the history for your
distribution.
Recipients receive an
e-mail message with one or more reports attached as PDF files. The
e-mail message contains a link to the report.
If you distribute a multi-section report that uses multiple data sources, and one
of the data sources is not accessible to a recipient, then a warning message about the non-accessible data source is appended to the PDF.
Tip
The print options that you
save with a report are used when you distribute the report to other
users.
Tip
If you distribute reports
to multiple locales or if you receive distributed reports, then you
can specify your User locale in the global
SAS preferences. For more information about setting global SAS preferences,
see Specifying Your Preferences.Add a New Report Job
To create a new report
job:
-
Select File
 Distribute Reports. The Distribute Reports window
is displayed.
Note: Only your report jobs are displayed in the New Report Job window. If another user has already used the name that you enter for the report job, a warning message is displayed. You must enter a different name for your report job.
Distribute Reports. The Distribute Reports window
is displayed.
Note: Only your report jobs are displayed in the New Report Job window. If another user has already used the name that you enter for the report job, a warning message is displayed. You must enter a different name for your report job. -
Click New Report Job. The New Report Job window is displayed.
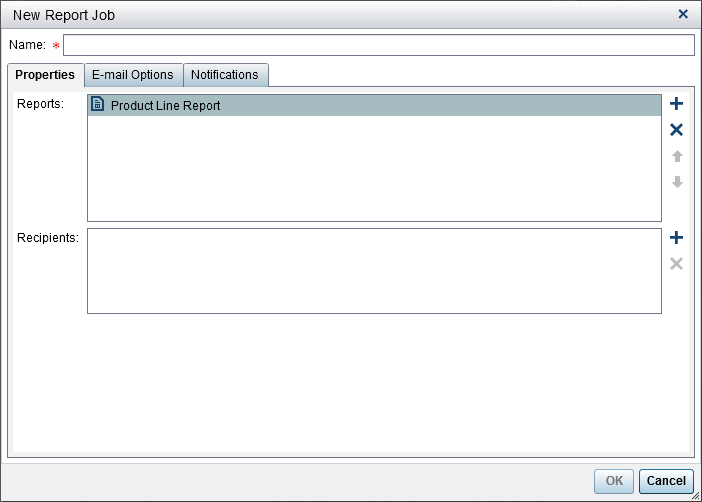
-
Enter a Name. The report job name cannot contain blanks, white space, or these characters:
!
                                    " $ % & ' ( ) * . + , / : ; < = > ? @ [ \ ] ^
                                    ` | ~ -
Note: Report jobs cannot be renamed. -
On the Properties tab:
-
Click
 beside the Reports field.
Select one or more reports from the list that is displayed. When you
select a report, it is added to the Reports list.
TipIf the report that you want is not displayed in the pop-up list, click Select another report, and use the Open window to find the report that you want to distribute.
beside the Reports field.
Select one or more reports from the list that is displayed. When you
select a report, it is added to the Reports list.
TipIf the report that you want is not displayed in the pop-up list, click Select another report, and use the Open window to find the report that you want to distribute. -
Click beside the Recipients field.
The Add Recipients window is displayed. Select
one or more users. Click OK to return to
the New Report Job window.
Note: A user’s e-mail address must be stored in metadata to be displayed on the View All tab in the Add Recipients window.
-
-
On the E-mail Options tab:
-
Enter a Subject for the e-mail message. If you leave this field blank, the name of the first report in the list is used as the subject.
-
(Optional) Enter a Message for the body of the e-mail message.
-
The Show the report job owner in the message option enables you to have your name appear in the e-mail message. Because the mail service cannot display the report job owner’s name in the From field of the e-mail message, this is the only way to inform recipients who created the report job.
-
-
Use the Notifications tab to specify that you want to receive the report job owner notifications. You can select Send e-mail notification when the report job starts, Send e-mail notification when the report job ends, or both.Note: If there is a warning (for example, when a recipient or a report cannot be found), then you automatically receive a notification with the details when the report job ends.
-
Click OK. The report job is displayed in the table in the Distribute Reports window.
Create a Report Distribution
To create a distribution:
-
Select Distributions in the left pane of the Distribute Reports window.
-
Select a report job, and click Schedule. The Schedule window is displayed.
-
Click New to create a time event. The Specify Schedule Details window is displayed.
-
Specify whether the distribution should happen One time only or More than once. By default, a new time event is defined to occur only once at a time that is approximately five minutes later than the time that you opened the Specify Schedule Details window.If you select One time only, then select an Hour and a Minute for the distribution.If you select More than once, then specify the details about when the distribution should occur. The specific fields that are available depend on the recurrence interval (Hourly, Daily, Weekly, Monthly, or Yearly) that you select.
-
If you select Hourly, then the time is calculated from hour zero on a 24-hour clock. For example, if you leave Interval hour set to 1, then the data query runs at hour zero (midnight) and runs each hour.Select an Interval hour, and then select a Starting hour and Minute.The Duration in minutes field is used to specify the maximum number of minutes after the specified time has been reached that the dependency is kept in an open state. This value is used when a report job has multiple dependencies. It specifies a window of time in which distribution remains open so that other time events can be met. If the report job does not have multiple dependencies, then it is recommended to use the default duration of 1 minute.If needed, specify the range of recurrence (the start date and end date for distribution). The default is to start at the current date and to not have an end date.
-
If you select Daily, Weekly, Monthly, or Yearly for More than once, then you can select start times.Here is an example of a Daily recurrence interval.
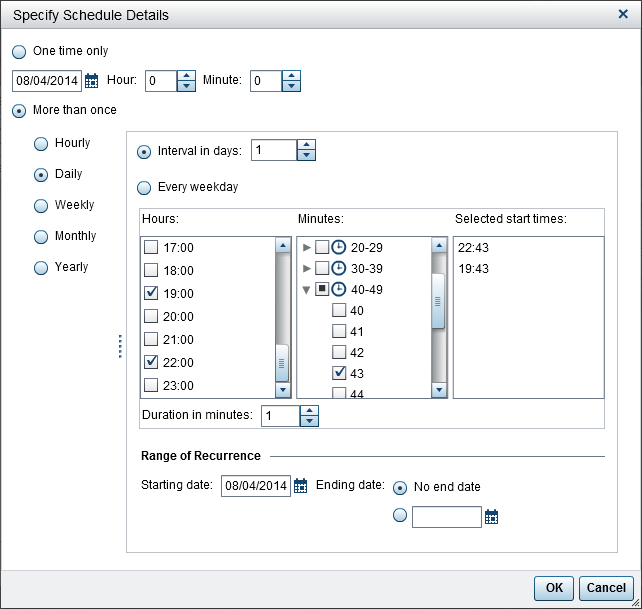 The following options are specific to the recurrence interval that you select:Recurrence IntervalOptionsDailySelect a number for Interval in days or select Every weekday for the report job to run.WeeklySelect a number for Interval in weeks, and then select the day (or days) that you want the report job to run.MonthlySelect a number for Interval in months, and then select a Day number or a Week and Day that you want the report job to run.YearlySelect a number for Interval in years and the Month. Then, select a Day number or a Week and Day that you want the report job to run.The following options are available for all recurrence intervals:
-
Use the Hours and Minutes check boxes to select the times. The Minutes area contains groupings of 10-minute intervals. Selecting a check box for a minute grouping selects all of the minutes in that grouping. Your selections are displayed in the Selected start times area.TipTo select individual minutes, expand the grouping.
-
If needed, specify the range of recurrence (the start date and end date for distribution). The default is to start at the current date and to not have an end date.
-
For more information, see Scheduling in SAS. -
-
Click OK to return to the Schedule window. The new schedule details are displayed under the Schedule heading.
-
Click OK to return to the Distribute Reports window. The new schedule details are displayed in the Schedule column.
-
(Optional) Click Run Now to have the distribution run immediately. Click Close in the information window.
-
Click Close.
Manage Report Distributions
The Distribute Reports window enables you to schedule, unschedule, run
now, delete, and show history for distributions that you own. Only
distributions that contain at least one report job that you own are
displayed. (Some distributions might contain report jobs that other
users own, but they are not displayed.)
Tip
You can delete a distribution
if it contains only report jobs that you own.
To see the history record
for a selected distribution that has been run, click Show History. The Show History window
is displayed. You can see the Start Time, Finish
Time, State, and Status
Message. Click Close to return
to the Distribute Reports window.
Copyright © SAS Institute Inc. All Rights Reserved.
Last updated: January 8, 2019