Creating Events

Why Use Events?

Events specify conditions that must be met before a step in the flow can take place. You can use SAS Visual Data Builder to create two types of events.
  • Time events are evaluated based on a specified time being reached.
    Note: You can specify multiple time events. However, the Operating System Services Scheduler (the default scheduler) can use only one of the time events.
  • File events are evaluated based on the state of a specified file.
You can create file events if your deployment includes a scheduling server that supports them, and the flow is deployed to that scheduling server. Time and file events can be used as triggers (conditions that must be met in order to run a flow on the scheduling server).

Creating a Time Event

You can create a time event and use it as a trigger.
To create a time event:
  1. In the Schedule window, select Select one or more triggers for this data query, and then click New Time Event.
  2. In the New Time Event window, specify whether the time event should happen one time only or more than once. If the time event should happen one time only, specify the date and time for the time event.
  3. If the time event should happen more than once, select More than once, and then select a radio button for how often the time event should repeat (such as hourly, weekly, or yearly).
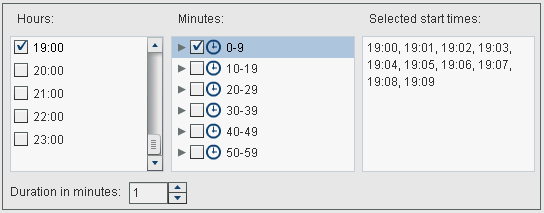
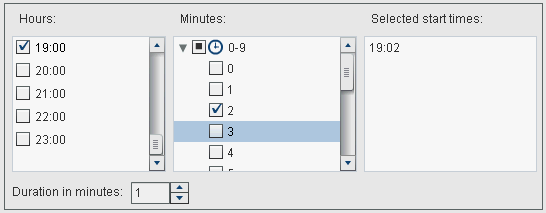
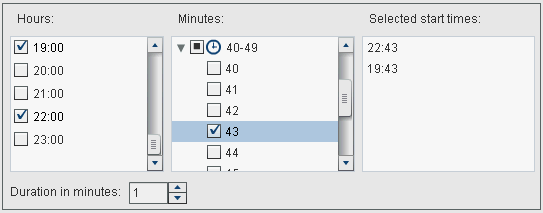
  4. Specify the details of when the time event should repeat. The specific fields that are available depend on the recurrence interval that you select.
    If you select Hourly, then the time is calculated from hour zero on a 24-hour clock. For example, if you leave Interval hour set to 1, then the data query runs at hour zero (midnight), and runs each hour. If you set Interval hour to 2, then the data query runs every other hour, and the Offset hour specifies whether to run on the even hours (when set to 0) or on the odd hours (when set to 1). In this case, the Offset hour specifies the offset from hour zero (midnight).
    If the recurrence interval requires you to select start times, use the Hours and Minutes check boxes to select the times. The Minutes area contains groupings of 10-minute intervals. Selecting a check box for a minute grouping selects all of the minutes in that grouping.
    multiple minutes selected
    To select individual minutes, expand the grouping.
    single minute selected
    If you select multiple values for Hours, all of the selections for Minutes apply to all of the selected values. For example, if you select 19:00 (07:00 PM) and 22:00 (10:00 PM) for Hours, and 43 for Minutes, the time event is scheduled for 19:43 and 22:43.
    multiple hours selected
  5. If needed, specify the start date and end date for the time event. The default is to start at the current date and time and not to have an end date.

Creating a File Event

You can create a file event and use it as a trigger. The file event can check for various file conditions, such as its existence, size, or age.
Note: Not all scheduling servers support file events. Platform Suite for SAS and the SAS Distributed In-Process Services Scheduling Server are two servers that do support file events. The New File Event button that is used to create a file event is available only when the scheduling server supports file events.
To create a file event:
  1. In the Schedule window, select Select one or more triggers for this data query, and then click New File Event.
  2. In the New File Event window, specify or select the file to use for the file event.
  3. Select the condition to evaluate the file to make the file event true. For example, if you selected not exist for the condition, the file event would be true only if the selected file was not in the specified location.
  4. If needed, specify the details (such as size or age) about the condition.