Manage Certificates in the Trusted CA Bundle Using the SAS Deployment Manager
Overview
In
the third maintenance release of SAS 9.4, you can
add your certificates by using the SAS Deployment Manager after installation.
Note: In the
second maintenance release for SAS 9.4 and earlier, when
providing your own signed certificates, you must add the CA root and
intermediate certificates to the SAS Private JRE using the Java
keytool
                        -importcert
command. See Add Your Certificates to the SAS Private JRE.The SAS Deployment Manager
installation process provides the following:
-
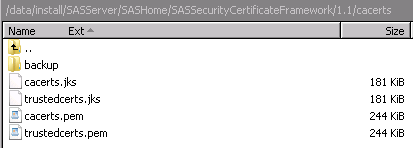
a Mozilla bundle of Trusted CA certificates. It is provided in the cacerts.pem file located in new directory
<SASHome>/SASSecurityCertificateFramework/1.1/cacerts. -
the ability to manage the trusted CA bundle by adding or removing certificates. The process also validates the certificates.
-
the SSLCALISTLOC system option set to the default certificate path:
<SASHome>/SASSecurityCertificateFramework/1.1/cacerts/trustedcerts.pem
Files placed in the
new directory and updated at installation are described below. How
the cacerts directory looks is shown
in SAS Security Certificate Framework Directory at Install.
cacerts.pem
contains the Mozilla bundle of CA certificates provided at SAS installation. This
file is in PEM format.
cacerts.jks
contains the Mozilla
bundle of CA certificates provided at SAS installation. This file
is in JKS (Java keystore) format.
trustedcerts.pem
contains a merged list of trusted CA certificates, including both CA certificates
in the cacerts.pem file and CA certificates added using the SAS Deployment Manager.
Trusted CA certificates can be added to and removed from this file using the SAS Deployment
Manager during the deployment process. This file is in PEM format.
trustedcerts.jks
contains a merged list
of trusted CA certificates, including both CA certificates in the
cacerts.jks file and CA certificates added using the SAS Deployment
Manager. Trusted CA certificates can be added to and removed from
this file using the SAS Deployment Manager during the deployment process.
This file is in JKS (Java keystore) format.
SAS Security Certificate Framework Directory at Install
Add Your Certificates to the Trusted CA Bundle
Starting
with the third maintenance release for SAS 9.4,
if you are providing your own site-signed certificates, then you must
add the CA root certificate and all of its intermediate certificates
to the trusted CA bundle. If you are using self-signed certificates,
the self-signed certificate needs to be added to trusted CA bundle
as well. You do this using SAS Deployment Manager.
Note: You can add only one certificate
at a time with the deployment manager. You must rerun the deployment
manager each time you add a certificate to the trusted CA bundle.
Note: If you have any Windows machines,
you must also add the CA root and intermediate certificates to the
Windows Certificate stores. For more information, see Add Your Certificates to the Windows CA Stores.
Note: These steps are to be performed
for sites that are running the third maintenance
for SAS 9.4 and later. If you
are running the second maintenance release for SAS 9.4 or earlier, see Add Your Certificates to the SAS Private JRE.
To add CA root and
intermediate certificates or to add self-signed certificates being
used in deployment, perform these steps:
-
Log on to the primary middle-tier machine as the SAS Installer user.
-
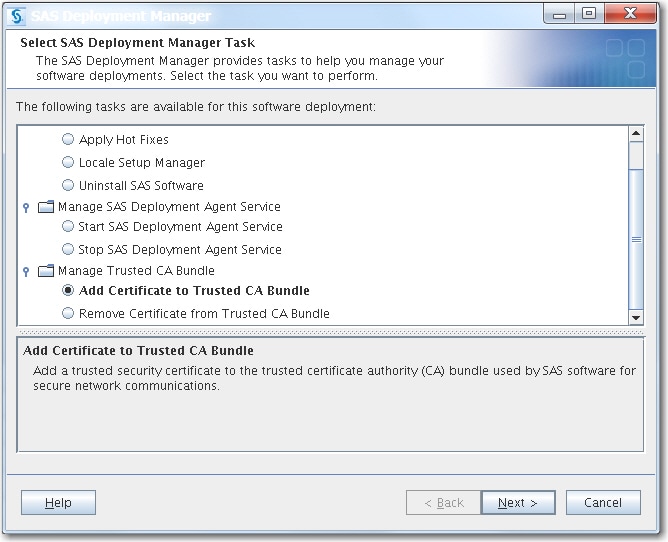
Start SAS Deployment Manager by navigating to
SAS-installation-directory/SASDeploymentManager/9.4and launchingsasdm.exe(Windows) orsasdm.sh(UNIX). On Windows, you can use the shortcut on the Start menu. -
When prompted for the task, select Add Certificate to Trusted CA Bundle, and click Next.
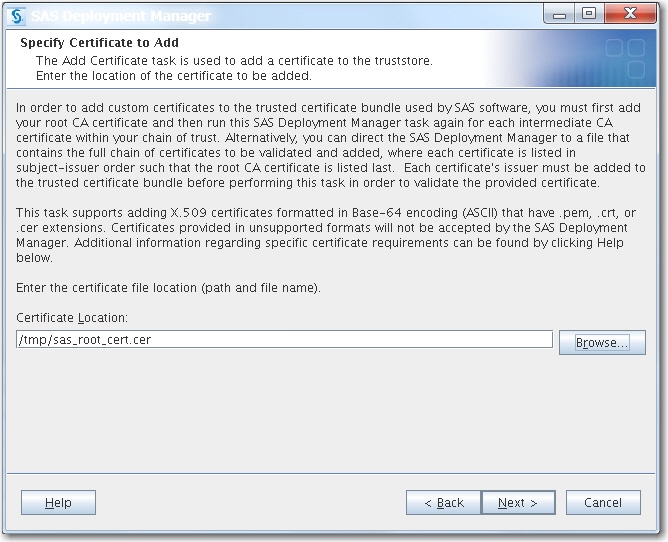
-
Specify the path to your CA root certificate, and click Next.The CA root certificate must be in base64 encoding (ASCII) and have a PEM, CRT, or CER file extension. For more information, see Certificate File Formats.Note: Add your CA root certificate before adding your CA intermediate certificates.
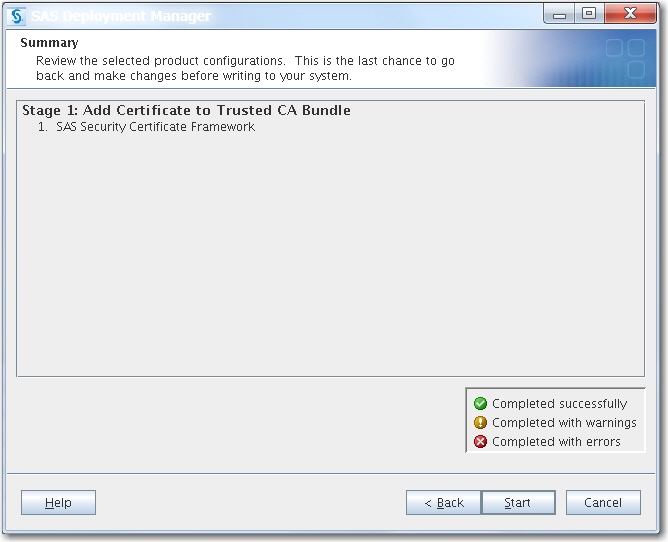
-
On the Summary page, click Start.
-
When you see a green checkmark on the Deployment Complete page, this means that you added your certificate successfully to
SAS-installation-directory/SASSecurityCertificateFramework/1.1/cacerts.Click Next. TipThe log files created by the add certificate task are located at
<SASHOME>/InstallMisc/InstallLogs/certframe*. -
On the Additional Resources page, click Finish to close the deployment manager.
-
Repeat steps 2 through 7 to add your CA intermediate certificates.
-
To verify that your CA root and intermediate certificates were successfully added, enter the following command:
path-to-keytool-command/keytool -list -keystore /SAS-installation-directory/SASSecurityCertificateFramework/1.1/cacerts/trustedcerts.jks.For example:/usr/java/jdk1.8.0_45/bin/keytool -list -keystore /opt/SASHome/SASSecurityCertificateFramework/1.1/cacerts/trustedcerts.jksYou should see output similar to the following:intca, Oct 15, 2015, trustedCertEntry, Certificate fingerprint (SHA1): 12:4D:C9:88:CD:D5:F3:E9:9E:29:D8:AB:F1:00:AD:93 :60:61:11:45 cn=twca root certification authority,ou=root ca,o=taiwan-ca,c=tw, Jun 2, 2015, trustedCertEntry, Certificate fingerprint (SHA1): CF:9E:87:6D:D3:EB :FC:42:26:97:A3:B5:A3:7A:A0:76:A9:06:23:48 rootca, Oct 15, 2015, trustedCertEntry, Certificate fingerprint (SHA1): 57:7B:1E:D7:16:5D:5F:44:EB:79:AB:40:FA:98:49:DD: DF:4F:B5:F7 cn=microsec e-szigno root ca,ou=e-szigno ca,o=microsec ltd.,l=budapest, c=hu, Jun 2, 2015, trustedCertEntry,
-
Repeat steps 1 through 9 on each machine.Note: Repeating these steps is required on client machines with Java clients such as SAS Management Console installed.
-
If you have any Windows machines in your SAS deployment, then proceed toAdd Your Certificates to the Windows CA Stores.
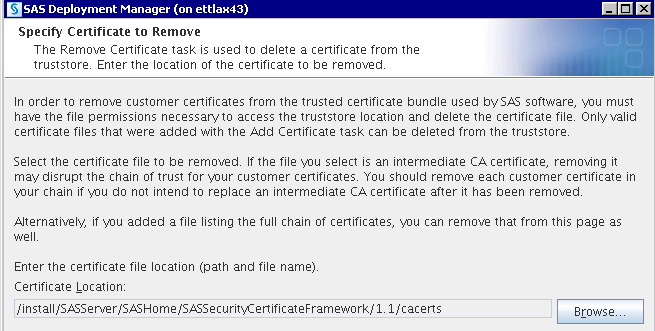
Remove Your Certificates from the Trusted CA Bundle
Starting
with the third maintenance release for SAS 9.4,
you can use SAS Deployment Manager to remove certificates from the
trusted CA bundle.
To remove a certificate
from the trusted CA bundle, you must have file permissions to access
the truststore location. Only certificate files that were added using
the Add Certificate Task can be deleted.
Tip
Your certificates
                        were added to SAS-installation-directory/SASSecurityCertificateFramework/1.1/cacerts
.
Select this directory when removing your certificates.
Note: If the file that you are
removing is an intermediate certificate, removing it might disrupt
the chain of trust for your customer certificate. If you do not plan
to replace this intermediate certificate, you should remove each customer
certificate in the chain.
Remove a Certificate from the Trusted CA Bundle Using the
Deployment Manager
Tip
The log files created by the
remove certificate task are located at <SASHOME>/InstallMisc/InstallLogs/certframe*.
Refer to the SAS
Deployment Wizard and SAS Deployment Manager 9.4: User's Guide for
detailed information about using the SAS Deployment Manager to manage
your certificates.
SAS Deployment Manager Criteria for Validating Certificates
The following criteria
must be met for the validation to complete. Otherwise, errors are
generated. See Troubleshooting TLS for possible
errors that might be generated.
-
Each certificate’s issuer must be added to the trusted certificate bundle before the certificate can be validated.
-
Certificates must be X.509 certificates formatted in Base-64 encoding that have .pem, .crt, or .cer extensions.
-
The issuing CA is a trusted CA.
-
The issuing CA's public key validates the issuer's digital signature.
-
The current date is within the certificate's validity period.
Copyright © SAS Institute Inc. All Rights Reserved.