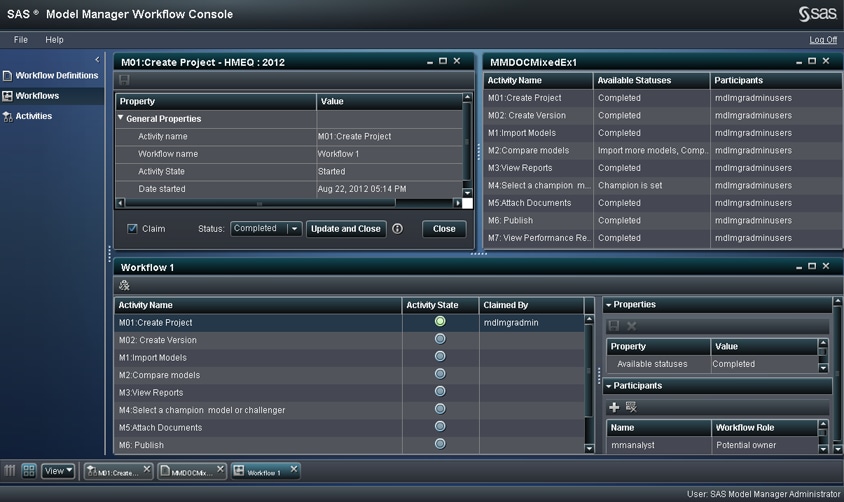
Working with Objects

When you open objects, you can add them to the tile pane as minimized items or open them and work with them in the layout. A layout is simply a collection of one or more open objects in a specific order or arrangement in the object view.

About the Tile Pane

The tile pane provides quick access to open objects and to tools that control how objects are displayed. By using the tile pane, you can perform the following activities:
  • switch between the category view and one or more open objects
  • view thumbnail images of open objects
  • tile open object views
  • open, minimize, and close objects and object groups
Note: The tile pane is workspace-specific. When you switch to a different workspace, the tile pane changes to reflect the open objects in that workspace.
Here is a description of the buttons in the tile pane.
Tile Pane Buttons
Button
Name
Description
View object list button
View object list
Returns to the category view and displays the list of objects.
View layout button
View layout
Tiles the display of open objects.
From the drop-down list, select the objects to tile and select Show Details to display object details in the thumbnail images.
View actions button
View actions
Displays the View actions menu that contains the following options:
  • Show All Items
  • Close All
  • Save Layout
  • Open Layout

Open Objects

To open an object in a category view:
  1. Double-click the object, or select Open on the toolbar and then select one of the following options:
    • Open: Opens the object in the object view and adds the object’s thumbnail image to the tile pane. This option enables you to work with the object immediately.
    • Add: Adds a selected object to the tile pane (when one or more objects are open).
    • Sent to Tile Pane: Opens the object’s thumbnail image in the tile pane. This enables you to continue selecting other objects in the object view.
      Tip
      You can drag an object from a list to the tile pane.
  2. (Optional) To switch to the object view, click the View object list button in the tile pane.
    Tip
    To obtain a list of open objects, click View. In this list, a check mark indicates that the object is open. You can select an object to open that object in the object view, or clear the check mark to return the object to a minimized (thumbnail) state on the tile pane.

Open Multiple Objects

To open multiple objects, use either of the following methods:
  • Use the SHIFT key to select multiple adjacent objects or use the CTRL key to select noncontiguous objects. The objects are tiled within the view and object thumbnail images appear on the tile pane.
  • Select an object and click Open, click the View object list button, select another object, and then click Open. The second object opens in the workspace, replacing the first item, and thumbnail images for both objects appear on the tile pane. Repeat this process to continue opening objects.
Tip
To display all open objects, rather than the most recently opened object, click the View actions button on the tile pane, and select Show All Items.
Here is an example of how three open objects appear when they are tiled within Workflow Console and how the relevant thumbnail images appear on the tile pane.
Tiled Open Items
Tiled Open Items

Rearrange Open Objects

To change the way open objects are displayed, you can do any of the following:
  • Minimize, maximize, or close each object by using the window controls.
  • Minimize objects by using View actions on the tile pane.
    To minimize an object, select the object in the list. This action clears the check mark and removes the object from the object view. The thumbnail image is retained in the tile pane for quick access when necessary.
  • Add objects to the object view by dragging their icons from the tile pane to the object view.
  • Resize windows by using the dividers between the item windows.
  • Rearrange objects by clicking their title bars and dragging them to a new position in the object view.

Save Layouts

To save the current object view layout for reuse, click the View actions button in the tile pane, select Save Layout, and provide a name for the saved layout.
To open a saved layout, click the View actions button on the tile pane, select Open Layout, and select the layout that you want to apply to the object view.

Close Objects

You can close objects in the following ways:
  • If the object is open in the object view, click Close buttonin the upper right corner of the thumbnail image. This closes the object in both the object view and in the tile pane.
    Note: To minimize an open object, click the minimize button in the upper right corner of the thumbnail image. This removes the object from the object view. The object thumbnail is visible in the tile pane.
  • If the object thumbnail image is visible in the tile, click Close buttonin the upper right corner of the thumbnail image. This action removes the object thumbnail from the tile pane.
After you close the object, you can open it again from the category view or open a previously saved layout that contains the object.