Creating and Managing Templates
About Creating and Managing Templates
There are three different types of templates that you can create or edit. The template types are Model, Report, and Properties. Models are associated with a specific model
template. A model template contains properties and component files that define a type
of model. Report templates can be used to create user-defined reports. A report template contains report requirements such as report name and the
number of required models to run the report. The properties template contains user-defined
properties and values for the model and project object types. In the Projects category
view, you can create a new template or manage existing templates.
Note: Only users who are in the
Model Manager Administrator Users or Model Manager Advanced Users
groups and who have Write permission to the WebDAV folder where the
user-defined model and report templates are stored can save a new
template or save changes to an existing template. For
more information, see Verify WebDAV Folder Permissions for User-Defined Templates in SAS Model Manager: Administrator’s Guide.
For more information
about the different types of templates, see the following topics:
Manage Templates
To manage templates:
-
Click
 and select Manage Templates.
-
Select an XML template or SAS code file to edit or delete. The Reserved column must be marked as No in order for the template to be editable. Life cycle templates cannot be edited but can be viewed as Read-only.
-
To edit a file, click
 . Make the appropriate changes and click Save.
-
To delete a file, click
 . Click Yes.
-
-
Click Close.
Create a New Template
To add a new template:
-
Click and select New Template.
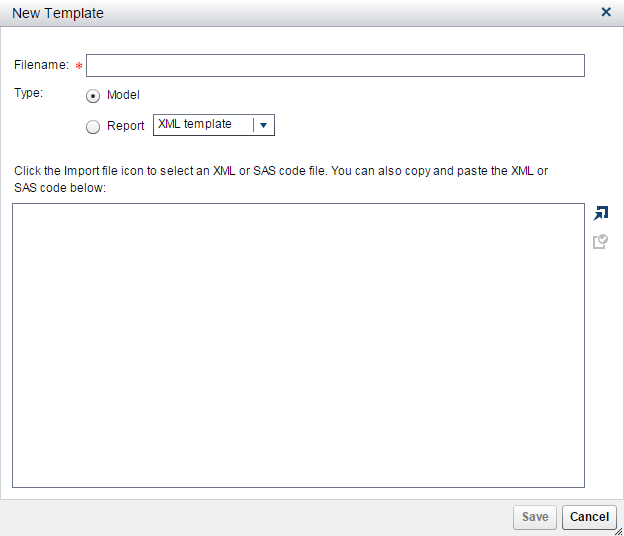
-
Enter a filename.
-
Select a type:
-
Model
-
Report (XML template or SAS code)
-
-
Click
 to select an XML or SAS code file. You can also copy and paste the XML or SAS code
in the text box.
Note: Ensure that the selected template type matches the XML content type before importing the file.
to select an XML or SAS code file. You can also copy and paste the XML or SAS code
in the text box.
Note: Ensure that the selected template type matches the XML content type before importing the file. -
Click
 to validate the XML.
-
Click Save.
User-Defined Properties Template
When you add a user-defined property using the UserDefinedProperties.xml file, you
specify the name of the property,
the initial value of the property, and the type of object in the model repository to which it applies. The user-defined property is created for the specified object
type when the object is added to the model repository. For example, if the XML file specifies a user-defined property Due date for
an object type of project, the project object has a property of Due
date each time a project is created in the Projects category.
User-supplied properties are not added to existing objects in the
model repository.
You can specify these
object types in the UserDefinedProperties.xml file:
-
AnalyticalModel
-
ClassificationModel
-
ClusteringModel
-
PredictionModel
-
Project
To add user-defined
properties for an object type:
-
Click and select Manage Templates.
-
Select the
UserDefinedProperties.xmltemplate and click.
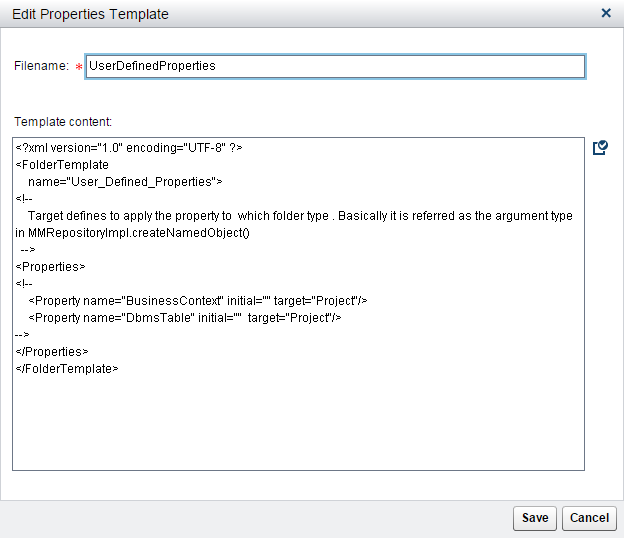
-
Add properties using an XML property element for each property. These arguments are required:name="property-name"specifies the name of the property.initial="initial-value"specifies a value for the property when it is added as a property for the specified object type in the model repository. If you do not want to specify an initial value, use two double quotation marks,
initial=""target="object-type"specifies the object type in the model repository for which the user-supplied value applies.Example:<Property name="Due date" initial=" " target="Project"/> -
Click Save.
-
Click Close.
Copyright © SAS Institute Inc. All Rights Reserved.
Last updated: February 14, 2017