How to Add Columns to Existing MXG Staged Tables

About Adding Columns to Existing MXG Adapter Staged Tables

SAS IT Resource Management staged tables are built based on a specific version of MXG. To identify the version of MXG for which the SAS IT Resource Management data models were created, see Data Sources Supported by SAS IT Resource Management Adapters or SAS Usage Note 8131: “Considerations for SAS® IT Resource Management sites that are upgrading to a new version of MXG.”
For MXG adapters in SAS IT Resource Management 3.4 and later, staged tables share the same names and columns (variables) as the data sets that are stored in an MXG PDB. If you install a more recent version of MXG than the version that generated your staged tables, you can add new columns from that more recent version of MXG to your SAS IT Resource Management staged tables. (The more recent version of MXG is the version from which the SAS IT Resource Management data models for MXG adapters were created.) This enables you to synchronize your SAS IT Resource Management staged tables with more recent tables and columns of the MXG adapter, before the release of SAS IT Resource Management data model updates.
Note: All staged tables contain certain columns that are required by SAS IT Resource Management. Exercise caution when modifying existing columns to avoid impacting SAS IT Resource Management.
To import new columns into staged tables, perform the following tasks:
Note: The addition of new columns will increase your disk space requirement. For more information, see Insufficient Disk Space.

How to Capture the MXG Tables

To capture the MXG tables, perform the following steps:
  1. Double-click the staging job that contains the MXG table to open it in the process flow diagram.
  2. Right-click the staging transformation and select Properties.
  3. Click the Precode and Postcode tab.
  4. Check the Postcode box and enter this code:
    libname mxgtemp 'userid.mxgtemp.fromwork';
    proc copy in=work out=mxgtemp;
       select <mxg_dataset_list>; 
       run; 
    libname mxgtemp clear; 
    In this code, mxg_dataset_list is the list of tables from which you want to import new columns. In addition, the “userid.mxgtemp.fromwork” library must already exist in this scenario.

How to Register MXG Data Sets from More Recent MXG Versions

The MXG data sets must physically exist in a SAS library that is accessible to the SAS IT Resource Management client.
To register the MXG tables in metadata, perform the following steps:
  1. In the SAS IT Resource Management client, select Filethen selectRegister Tables.
  2. In the Register Tables dialog box, select SASthen selectNext.
  3. In the SAS Library field, specify the SAS library where the MXG data sets are stored. You can select an existing library from the list or click New to register a new library.
    If you choose to register a new library, respond to the prompts of the New Library Wizard, as follows:
    1. Enter the name of your library. For example, you might enter MXGTEMP.
    2. Select your SAS IT Resource Management application server. To do so, use the right arrow to move it from the Available column to the Selected column.
      Note: The default application server is SASITRM.
    3. Choose a libref to be associated with this SAS library (MXGTEMP, for example).
    4. Choose a path specification by moving it from the Available items column to the Selected items column. Alternatively, click New to register a new path. If you want to do this, enter the path to the SAS library where the MXG data sets are stored and then click OK.
    If you choose to use an existing library, perform the following steps:
    1. Use the drop-down arrow in the field to display the existing libraries.
    2. Select the library that you want to use. Click Next.
  4. A list of tables appears that represents the MXG data sets in the SAS library that you specified. Specify the location of the metadata folder where you want your MXG tables to be registered, or note the default path that is presented. Select the tables that you need and click Next.
  5. Click Finish. Your MXG data sets are registered in metadata.

How to Import the Columns from an MXG Table into a Staged Table

To import columns from an MXG table into a SAS IT Resource Management staged table, perform the following steps:
  1. Select the IT data mart that contains the staged table that you want to update. Expand the Staging folder.
  2. Right-click the staged table that you want to update and select Properties. The Properties dialog box appears.
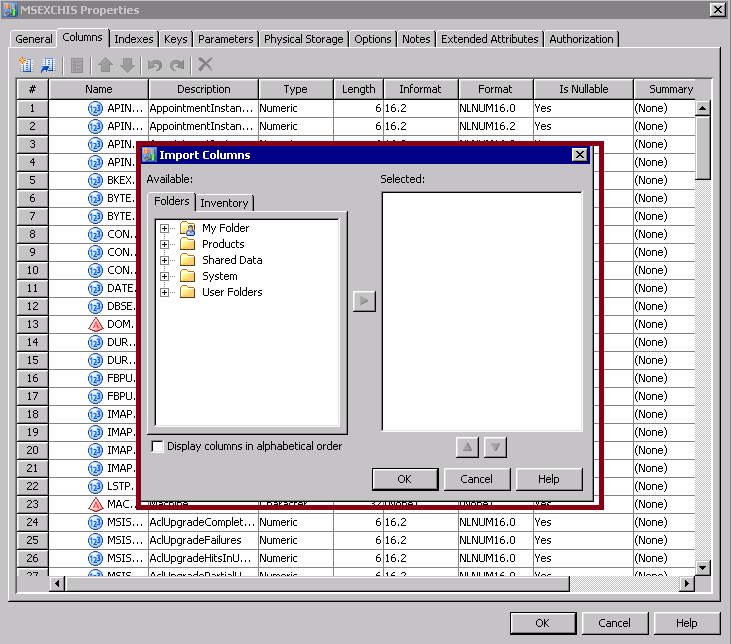
  3. Select the Columns tab. Then, click the Import columns icon (Import Columns). The Import Columns dialog box appears.
    Import Columns Dialog Box
    Import Columns dialog box
  4. In the Folders tab of the Available column, navigate to the folder that contains the MXG data sets that you registered.
  5. Select the table from which you want to import a column. Click the plus sign to expand the list of columns in that table. (To select the columns that you want to import, use the right arrow to move those columns from the Available column to the Selected column.)
  6. Click OK to close the Import Columns dialog box. Click OK to close the Properties dialog box.
  7. Redeploy the staging job.
  8. The imported columns are added to the staged table metadata. The columns are not created in the physical table until the staging job is run. When the staging job for the updated staged table runs successfully, the data in the columns can be viewed in the SAS IT Resource Management client.
CAUTION:
Do not import columns into the table that have the same name as existing columns in that table.
Doing so can cause unpredictable results.