Setting Access Permissions for an Object (IBM Secureway)
The Administrator implements security by letting you set permissions for
objects in the IBM Secureway directory. Using these permissions, you can allow or
deny access to objects or groups of objects by users or classes of users.
A well-planned security strategy allows users to access
objects that they need to use (for example, personal subscriptions) while restricting
access to sensitive information (for example, a SAS table that contains
salary information).
To control access to an object, you must specify the following information:
- The object whose access you want to control
- Whether the access is for the object only, or also for all objects beneath it in the
LDAP hierarchy
- The ACL access rule (who has access and what kind of access they have)
- Who is the owner of the object (who has permission to perform any action, regardless
of the ACL rule).
To set permissions for an object in the directory, follow
these steps:
- In the tree view, select an object or a folder whose permissions
you want to set.
- Select the Set Access Permissions tool
 on the toolbar.
If the tool is grayed out, you cannot set permissions for the selected
object.
on the toolbar.
If the tool is grayed out, you cannot set permissions for the selected
object.
When you select the tool, the
Access Control window appears.
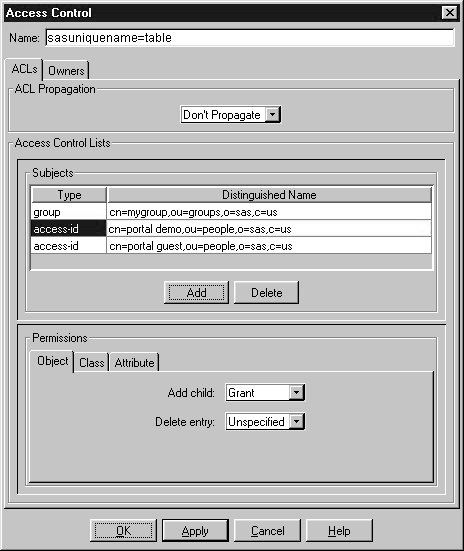
- The Access Control window lists all of the existing access rules for
the selected object.
Use the ACL Propagation pull-down menu to specify to what level the
ACL rules are applied. Choose
- Unspecified
- Inherit rules, clearing any rules explicitly specified for this object.
- Propagate
- The rules apply to the object and all objects below it in the
LDAP hierarchy.
- Don't Propagate
- The rules apply only to the chosen object.
- To add an access control list, select the Add button. A new subject
is created with a default permission set. Specify the subject's type and
distinguished name. Use the Permissions pane to specify the desired permissions.
- Under the Subjects pane, click the Type field to display a
pull-down menu of the subject types. Select one of the following:
- access-id
- The rule applies to a specific user or user ID. You should then enter
a distinguished name of a specific user, for example, cn=Julieb,o=Alpine Airways.
Specify cn=this specifies the bindDN that matches the object's DN.
- group
- The rule applies to a group of users. You should then enter
a distinguished name of a group of users, for example, cn=accounting,o=Alpine Airways.
Enter cn=anybody in the Distinguished Name field to specify all users, including
unauthenticated users. Enter cn=authenticated to specify any DN that has been
authenticated to the directory.
- role
- The rule applies to a specific user role. You should then enter the
distinguished name of a defined access role, for example, cn=administrator,o=Alpine Airways.
- Double-click in the Distinguished Name field to enter the DN of
the subject as detailed above.
- To specify the permissions for a subject, select the subject in the
Subject pane, then select the tabs in the Permissions pane.
- Under the Permissions pane, select the Objects tab.
Specify the following:
- Add child
- Specify Unspecified, Grant or Deny. This access control determines whether
the subject is allowed to add an object under the current object in the LDAP
hierarchy. Choose Unspecified if you want to inherit this setting.
- Delete Entry
- Specify Unspecified, Grant or Deny. This access control determines whether
the subject is allowed to delete the object from the LDAP
directory. Choose Unspecified if you want to inherit this setting.
- To define class level permissions, select the Class tab in the
Permissions pane.
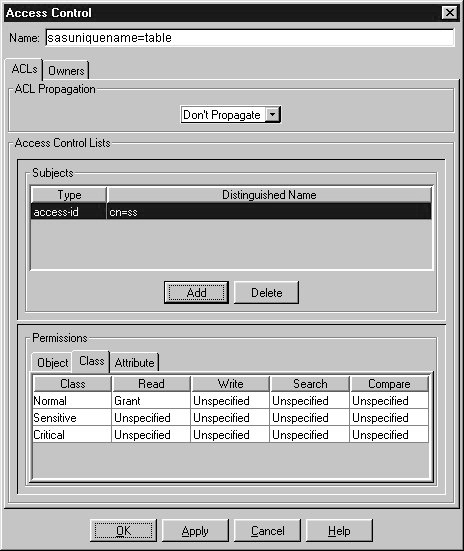
Classes are groups of attributes for the object. For example,
the userpassword attribute is a member of the Critical class, while the commonName attribute
is a member of the Normal class.
- For each class listed, specify whether the subject is granted or denied read, write,
search and compare access for the attributes in the class. Choose Unspecified to inherit
the access control setting. Details of the permissions are as follows:
- Read
- Directory data may be read.
- Write
- Directory data may be changed, created, or deleted.
- Search
- Directory data may be searched. For example,
denying search rights for a user login object prevents users from
searching for a particular user login name.
- Compare
- Directory data may be used for comparisons. Unlike
searches, the information is not displayed as a result of the comparison; only
an indication as to whether the search was successful is returned.
- To define permissions for specific attributes, select the Attributes tab in the
Permissions pane.
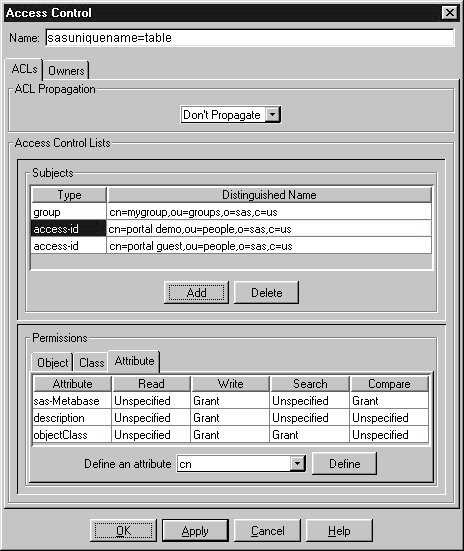
Select an
attribute from the Define an Attribute pull down menu and select Define. Select whether
the subject should be granted or denied read, write, search and compare access for the
specified attribute. Choose Unspecified to inherit the access control setting.
- To define the owner of the object, select the Owners tab.
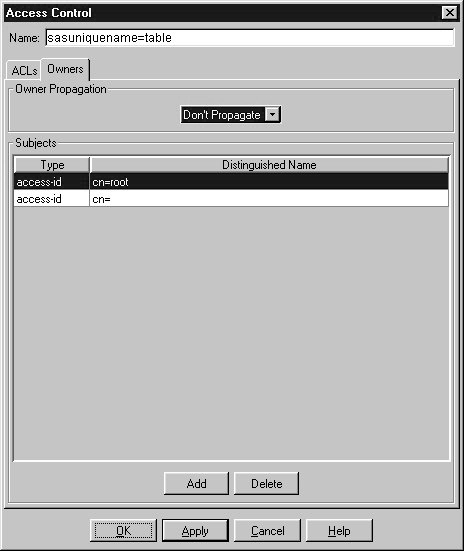
Specify the following:
- Owner Propagation
- Use the pull-down menu to specify whether the owner of the object is also
the owner of all objects under it in the LDAP hierarchy. Select Propagate to
specify that the owner also owns the other objects; select Don't Propagate to
specify that the owner only owns the current object. Select Unspecified to inherit
this access control setting.
- Subjects
- Specify who has full access to the object regardless of the ACL rules. To add an
owner, select Add. Use the Type pull-down menu to specify whether the owner is a
specific user (access-id), a group of users (group), or a type of user (role). Enter
the owner's distinguished name in the Distinguished Name field.
- Select Apply to apply the defined access controls and leave the Access
Control window open. Select OK to apply the access control and close
the Access Control window.
NOTE: If any items in the tree view were expanded when you opened
the Access Controls window, they are all collapsed when you return
to the main Administrator window.


