Query Builder
The SAS Query Builder enables you to build complex SQL Server queries using a query building interface. To use the Query Builder, you should have basic knowledge of SQL concepts. Then, you can write queries using the correct method without understanding the technical details.

Query Builder
About the Query Builder Dialog
Main - The Query Building Area is the main area where the query will be displayed. In this area, you can define source database objects and derived tables, define links between them and configure properties of tables and links.
Sub-query Handling Control - The  in the Query Building Area represents the Sub-query Handling Control. Here you can add new union sub-queries and perform all necessary operations with them.
Page Control - When you have sub-queries, you will see multiple tabs at the top of the Query Building Area.
Query Output Columns and Expressions - Use this section to define field aliases, sorting and grouping criteria, and define criteria for your queries.
Database Connection View - The expandable tree on the right of the Query Builder provides Tables, Views, and Procedures.
Query Building Area
The Query Building Area is the main area where the query will be displayed. Here, you can define source database objects and derived tables, define links between them, and configure properties of tables and links.
Objects
Add Object
Click the Main tab. Then, right-click in the query building area, and select Add Object in the pop-up menu.

Use the Add New Object dialog to add one or more objects to your query. The objects are grouped according to type, Tables, Views, and Procedures (Functions).
To select more than one object, press Ctrl and select the objects. Click OK when you finish selecting the objects. Click Close to close the Add New Object dialog.
Filter objects by Schema name - For servers containing schemas or allow objects for different databases, you can filter objects by database or schema name.
Tables - Shows a list of tables available for the query.
Views - Shows a list of available views for the query.
Procedures - Shows a list of procedures available for the query.
Create links from foreign keys - You can establish links between tables based on foreign keys in the database. This option is active by default. Click Create links from foreign keys to turn this option off.
To add an object to the Query Builder, click to select the object and click Add Object. Click Close. The object now appears in the Query Building Area.

Edit Objects
 You can change the properties of each object added to the query, right-click the object and select Edit from the drop-down menu or double-click the object header.
The Data Source Properties dialog can vary from server to server. However the Alias property is the same for all database servers.
Joining Tables
To join two fields in two separate objects, select the field in one object and drag to the corresponding field of the other object. When this is done, a line connecting the linked fields appears.

The join type created by default is INNER JOIN. This means that only matching records of both tables will be included in the results. To define other joins, you should right-click the link and select Edit from the drop-down list or double-click to open Link Properties. This dialog enables you to define join type and other link properties.

To remove a link between objects, right-click the link line and select Remove.
Add Derived Table
You can add a derived table (a sub-query used in the FROM clause) using the Query Building Area.
To add a sub-query, right-click on the Query Building Area and select the Add Derived Table item from the drop-down menu.
A new object representing the newly created derived table will be added to the query building area of the main query. In addition, the corresponding tab will be created after adding the derived table. This tab enables you to edit the sub-query visually in the same way as you edit the main query. Another way to switch to the sub-query tab is to press the maximize button at the header of the object representing this derived table.
Union
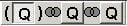
You can work with union sub-queries using the small panel in the top right corner of the Query Building Area. Initially there is only one union sub-query labeled with the "Q" letter. All required operations are performed by means of context drop-down menus.
- To add a new union sub-query, select the New Union SubQuery menu item.
- To enclose the sub-query in brackets, select the Enclose in Brackets menu item.
- To move the sub-query or bracket to the top of the query (the topmost sub-query is the left one), select the Move Backward menu item.
- To move the sub-query or bracket to the bottom of the query, select the Move Forward menu item.
- To remove the sub-query or bracket, select the Remove menu item.
- To change the uniting operator, select the necessary operator in the list of supported operators in the drop-down menu.
New Union Sub-Query - Click the following icon to add an additional union to the Query Builder.

Enclose in Brackets - Click the following icon to add brackets to the union you have selected. When you right-click on Enclose in Brackets, the following operations are available: Move Forward, Move Backward, and Remove Brackets.
Additional operations available include:
- Union
- Union All
- Except
- Intersect
- Remove
Query Output Columns and Expressions
Expression - Create an expression to develop custom programming to modify your data.
Alias - Add the output field alias.
Sort Type - Specify how the fields will be sorted (Ascending or Descending order). To disable sorting by a specific field, you should clear the Sort Type column for this field.
Sort Order - Set up the order in which fields will be sorted, if more than one field will be sorted.
- Expression
- Where
- Group By
- Having
- Avg
- Avg Distinct
- Count
- Count Distinct
- Max
- Max Distinct
- Min
- Min Distinct
- Sum
- Sum Distinct
Criteria - To define criteria for the expression listed in the Columns Pane you must use the Criteria column. There you should write the criterion omitting the expression itself. To get the following criterion in your query:
WHERE (field >= 10) AND (field <= 20)
you should write:
>= 10 AND <= 20
in the Criteria column.
Or... - You can specify several criteria for a single expression using the Or column. These criteria will be concatenated in the query using the OR operator.
Selecting Output Fields
To add a field to the list of query output fields, select the check box next to the field name in the Query Building Area. To include all the fields of the object, select the asterisk check box in the object.
You can also select a field name from the Expression drop-down list or type any valid expression in the SQL Query area at the bottom of the dialog.

To remove a field from the list of query output fields you should uncheck the check box at the left of the field name in the Query Building Area or uncheck the Output column check box.
You can also remove lines, right-click the gray left column and select Remove Item.
Database Connection View
This pane displays the database objects for the currently active database connection. In this pane, you can browse database objects such as tables, views, and stored procedures. More importantly, you can use this view to drag-drop objects into the Relations pane.
Essentially, this pane displays the currently open database with static folders Tables, Views, Procedures, and Functions, respectively containing all the existing tables, views, stored-procedures and functions in that database. These objects, being nodes in their respective folders, will have their field or parameter structures as child-nodes.
SQL Query
This pane is a complete and fully syntax-colored editor, with cut, copy, paste, find, replace, multiple redo/undo, and other features. The actions made on the Relations and Columns panes affect the content of the SQL pane, producing an SQL statement you can eventually run against the database defined by the currently active database connection.
Using the SQL functions toolbar, you can also insert SQL functions with arguments taken from the currently selected field-columns in the Columns pane. This will insert string segments into the SQL pane that include the appropriate SQL function syntax with the selected field names as arguments.
A list of available functions follows:
- Functions for concatenation of fields into a string.
- Functions for masking concatenated fields.
- Aggregate functions, including AVG, COUNT, MAX, MIN, SUM, STDEV, and VAR.
- String functions, including CHARINDEX, DIFFERENCE, LEFT, LEN, LOWER, LTRIM, PATINDEX, REPLACE, QUOTENAME, REPLICATE, LEFTPAD, RIGHTPAD, REVERSE, RIGHT, RTRIM, SOUNDEX, SPACE, STR, STUFF, SUBSTR, TRIM, and UPPER.
- Numeric functions, including ABS, CEILING, FLOOR, ROUND, TRUNCATE, and SIGN.
- Date-part functions, including YEAR, QUARTER, MONTH, DAYOFYEAR, DAY, WEEK, WEEKDAY, HOUR, MINUTE, SECOND, and MILLISECOND.
- Date-name functions, including YEAR, QUARTER, MONTH, DAYOFYEAR, DAY, WEEK, WEEKDAY, HOUR, MINUTE, SECOND, and MILLISECOND.
- Conversion-to-char functions.
- Conversion-to-number functions.
- Conversion-to-date functions.
- Null case function.
- Simple case function.