DataFlux Data Management Studio 2.7: User Guide

Verifying Addresses with the Address Verification (World 2) Node

Overview

This topic describes the general steps for using an Address Verification (World 2) node to verify addresses in the context of a data job. Before you can use this node: 

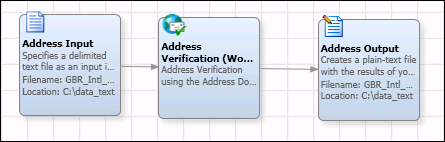
The following example job is used for illustration: 

In the example job, Address Input is a Text File Input node that specifies a text file that contains addresses to be verified. The Address Verification node reads the input addresses and uses Address Doctor software to calculate mailability scores for each address. It then writes the addresses and their mailability scores to Address Output, which is a Text File Output node that specifies a text file.

Create and Run the Data Job

  1. Create a data job that includes the Address Verification (World 2) node. The data job shown above is one example.
  2. Specify the data source. In the example job, you would begin by opening the properties dialog for Address Input, which is a Text File Input node.
  3. You would then specify the location of a text file that contains addresses to be verified.
  4. Select the address fields that you want to verify. This might be a subset of the fields in the data source.
  5. The next task is to configure the Address Verification (World 2) node. Begin by opening the properties dialog for the node.
  6. Specify XML parameters for the node. Typically, you will specify the location of a parameters XML file in the Parameters XML file field. Alternatively, you could create a custom set of XML parameters and paste them into the Parameters XML field.
  7. The next task is to map the input fields from the data source to input types that are required by the node. By default, the input fields will be listed in the Input fields list box, as shown in the next display.


  8. Click the Edit button beside the Input fields list box to specify an input type for a selected field. The Edit Input dialog displays.
  9. Select an Input Type. The available input types are ELEMENT, LINE and COMPLETE. Specify ELEMENT if the input field represents a piece of the address, such as street name or city name. Specify LINE if the input field represents a specific line of the address, such as a line that contains the recipient's name, or a line that contains a delivery address. Specify COMPLETE if the input field represents the complete address.
  10. Select a Name. A name enables you to classify the selected input field, so that the address verification engine will know how to process it. The values for Name vary according to the Input Type in the previous field. See the names in the previous display for examples.

    If you selected the ELEMENT type, you can specify an appropriate name for the element, such as Locality, Street, or Province.

    If you selected the LINE type, you can specify an appropriate name for the line, such as RecipientLine or DeliveryAddressLine.

    If you selected the COMPLETE type, you cannot specify any subproperties. The address verification engine will attempt to parse the line into its components.

  11. Select a version Number for the input field. Typically you will accept the default of 1.
  12. Select an Element Type. An element type enables you to further classify the selected input field, so that the address verification engine will know how to display it. See the element types in the previous display for examples.
  13. The next task is to specify outputs for this node. Outputs can include address elements (such as COUNTRY), parameters (such as Mailability Score), and others. To specify an output, click the Add button beside the Output fields list box. Use Edit Output dialog to select the following values.
  14. Select an Output Name, which is a descriptive name of the output as shown in the next display.


  15. Select an Output Type. Selecting one of these output types will drive the selection of Name, Number and Element Type:

    XML will provide the entire response in its raw format. During the initial design of the job, you can specify XML outputs to get an understanding of the data that is being returned. After the initial design phase, outputs can be added that match what is desired.

    PARAMETER provides the data specific around how the data was processed. See Process Status Values.

    DATAPARAMETER provides the specific values for response codes. Select these values to be able to determine how well the address was validated.

    ELEMENT provides unique pieces of the address, like Street, Building Number, etc.

    LINE provides all the elements that make up one line of the address.

    COMPLETE provides the entire address in one field.

    ENRICH_DATAPARAMETER is used to retrieve the status field in case any enrichment actions are allowed. These actions are driven by the AddressDoctor license.

    ENRICH_ELEMENT is used to get the enrich data that the engine returned.
  16. Select a Name for the output type. For example, if you selected the output type DATAPARAMETER, you could select names such as MailabilityScore and ResultPercentage, as shown in the previous display.
  17. Select a version Number for the selected output field. Usually you will accept the default of 1.
  18. Select an Element Type that is associated with the name you selected in the Name field. For example, if you selected Geocoding in the Name field, you could select an element type of Latitude.
  19. Specify the Length (number of characters) of the output field. Note that the default Length is 255. When you set XML as the Output type, you should change the Length to a much larger value such as 2000 or 2500 to avoid null values.
  20. After you specify all of the desired inputs and outputs, click OK to save your changes to the Address Verification (World 2) node.
  21. The next task is to specify the output table or file for the Address Verification (World 2) node. In the example job, you would begin by opening the properties dialog for Address Output, which is a Text File Output node.
  22. You would then specify the location of a text file that will contain addresses and mailability scores.
  23. When you are finished configuring the job, run the job as usual and check the output.

When designing a job that will use the Address Verification (World 2) node, make sure that all selected output values will be returned for each address. If a field is not returned, then this could create an error when the job runs. An example of where this could happen is with geocoding. If the geocode output elements are included as output, but a country has not been licensed for geocoding results, the node will throw an error. Make sure that enough data has been run through the node before promoting a job to production.

Documentation Feedback: yourturn@sas.com
Note: Always include the Doc ID when providing documentation feedback.

Doc ID: dfDMStd_Task_World2_Using.html