DataFlux Data Management Studio 2.6: User Guide
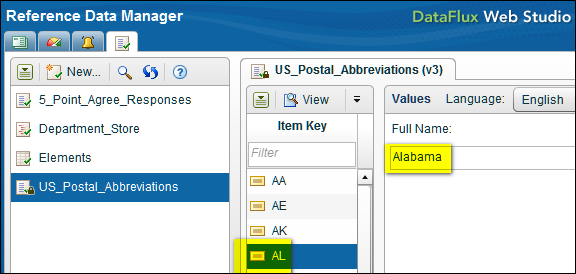
Reference Data Manager is a separately-licensed DataFlux Web Studio module. It enables you to manage a central repository of reference information. Examples of reference information include a list of NASDAQ stock symbols with their associated company names, or a list of valid zip codes with their associated cities and states. The next display shows a Reference Data Manager domain called US_Postal_Abbreviations.
The US_Postal_Abbreviations domain consists of the names and two-letter abbreviations for states in the United States. The two-letter state abbreviations are the key fields (Item Key) in the US_Postal_Abbreviations domain.
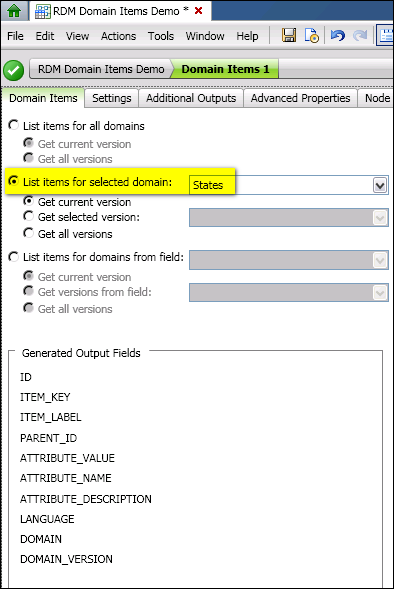
The Domain Items node in DataFlux Data Management Studio enables you to list the items within one or more Reference Data Manager domains. You can use these items to validate incoming data in a job. For example, you could use a Domain Items node to compare incoming address data to the state abbreviations in the US_Postal_Abbreviations domain that is shown above. Nonstandard abbreviations could be listed in a report. The next display illustrates such a job.

In the example job, the Domain Items node could list items in the US_Postal_Abbreviations domain, including the two-letter abbreviations for states.
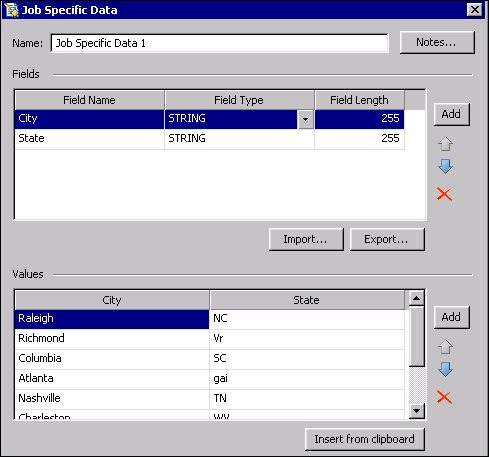
Job Specific Data nodes are typically used for demonstration jobs when it is not convenient to use real data. In the example job, the Job Specific Data node could specify a few cities and states, where the state is specified as a two-letter abbreviation. Some of the abbreviations could be incorrect, to verify that the job could handle such exceptions. In a production job, a Data Source node or some other data input node would be used instead of the Job Specific Data node.
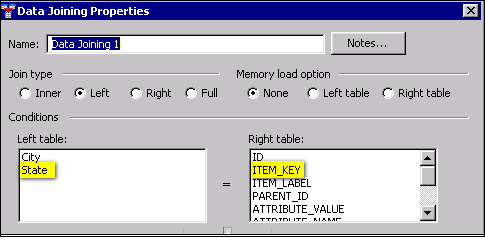
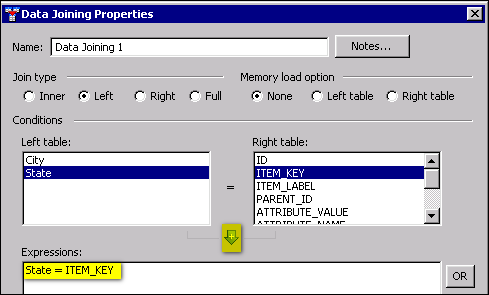
The Data Joining node uses a key field to join incoming data (from the Job Specific Data node) to a set of reference information (from the Domain Items node). In the example job, the key field would be a field for two-letter state abbreviations.
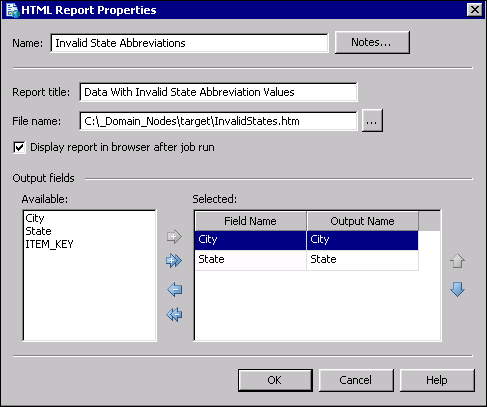
The Data Validation node evaluates the output of the join. In the example job, only rows where the state abbreviation from the data source does not match the state abbreviation from the reference data will be written to the HTML Report node at the end of the flow (Invalid State Abbreviations).
Before you can use the Domain Items node in a data job:
If the prerequisites have been met, then you can perform the following steps to create a job that lists the items within a Reference Data Manager domain. You can then use these items to validate incoming data. It is assumed that you are familiar with creating and running data jobs. For more information about data jobs, see Maintaining Data Jobs.
The goal is to list items from the US_Postal_Abbreviations domain, including the two-letter state abbreviations. Assume that this domain has the short name States.
The next step is to specify the input data for the job. For the example job, you could specify a few cities and states, where the state is specified as a two-letter abbreviation. Some of the abbreviations could be incorrect, to verify that the job could handle such exceptions.
The next step is to join the source data from the Job Specific Data node with the reference data from the Domain Items node. Both the source data and the reference data have a field that contains two-letter state abbreviations. This field will be used to create the join expression.
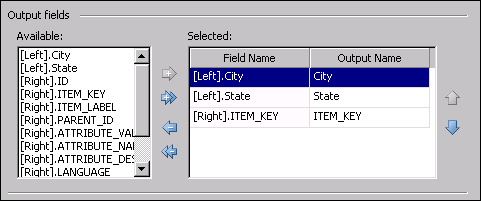
These fields will appear in the report which is generated at the end of the job.
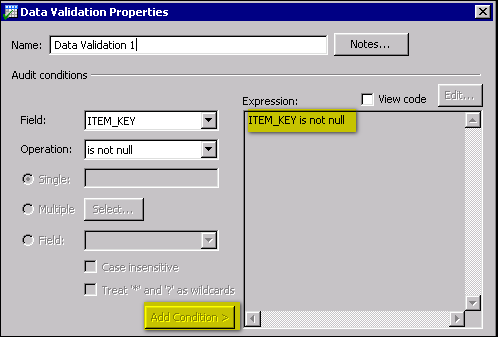
The next task is to configure the Data Validation node that will evaluate the output of the join. In the example job, only "bad data" will be reported. That is, only rows where the state abbreviation from the data source does not match the state abbreviation from the reference data will be written to the HTML Report node at the end of the flow. The steps below describe one way to configure the Data Validation node to get the desired result.
The logic is as follows: when the data source and reference data tables are joined, both the State field from the source and the ITEM_KEY field from the reference data will have the same two-letter state abbreviation--unless the state abbreviation from the data source does not match the state abbreviation from the reference data. In that case, the ITEM_KEY field will be null. When the ITEM_KEY field is null for a row, that row will be written to the HTML Report node at the end of the flow.
Perform the following steps to implement this logic for the example job.
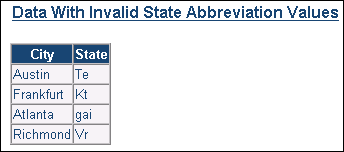
The HTML Reports node at the end of the example job displays rows from the data source that do not have valid state abbreviations. That is, the rows have state abbreviations that are not found in the US_Postal_Abbreviations domain. The steps below describe one way to configure the HTML Reports node.
|
Documentation Feedback: yourturn@sas.com
|
Doc ID: dfDMStd_Task_RDM_DomainItems.html |