DataFlux Data Management Studio 2.6: User Guide
Deploying Profiles to a DataFlux Data Management Server
Overview of Deploying Profiles
Profiles can be deployed from DataFlux Data Management Studio to a DataFlux Data Management Server, where the profiles can be executed. Unlike data jobs and process jobs, however, profiles are not stored as files. They are stored as metadata. Accordingly, the features that are used to copy or export metadata are used to deploy profiles to a DataFlux Data Management Server. This topic describes the basic steps for deploying profiles to a DataFlux Data Management Server. For complete information about this server, see the DataFlux Data Management Server Administrator's Guide.
General Prerequisites
You will need a connection to a DataFlux Data Management Server on the DataFlux Data Management Servers riser bar. See Connecting to Data Management Servers.
You must be connected to the source repository (DataFlux Data Management Studio repository that contains the profile that you want to deploy) and the target repository (repository on the DataFlux Data Management Server).
You must have the same DSN connections, business rules, and other resources on the DataFlux Data Management Server that you used to run profiles in DataFlux Data Management Studio. Here are some typical resources that you might need on the server.
DSN Connections. If a profile uses a DSN connection, that DSN or a copy of it must be available on the DataFlux Data Management Server. See Maintaining Data Connections for the Server.
Macro Variables and Configuration Directives. If a profile depends on macro variables, physical paths, or other directives that are specified in DataFlux configuration files, these files must be available on DataFlux Data Management Server. You might find it convenient to add all of the appropriate items to the configuration files for DataFlux Data Management Studio, and then copy these files to the DataFlux Data Management Server and edit them as needed. See Data Management Studio Files for Macro Variables and Configuration Directives and Data Management Server Files for Macro Variables and Configuration Directives.
Licenses. You do not need a special profile license to execute a profile on the DataFlux Data Management Server.
DataFlux Data Management Platform Repositories. If you have a set of profiles that reference business rules, tasks, custom metrics, and other metadata items in a DataFlux Data Management Studio repository, then you might want to copy that repository to the DataFlux Data Management Server. See Accessing a DBMS Repository From the Server.
Alternatively, if you have only a few profiles with a few dependencies on business rules or other metadata items, then you might want to deploy these dependent objects along with the profile. In this case, you might want to copy or move all related objects to be exported into a single custom folder in the source repository. This will make it much easier to select and deploy a collection of related objects, such as a profile and any related business rules. To do this, use the Move to Folder wizard, which is similar to the Copy to Folder wizard that is described in Copy Profiles to a Data Management Server.
You can use either of the following methods.
Copy Profiles to a DataFlux Data Management Server
You can copy profiles as well as any related metadata items, such as business rules, from a DataFlux Data Management Studio repository to a repository on a DataFlux Data Management Server. Perform the following steps:
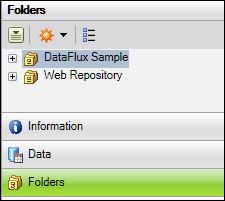
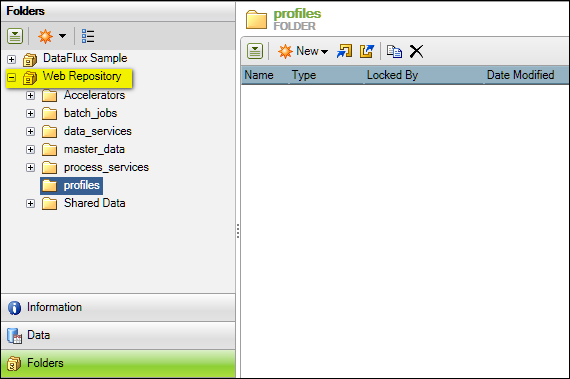
- Click the Folders riser. The top-level icons in the tree on the left represent repositories. An example source repository, DataFlux Sample, is shown in the next figure. The target repository, Web Repository, is also shown. Web Repository is stored on the DataFlux Data Management Server.
-
- Expand the source repository. Verify that the folders tree on the left is in user-defined folders mode (not Group Items by Type mode), as shown in the next figure. In this mode, all of the folders have identical icons.
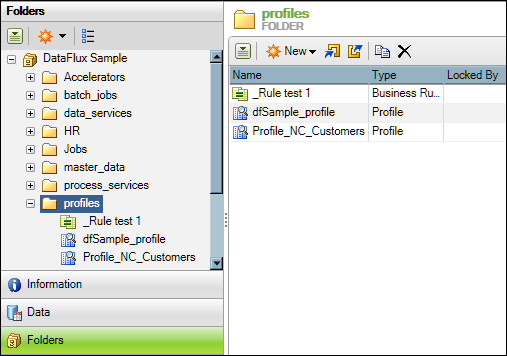
- Expand the user-defined folder that contains the profile that you want to deploy to the DataFlux Data Management Server. In the current example, you would open the profiles folder, as shown above. This folder contains three objects: two profiles and a business rule that is used by one of the profiles.
- For the current example, assume that you want to copy all objects in the profiles folder. With the profiles folder selected in the tree on the left, use Shift-click to select all objects on the right, as shown in the next figure.
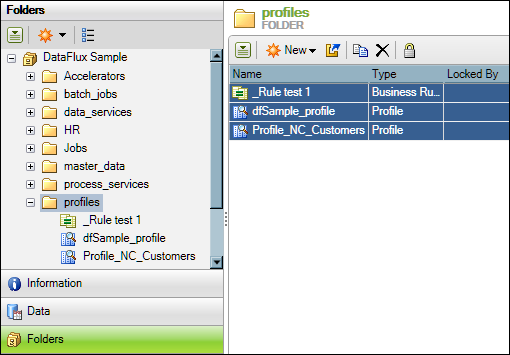
- Right-click the selected objects on the right and select Copy to Folder.
A dialog displays that will enable you to select the target repository.
- Use the Look In control to select the target repository. For the current example, this would be the Web Repository, as shown in the next figure.
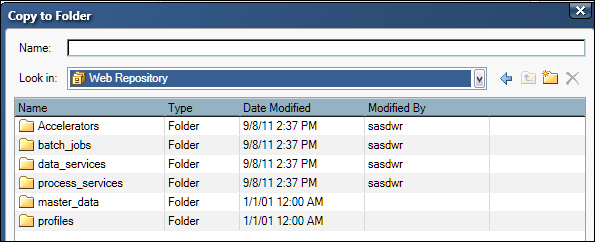
- Ignore any value in the Name field in this dialog. This is just the name of the last item copied. If an appropriate folder is not available, you can add one by clicking the new folder icon at upper right of the dialog. When an appropriate folder is available, select it.
- Click Open to copy the selected objects to the selected folder on the DataFlux Data Management Server.
- To verify that these copied objects are on the DataFlux Data Management Server, navigate to the target repository in the Folders tree, open the target folder, and verify that the objects were copied as specified above.
- To run the profiles, you must go to the DataFlux Data Management Servers riser. Click that riser.
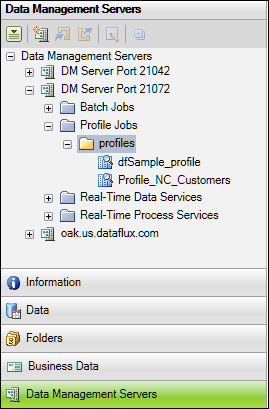
- Expand the target DataFlux Data Management Server and navigate to the Profile Jobs folder that contains the profiles that you just copied, as shown in the next figure.
- To run a profile, you can right-click the profile and select Run.
- If you get errors, click the Run History tab in the right panel.
- Right-click the record for the appropriate run, and then select Open Log.
Import Profiles to a DataFlux Data Management Server
You can export profiles as well as any related metadata items, such as business rules, from a DataFlux Data Management Studio repository. Then you can import them to a repository on a DataFlux Data Management Server. Perform the following steps:
- Click the Folders riser. The top-level icons in the tree on the left represent repositories. An example source repository, DataFlux Sample, is shown in the next figure. The target repository, Web Repository, is also shown. Web Repository is stored on the DataFlux Data Management Server.
- Expand the source repository. Verify that the folders tree on the left is in user-defined folders mode (not Group Items by Type mode), as shown in the next figure. In this mode, all of the folders have identical icons.
- Expand the user-defined folder that contains the profile that you want to deploy to the DataFlux Data Management Server. In the current example, you would open the profiles folder, as shown above. This folder contains three objects: two profiles and a business rule that is used by one of the profiles.
- For the current example, assume that you want to export all objects in the profiles folder. With the profiles folder selected in the tree on the left, use Shift-click to select all objects on the right, as shown in the next figure.
- Right-click the selected objects on the right and select Export.
The first page of the Export wizard displays, as shown in the next figure.
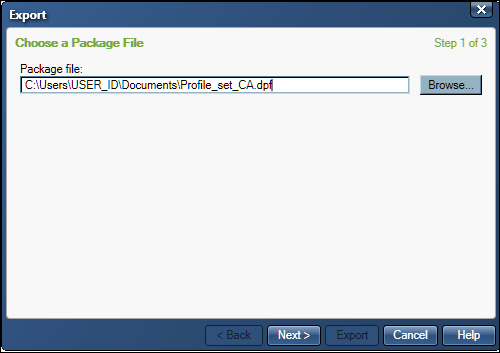
- Ignore any value in the Package file field on this page. This is just the name of the last item exported. Replace any old value with a name that is appropriate for the items that you are exporting now. such as Profile_set_NC. You can browse to a target folder or just type the name of the exported object into the field on the first page. By default the package will be saved to a folder in the user area.
- When ready, click Next to go to the next page of the wizard, as shown in the next figure.
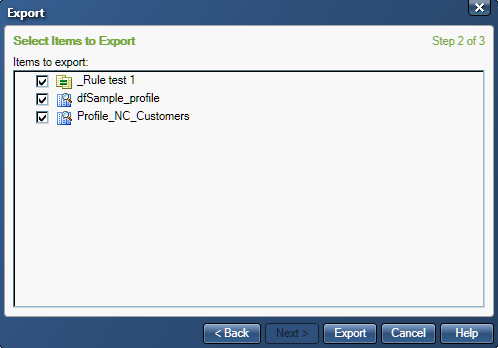
- Review the items that you have selected for export. When ready, click Next to go to the last page of the wizard.
- The selected items will be exported as a package to the path that was specified in Step 6. The next task is to import the package to a folder in a DataFlux Data Management Server repository.
- On the Folders riser, expand the folder for the target repository, such as Web Repository.
- Navigate to an appropriate folder for the package that you want to import, such as the profiles folder that is shown in the next figure.
- Right-click the target folder and select Import. The first page of the Import wizard displays. The name and path of the package that you exported will be displayed. If you are importing a package other than the one that is provided by default, browse to the package. When ready, click Next to go to the last page of the wizard.
- Review the items that you have selected for import. When ready, click Next to go to the last page of the wizard.
- The selected items will be imported to the target folder.
- To run the profiles, you must go to the DataFlux Data Management Servers riser. Click that riser.
- Expand the target DataFlux Data Management Server and navigate to the Profile Jobs folder that contains the profiles that you just imported, as shown in the next figure.
- To run a profile, you can right-click the profile and select Run.
- If you get errors, click the Run History tab in the right panel.
- Right-click the record for the appropriate run, and then select Open Log.
|
Documentation Feedback: yourturn@sas.com
Note: Always include the Doc ID when providing documentation feedback.
|
Doc ID: dfDMStd_T_DMServerProfile.html
|