DataFlux Data Management Studio 2.5: User Guide
You can add a new DataFlux Data Management Studio repository to store profiles, business rules, jobs, and other objects. You can perform the following tasks:
See also Repository Usage Notes.
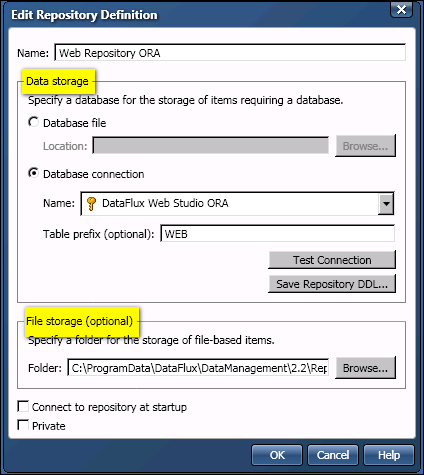
To add or update a repository, you will access the Repository Definition dialog. This dialog is used to create a repository definition file (.RCF file). There are two main sections of the Repository Definition dialog, as shown in the next figure:
Data storage - specifies a database for the storage of data explorations, profiles, and all objects in the Business Rule Manager (rules, tasks, custom metrics, etc.). Supported databases include SQLite and other database formats.
File storage - specifies a separate storage location for objects that are stored as files, such as data jobs, process jobs, queries, *.sas files (SAS code files), and Entity Resolution Output files (*.sri files).
Administrators should review the storage options for repositories, identify the appropriate databases and physical paths, and create the required DSN connections, as described in Maintaining Data Connections. For more information about supported database formats, see "Repository Storage" in the DataFlux Data Management Studio Installation and Configuration Guide. See also Repository Usage Notes.
Use the following table to plan how you will set the attributes for your new repository.
| Goal | Repository Attributes |
|---|---|
| Create a standalone repository for your own use. | For more information, see Work with Private and Public Repositories. |
| Share a repository among multiple Data Management Studio users. |
Due to locking issues, file-based repositories and Microsoft Access-based repositories are not recommended for production systems. Accordingly, see the "Store the repository in a database format other than SQLite" row in this table. Set your repository definition to public. For more information, see Work with Private and Public Repositories. |
| Store the repository in SQLite database format. |
Specify a Database file.
|
| Store the repository in a database format other than SQLite. |
Specify an existing Database connection. For information about connections, see Maintaining Data Connections.
|
| Work with DataFlux Data Management Studio objects that are stored as files, such as data jobs, process jobs, queries, *.sas files (SAS code files), and Entity Resolution Output files (*.sri files). Most users will want to do this. | Specify a Data storage location and a File storage location. |
| Work exclusively with objects that are stored in database format, such as profiles, rules, and tasks. Never work with DataFlux Data Management Studio objects that are stored as files. | Specify a Data storage location but no File storage location. |
| Change the default location of the DataFlux Master Data Foundations content for a repository. | Specify a path for the macro variable MDM_REPOSITORY_ROOT_FOLDER in a configuration file, such as app.cfg. By default, the DataFlux Master Data Foundations content will be stored the master_data subfolder in the File storage area. |
For more information about the databases that are supported for data storage, or the platforms that are supported for file storage, see "Repository Storage" in the DataFlux Data Management Studio Installation and Configuration Guide.
At start up, DataFlux Data Management Studio looks for repository definition files (.RCF files) in two locations:
C:\Documents and Settings\<userid>\Application Data\DataFlux\...For best performance, each DataFlux Data Management Studio user should work in his or her individual repository. Accordingly, when you add a new repository, the Private checkbox is selected by default. If Private is selected, then the repository definition file will be saved in a user-specific folder. Other users will not be able to see a repository whose definition file is stored in a user-specific folder.
If Private is not selected, then the repository definition file will be saved to a subfolder in the DataFlux Data Management Studio installation directory. All users who can access DataFlux Data Management Studio on that computer will be able to see a repository whose definition file is stored in the installation directory. These users would also need to be able to access the Data storage location and File storage location (if any) that is specified in the repository definition file.
![]() Note: If you attempt to create a public repository, and you get an error that says that you cannot access the path that is specified for Data storage or File storage, then change the path to a path that is accessible to those who will share the public repository.
Note: If you attempt to create a public repository, and you get an error that says that you cannot access the path that is specified for Data storage or File storage, then change the path to a path that is accessible to those who will share the public repository.
It is possible for multiple users to share a repository over a network if these users can access the repository definition file, the Data storage area, and any File storage area for that repository.
If you want to create a repository in a database management system, you must first create a DSN connection to that system, as described in Maintaining Data Connections. Perform the following steps to add a repository definition file (.RPS file) and create a new repository in the location that is specified in the definition file.
etc/repositories folder in the Data Management Studio installation directory. A new repository will be created in the location that is specified in the Data storage field of the definition file. You will be connected to the new repository.
![]() Note: Do not create a repository definition file (.RPS) in the file storage location. This practice prevents manipulating the file through DataFlux Data Management Studio, and it triggers unneeded update events in the file storage area every time that the definition file is updated.
Note: Do not create a repository definition file (.RPS) in the file storage location. This practice prevents manipulating the file through DataFlux Data Management Studio, and it triggers unneeded update events in the file storage area every time that the definition file is updated.
If you upgrade DataFlux Data Management Studio from an earlier release, you might be prompted to upgrade your repository. Be sure to back up any repository before upgrading it.
If you specify the location of a dfPower Studio repository in the Add Repository dialog, the repository will be converted to DataFlux Data Management Studio format. Some objects in the repository will be converted and will be ready to use, and others will require additional processing. For more information, see the DataFlux Migration Guide.
![]() Note: DataFlux Data Management Studio does an in-place upgrade of a dfPower Studio repository. dfPower Studio cannot access a repository that has been converted to DataFlux Data Management Studio format.
Note: DataFlux Data Management Studio does an in-place upgrade of a dfPower Studio repository. dfPower Studio cannot access a repository that has been converted to DataFlux Data Management Studio format.
Accordingly, make a copy of the dfPower Studio repository to be upgraded, and then upgrade the copy rather than the original. Upgrading a copy of your repository enables you to preserve your original dfPower Studio content.
The Save Repository DDL button is active for repositories that are stored in a database management system. This button enables you to save a Data Definition Language (DDL) file for the current repository. Use the Browse button to specify a path to the DDL file.
At some sites, a DataFlux Data Management Studio user might not have appropriate privilege to create a repository in the target database. In such a case, you can use this field to create a DDL for the repository. Then a database administrator can use the DDL as a reference for creating the repository in the target database.
|
Documentation Feedback: yourturn@sas.com
|
Doc ID: dfU_T_ReposAdd.html |