You are here: Data Riser Bar>Maintaining Data Connections>Adding ODBC Connections

DataFlux Data Management Studio 2.5: User Guide

Adding ODBC Connections

You can use ODBC Data Source Name (DSN) connections to access data in many different database management systems. Perform the following steps.

  1. Click the Data riser on the DataFlux Data Management Studio desktop.
  2. Expand the Data Connections folder.
  3. Select the New Data Connection menu in the Data Connections pane on the right. Then select ODBC Connection to display the ODBC Data Source Administrator dialog.
  4. Select the type of connection that you want to establish. For example, you can click System DSN to create a connection to a data source that all users on the machine can access. The System DSN tab is shown in the following display:

  5. Click Add to select the driver for your data source. Select the appropriate driver as shown in the following display.

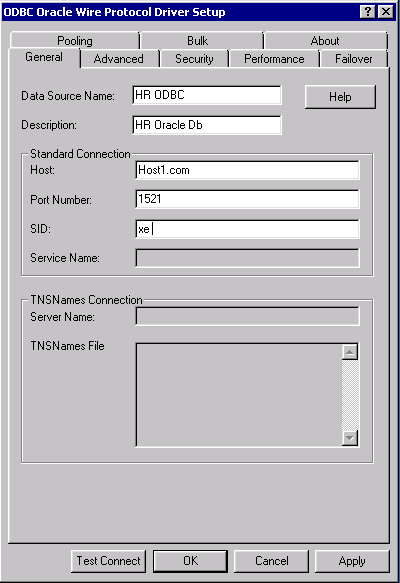
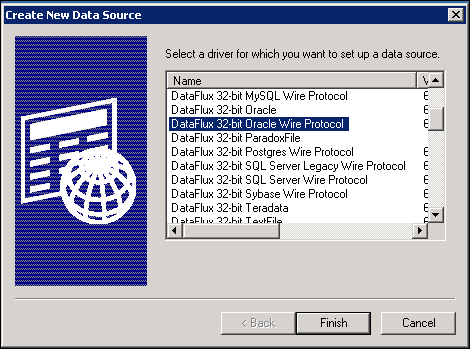
    Note that when you specify a given driver in a DSN connection, the server that you are connecting to must be configured to expect the protocols and other attributes of that driver. For example, if you specify the DataFlux 32-bit SQL Server Wire Protocol driver in the DSN, you must also enable TCP/IP in the SQL Server Configuration Manager.

  6. Click Finish. A setup dialog displays for the selected driver (connection type).
  7. Enter a name, a description, and other attributes into the setup dialog. We recommend that you avoid using special characters such as quotation marks in your data source names. The dialogs for different drivers will have different fields for specifying login names, passwords, and other connection attributes. The information that you need to enter should be supplied by an administrator at your site. The following display shows a set of attributes for an Oracle Wire Protocol connection.


  8. The last steps will vary for different ODBC connection types. For the Oracle Wire Protocol connection shown above, you would click OK save the connection and return to the ODBC Data Source Administrator dialog. The new connection is included on the System DSN tab of that dialog.
  9. Click OK to close the ODBC Data Source Administrator dialog and return to the Data riser.
  10. Refresh the Data riser in order to see the new connection in the Data Connections folder in the left pane. Select View, and then select Refresh from the main menu. The new connection should appear in the Data Connections folder.
  11. To verify a connection, double-click the connection in the Data Connections folder in the left pane. Enter any required credentials. If the connection works, you will be able to see tables, fields, and other attributes in the right panel.

See also Data Connection Usage Notes.

Documentation Feedback: yourturn@sas.com
Note: Always include the Doc ID when providing documentation feedback.

Doc ID: dfU_T_DataConnODBC.html