Menus and Toolbars
Menus
File Menu
The File menu
provides commands for file manipulation. Some of these commands are
also included on the toolbar for quicker access.
 New (Ctrl-N)
 Open (Ctrl-O)
 Save (Ctrl-S)
 Save As (F12)
 Close (Ctrl-F4)
 Close All Files
 Print (Ctrl-P)
New (Ctrl-N)
creates a new, blank workflow template.
Open (Ctrl-O)
opens a workflow template that is stored locally in a file.
Save (Ctrl-S)
saves the active template
to a file.
Save As (F12)
saves the active template
to a file and prompts you for a filename.
Close (Ctrl-F4)
closes the active template.
Close All Files
closes all open workflow templates.
Print (Ctrl-P)
prints the active template.
Properties
enables you to modify
properties of the active template, including the name, description,
and associated attributes and tags.
Options
enables you to set
session properties for SAS Workflow Studio such as time and date formats,
history size, and other configuration options. Changes made to these
settings are not saved after you click Submit.
Instead, the changes to settings are saved after you close SAS Workflow
Studio.
Note: If you are using Microsoft
Windows, your user preference settings for SAS Workflow Studio are
saved in the
C:\Users\username\AppData\Roaming\SAS directory.
Otherwise, they are saved in the installation directory.
Recent Files
lists recently opened workflow templates.
Exit
closes SAS Workflow
Studio.
Edit Menu
The Edit menu
provides commands for manipulating objects. Some of these commands
are also included on the pop-up menus in the project tree and diagram
editor for quicker access.
 Edit Properties
 Cut
Cut
 Copy
Copy
 Paste
Paste
 Delete
 Add to Clip Explorer
Edit Properties
edits the properties
of a selected object.
Cut
copies the selected
object to the clipboard and removes it from the drawing pane.
Copy
copies the selected
object to the clipboard without removing it from the drawing pane.
Paste
pastes the current
clipboard contents to the drawing pane.
Delete
removes the selected
object from the drawing pane.
Add to Clip Explorer
adds the selected object
to the default folder of the Clip Explorer.
View Menu
The View menu provides commands to enable and disable the SAS Workflow Studio utilities: workflow
tree, format toolbar and Clip Explorer. Some of these commands are also included
on the toolbar for quicker access.
 Format Toolbar (F10)
 Clip Explorer (F11)
Workflow Tree
displays the content hierarchy of the template that is open in the diagram editor.
The workflow tree displays all of the template’s Data Objects, Statuses, Policies,
Participants,
and Tasks organized by type and associated task.
Format Toolbar (F10)
is used to configure
graphics properties of the diagram.
Clip Explorer (F11)
stores workflow elements as a library of symbols and formatted workflow objects that
can be reused
using the copy and paste commands.
Server Menu
The Server menu provides commands for managing workflow templates between SAS Workflow Studio
and the SAS Content Repository. Some of these
commands are also included on the toolbar for quicker access.
 Save to Repository (F7)
 Open from Repository (F5)
 Manage Templates (F3)
Log On (F9)
logs on to the SAS
Platform.
Log Off (Alt-F9)
ends the connection
with the SAS Platform.
Save to Repository (F7)
uploads a workflow template to the SAS Content Repository.
Open from Repository (F5)
retrieves or checks out a copy of a workflow template from the SAS Content Repository.
Manage Templates (F3)
displays a list of workflow templates currently available in the SAS Content Repository
and facilitates management
of active workflow definitions.
Compare Versions
compares the version
of the template that is currently open in the editor pane with another
version in the content repository.
Manage Access
manages user and group
access control for the currently open template.
Help Menu
The Help menu
provides access to product documentation and configuration information.
 Help Topics (F1)
Help Topics (F1)
opens the online Help
for SAS Workflow Studio.
SAS on the Web
provides links to additional
resources on the SAS website, including a link to the SAS Workflow Studio: User’s Guide.
About SAS Workflow Studio
displays product information
for SAS Workflow Studio.
Drawing Tools
The drawing toolbar provides a set of controls that can be used to construct or edit
a workflow template. Select the corresponding button to activate a command. To select
an element in the
diagram editor (to move it, or for access to the right-click menu), use the Select Tool button
in the toolbar.
 Select Tool (spacebar)
 Hand Tool (H)
 Add Task (A)
 Add Sequence flow Line (C)
 Add Logic Gateway (L)
 Add Swimlane (W)
 Add Annotations (N)
 Add Merge/Fork Gateway (J)
 Add Decision Gateway (D)
 Add Timer (T)
 Add Stop Node (S)
Select Tool (spacebar)
selects an object on
the editor pane before moving it or right-clicking it.
Hand Tool (H)
navigates the editor
pane and acts as a scroll bar.
Add Task (A)
adds a new task to the diagram.
Add Sequence flow Line (C)
links together tasks
and gateways.
Add Logic Gateway (L)
adds a logic gateway (AND or OR) that controls the execution flow behavior of the connected tasks.
Add Swimlane (W)
assigns the participants
of the contained tasks.
Add Annotations (N)
adds annotations to
the diagram.
Add Merge/Fork Gateway (J)
represents execution
flow forking (splitting) or joining to denote parallel processing
paths.
Add Decision Gateway (D)
adds a Decision gateway to the diagram to denote alternate processing paths.
Add Timer (T)
adds a Timer node to
the diagram.
Add Stop Node (S)
adds a Stop node to
the diagram.
SAS Workflow Studio supports several predefined keyboard shortcuts to create multiple
objects of the same type. If a shortcut key is pressed followed by a left mouse click
in the diagram editor, then the associated object is created. For example, if you
press the A key and then click the mouse in the drawing pane, a Task node is created
to the right of the mouse pointer location. If you press the W key, then you can use
the mouse to draw the boundaries of the swimlane.
In addition, the following
movement key bindings are available:
-
The left, right, up, and down arrows move a selected object one pixel in the corresponding direction.
-
The same keys in combination with the Shift key move the object 8 pixels in the corresponding direction.
-
The same keys in combination with the Alt key move the object 18 pixels in the corresponding direction.
Note: These key bindings cannot
be customized.
Zoom Toolbar
SAS Workflow Studio
includes a zoom toolbar that allows users to zoom in or zoom out of
the current diagram. Choosing a zoom factor of 100% yields a 1:1 magnification
ratio. A higher zoom percentage zooms in to the diagram, and a lower
zoom percentage zooms out from the drawing.

You can also use the
navigator pane to view large diagrams. See Using the Navigator Pane for more information.
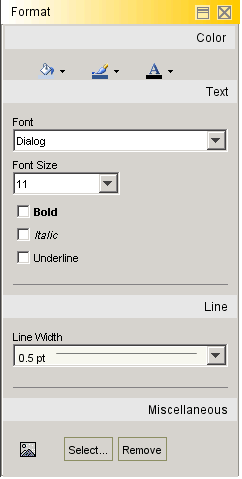
Format Toolbar
The format toolbar provides additional formatting properties for workflow templates.
It contains the following four main control groups:


Color Property Controls
Text Property Controls
Outline Property Controls
Miscellaneous Property Controls
The format toolbar can
be toggled on and off by pressing F10 or by selecting the Format
Toolbar check box in the View menu.
The format toolbar can also be displayed as a panel by selecting the
Switch to panel mode icon ( ) in the Miscellaneous Property Controls group.
) in the Miscellaneous Property Controls group.
Format Toolbar in Panel Mode
Note: Standard cut and paste operations
do not maintain any special formatting. Formatted objects should be
reproduced using the Clip Explorer.
Copyright © SAS Institute Inc. All Rights Reserved.
Last updated: March 5, 2020