Working with Statuses
Overview
Statuses are used to
denote the outcome of a process step as values associated with a logical
transition from one activity to another. These values appear as labels
on the flow connections and they represent the condition, which must
be met in order to realize the transition.
By default, when no status is added,
the task completes and the subsequent task is automatically started.
This default value is represented as the (FINISHED) state in the status
assignment menu, but does not explicitly appear on the transition
as a label. Predefined values are
Cancel, Done, Okay, Overdue,
and Scheduled. You can also define
custom status values.
If a status is specified
on the connection, then the process advances to the next activity
in the sequence only when that status changes to the associated value
causing the current activity to complete.
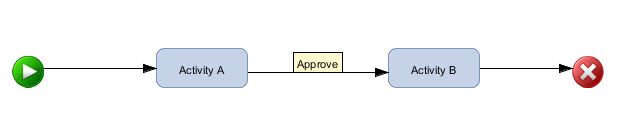
For example, the process
contains two activities, A and B, with a connection from Activity
A to Activity B. If Activity B is initiated after Activity A has been
approved, then we can represent it by assigning an Approve status
to the connection between Activity A and Activity B, as shown in the
following figure:
Assigning a Status
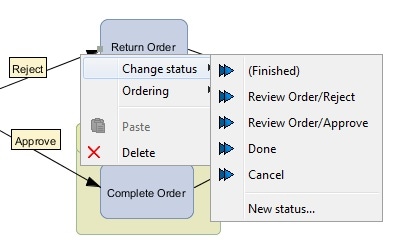
To assign a status,
right-click on a connection between activities and then select Change
status. This opens a menu containing the status values
defined for the workflow. If the desired status is not defined, then
you can select the New status menu option
to define the new status value.
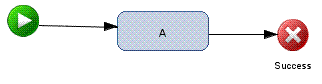
The Change
status menu does not appear on the pop-up menu for the
connection between the Start node and the first activity. However,
a status value can be assigned to a connection to the Stop node, as
shown in the following figure:
Tip
You can use the Selection
tool ( ) to reposition the activity figures in the diagram
editor to ensure that the statuses are visible. Also, you can reposition
the connection endpoints by selecting the target connection. Then,
select the endpoint and drag it to the new location in the figure
by releasing the mouse.
) to reposition the activity figures in the diagram
editor to ensure that the statuses are visible. Also, you can reposition
the connection endpoints by selecting the target connection. Then,
select the endpoint and drag it to the new location in the figure
by releasing the mouse.
Local Statuses
When you define a status
locally for an activity, not for the whole process, SAS Workflow Studio
displays the relative label path. A label path is an alternative way
to refer to an object when using the object ID is not feasible. A
label path contains a sequence of strings. Each string is the label
of a parent or ancestor of the object except for the last label, which
corresponds to the object itself.