Opening and Creating Programs
Opening a Program
You can open SAS programs
from the Server Files and Folders section of the navigation pane. To open a program, expand the appropriate folder and double-click the program that
you want to open, or drag it into the work area. The program opens in a new tab in
the work area.


Running a Program
After you have written
your program, you can run the entire program or you can select specific
lines of code to run. To run the entire program, click  . To run a portion of the program, select the lines
of code that you want to run and then click .
. To run a portion of the program, select the lines
of code that you want to run and then click .
. To run a portion of the program, select the lines
of code that you want to run and then click .
If there are no errors,
the results open automatically. If there are errors, the Log tab
opens by default. You can expand the Errors, Warnings, and Notes sections
to view the messages. When you click on a message, SAS Studio highlights
it for you in the log so that you can see exactly where the message
occurs in the log.

Note: Because you are working in
a server environment, do not include the ENDSAS statement in your
SAS programs. If you run a program that contains ENDSAS, reset your
SAS session by clicking  and selecting Reset SAS Session.
and selecting Reset SAS Session.
Using the Batch Submit Feature
Running a Program in Batch Mode
To run a program in batch mode, right-click the program in the navigation pane and select Batch
Submit.
Note: You cannot run a program
in batch mode if the program is saved on an FTP server or on a SAS
server running on the native z/OS file system. Programs that are saved
on a z/OS SAS server running the HFS file system can be run in batch
mode.
By default, a notification
message is displayed when the program is submitted and again when
the program has finished running. If you log off of SAS Studio while
the program is running, the program continues to run, but the notification
message that indicates when the program is finished is not displayed.
Note: Because batch mode uses a
separate workspace server, any libraries that are created by your
program do not appear in the Libraries section
of the navigation pane in SAS Studio.
To view the status of
your batch jobs, click and select Batch Submission Status.
and select Batch Submission Status.
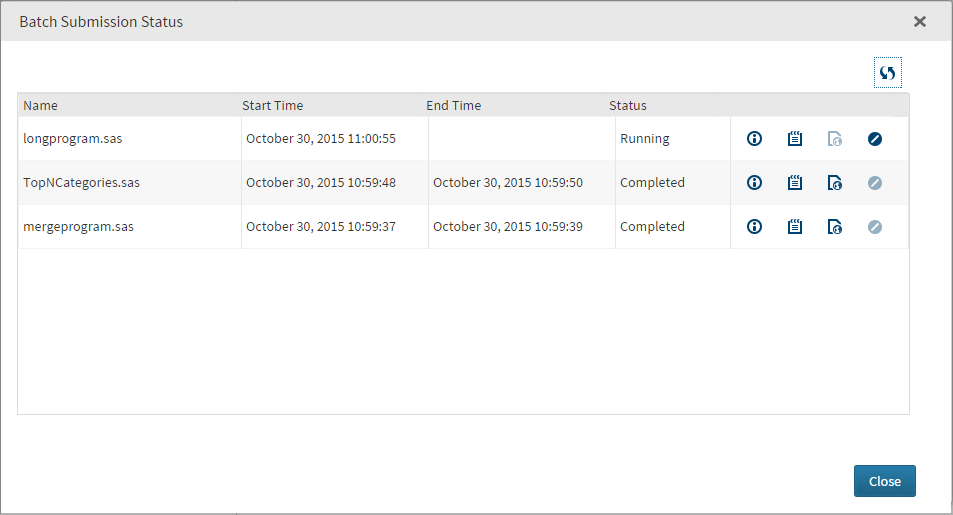
You can use the Batch
Submission Status window to perform the following tasks:
 |
Display the batch job
properties, including file pathnames, start time, end time, and status.
|
 |
Open the program log
in the SAS Studio work area.
|
 |
Open the program results
in a separate window.
|
 |
Cancel a running batch
job. Any output that has been created by the job is not deleted.
|
After the batch job
completes, you must refresh the Server Files and Folders pane to view any output and log files.
Customizing Your Batch Submissions
The Preferences window
enables you to customize how to handle batch submissions.
To change whether existing log and output files are deleted or overwritten when you rerun a batch job, click and select Preferences.
Click Batch.
and select Preferences.
Click Batch.
For more
information about each option, see Setting Preferences for Batch Submissions.
Using the Autocomplete Feature
About the Autocomplete Feature
The autocomplete, or code completion, feature in the code editor can predict the next word that you want to enter before you actually enter it completely.
The autocomplete feature can complete keywords that are associated with SAS procedures, statements, macros, functions, CALL routines, formats, informats, macro variables, SAS colors, style elements, style attributes, and statistics keywords, and various SAS statement and procedure options. The autocomplete
feature can also complete librefs and table names.
Note: The autocomplete feature
is available only for editing SAS programs.

How to Use the Autocomplete Feature
To use the autocomplete
feature:
-
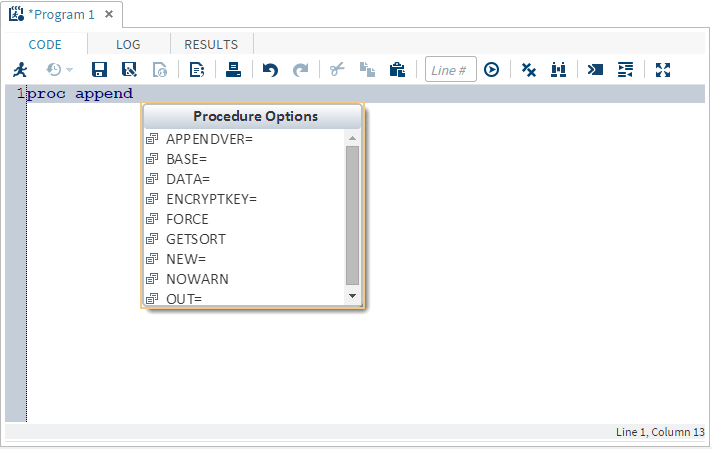
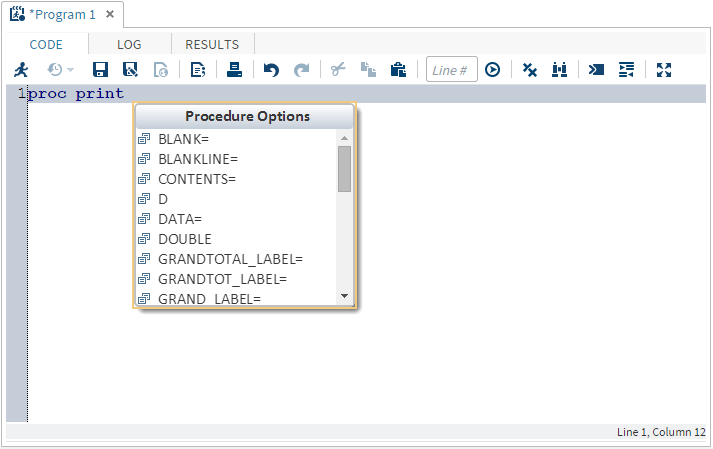
How you open the autocomplete list depends on the keyword that you want to add.
-
If you want to add a global statement, DATA step statement, CALL routine, procedure, macro statement, or automatic macro variable, enter the first one or more letters of the keyword that you want to use.A window opens with a list of suggested keywords that begin with those letters.
-
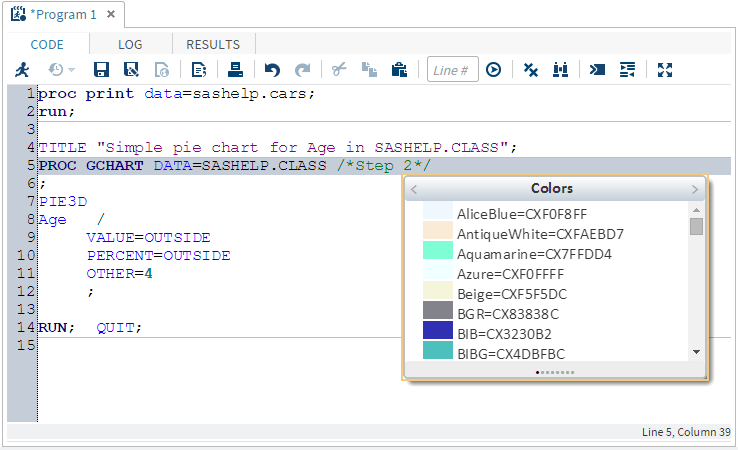
If you want to specify colors, formats, informats, macro functions, SAS functions, statistics keywords, style elements, or style attributes, position your mouse pointer in a comment and press Ctrl+spacebar. To navigate through the list of options backward, press Ctrl+Shift+spacebar.Note: These shortcuts work even if you have deselected the Enable autocomplete option in the Preferences window. For more information, see Customizing the Code Editor.
-
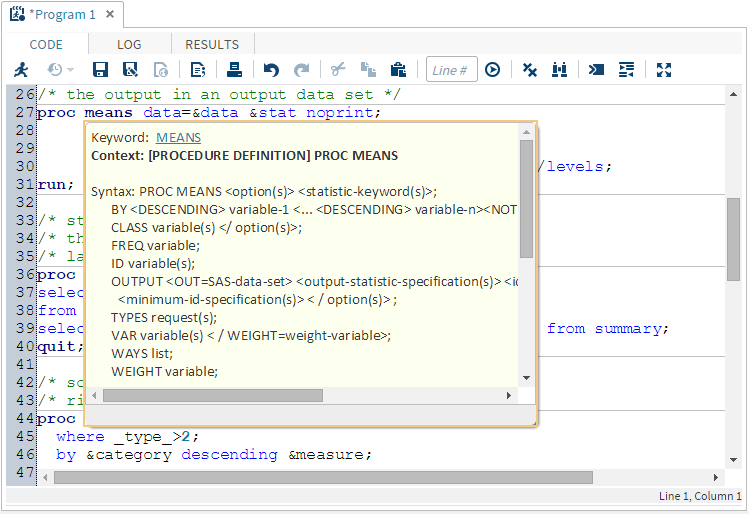
Using the Syntax Help
The code editor displays brief SAS syntax documentation as you write and edit your
programs. You
can display the Help in the following ways:
-
Right-click a keyword in your program and select Syntax Help.
-
Start entering a valid SAS keyword, and then click a suggested keyword in the autocomplete window.
-
Position the mouse pointer over a valid SAS keyword in your program. This works only if you have selected the Enable hint option in the Editor preferences. For more information, see Customizing the Code Editor.
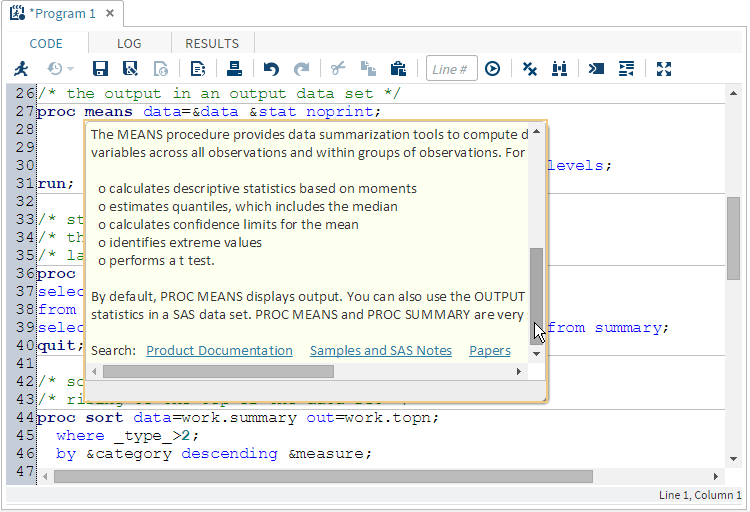
The SAS Product Documentation provides more comprehensive usage information about
the SAS language, but the syntax help in the code editor can get you started with
a hint about the syntax or a brief description of the keyword.
You can get additional help by clicking links in the syntax help window as follows:
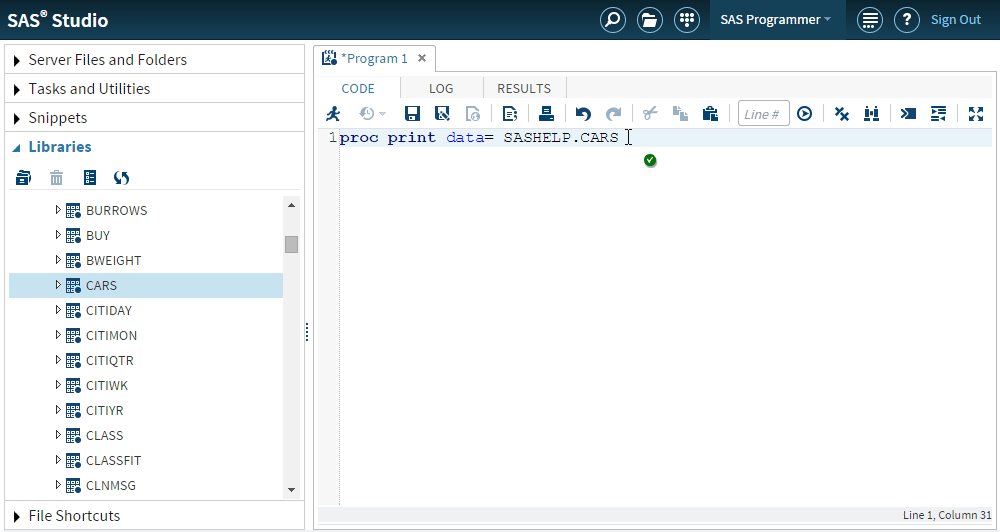
Adding Table Names and Column Names
From the Libraries section of the navigation pane, you can use a drag-and-drop operation to move table
names and column names into
the SAS code. For example, you can move the Sashelp.Cars table into the DATA option
for the PRINT procedure. When you release the mouse, the fully qualified name for
the table appears in your code.
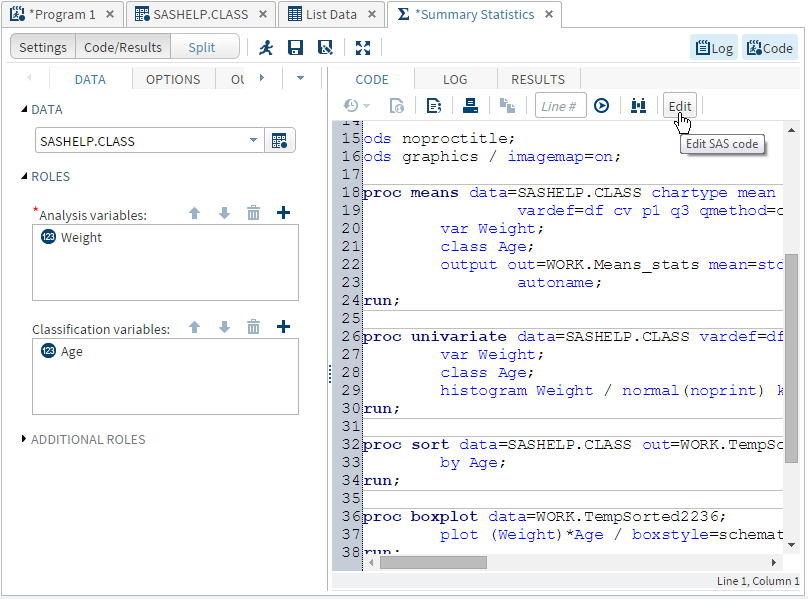
Editing the Code from a Task
You can edit the code
that is generated automatically when you run a task and then run it
with your modifications. When you edit the code, SAS Studio opens
it in a separate program window. The code is no longer associated
with the original task.
To edit a program generated
by a task:
-
On the appropriate task tab in the work area, click Code to display the code that is associated with the task.Note: In order to edit the code that is associated with a task, you must first display the code with the task. If the task code is not displayed, click and select Preferences.
Click Tasks, and then select Show
Task Code.
-
Creating a SAS Program Package
A SAS Program Package is a file that contains a snapshot of a SAS program along with
its log and HTML results. You can create a program package from code that you have written as well as code that is automatically generated when
you run a task. When you open a program package in SAS Studio, you can access the
code as well as the log and results without running the program again. If you make
changes to the code and rerun it, the package is not automatically updated. You must
save the package again to keep the changes.
Note: The program package does
not include PDF or RTF results. You cannot create a program package
if you are running your program in interactive mode.
To create a program package file, open the code that you want to use and click  . Specify the file location and name, and then select
. Specify the file location and name, and then select SAS
Program Package as the Save as type option.
Note: If you want to save the program
or log individually or download the results as an HTML, PDF, or RTF
file, you must resubmit the program after you open the program package file.
Creating a Program Summary
You can create a summary page for code that you have written as well as code that
is automatically generated when you run a task. The Program Summary page is an HTML
file that opens in a separate browser tab and includes information about the program execution, the complete SAS source code, the complete SAS log, and the results. To view the Program Summary page for a program,
click  .
.
.
Note: The Program Summary is available
only after you have run the program.
You can also save a
Program Summary file to a folder that you specify by clicking and selecting
and selecting SAS Program Summary as
the Save as type option. The Program Summary
is saved as an HTML file.
Using Macro Variables
Macro variables can be used to add information that is obtained when a program or
task is run, such as the name and version number of the application. You can reference these items within code, titles, or footnotes by preceding them
with "&".
For example, you can
use macros in a footnote like the following:
Generated with &_CLIENTAPP &_CLIENTAPPVERSION
Note: In addition to the following
macro variables, you can use SAS macro functions and variables in
your code. For information about SAS macro functions and variables,
see SAS Macro Language Reference.
|
Macro Variable
|
Description
|
|---|---|
|
_CLIENTAPP
|
name of the application.
|
|
_CLIENTAPPVERSION
|
application version number.
|
|
_SASPROGRAMFILE
|
the full path and filename of the SAS program that is currently being run. This macro
variable is available only for SAS program files that are saved on the same server
on which
your SAS Studio code is running.
|
Note: If you specify
%put
                        _all_
or %put _global_ in your
SAS program, the output does not include any special characters. For
example, slashes are not included in directory paths. To view the
output with these special characters, you must specify the individual
macro variable by name, such as %put &_sasprogramfile;.
Using Your Submission History
SAS Studio maintains
a log with entries for each time you run a program or task. You can
use this log, or submission history, to access prior versions of your
submitted code. To view your submission history, click the Code tab in your program or task window. On the toolbar, click  and select the version that you want to open. The
prior version of the program opens in a new window from which you
can copy and paste the code as needed.
and select the version that you want to open. The
prior version of the program opens in a new window from which you
can copy and paste the code as needed.
and select the version that you want to open. The
prior version of the program opens in a new window from which you
can copy and paste the code as needed.
Note: The submission history is
cleared when you sign off from SAS Studio.
Automatically Formatting Your SAS Code
You can use the code editor to make your programs easier to read by automatically
formatting your code. When
you automatically format your code, line breaks are added, and each line is correctly indented according to
its nesting level. To format the code in the code editor, click  .
.
.
For example, the following
code is difficult to read because it lacks indention and logical line
breaks:
data topn;
length rank 8; label rank="Rank";
set topn; by &category descending &measure;
if first.&category then rank=0; rank+1;
if rank le &n then output;
run;
After you use the automatic
code-formatting feature, the program looks like this:
data topn;
    length rank 8;
    label rank="Rank";
    set topn;
    by &category descending &measure;

    if first.&category then
        rank=0;
    rank+1;

    if rank le &n then
        output;
run;
Working in Interactive Mode
What Is Interactive Mode?
Some SAS procedures are interactive, which means they remain active until you submit
a QUIT statement,
or until you submit a new PROC or DATA step. In SAS Studio, you can use the code editor
to run these procedures, as well as other SAS procedures, in interactive mode.
By using interactive mode, you can run selected lines of code from your SAS program
and use the results to
determine your next steps. For example, the OPTMODEL procedure in SAS/OR enables you to model and solve mathematical programming
models. By running this procedure interactively, you can quickly check
results for parts of the program and determine whether you need to
make any modifications without running the entire program.
Note: Interactive mode is available
only if you are running the first maintenance release for SAS 9.4
or later releases.
Running a Program in Interactive Mode
To run a program in interactive mode, click  on the toolbar. To turn off interactive mode, click again. If you change modes while a program is open,
the log and results for that program are cleared. You can also clear
the log and results manually by clicking
on the toolbar. To turn off interactive mode, click again. If you change modes while a program is open,
the log and results for that program are cleared. You can also clear
the log and results manually by clicking  on the appropriate toolbar.
on the toolbar. To turn off interactive mode, click again. If you change modes while a program is open,
the log and results for that program are cleared. You can also clear
the log and results manually by clicking on the appropriate toolbar.
When you run a program in interactive mode, SAS Studio does not add any automatically
generated code, such as ODS and %LET statements, to your program. In addition, results are generated only in
HTML. In interactive mode, the log and results are appended to the existing log and
results. Previously submitted code remains active until you terminate it.
For example, suppose
you have the following program:
proc sql;
  select * from sashelp.cars;

  select * from sashelp.class;
  quit;
In noninteractive mode,
if you select the first two lines of code and submit them, the code
runs successfully. If you then select the last two lines of code and
submit them, the code fails because the PROC SQL statement is missing.
If you switch to interactive mode and follow the same steps, the last two lines of
code run successfully because the
PROC SQL statement is still active.
Note: For documentation about specific
procedures, see the SAS Programmer’s Bookshelf on support.sas.com.
About Libraries in Interactive Mode
When you use interactive mode, you are creating a new workspace server session with its own list of libraries that are available only in that session. If you assign a new library when you are in interactive mode, the library might not be available when you turn
off interactive mode. In order to share data in a library between interactive mode
and noninteractive mode, the library must be included in your autoexec.sas file so
that it is assigned every time you use SAS Studio. For more information, see Editing the Autoexec File.
Webwork is the default output library in interactive mode. If you refer to a table
without specifying both the libref and the table name,
SAS Studio assumes it is stored in the Webwork library. The Webwork library is shared
between interactive mode and noninteractive mode. Any data that you create in the
Webwork library in one mode can be accessed in the other mode.
Note: If you run a program that
creates output data in interactive mode and this data is saved in
a library that is available in both interactive and noninteractive
mode (such as the Webwork library), you must refresh the Libraries section
of the navigation pane to view the new data from the user interface.
The Work library is not shared between interactive mode and noninteractive mode.
Each workspace server session has its own separate Work library, and data cannot be
shared between them. Any data
that you save to the Work library in interactive mode cannot be accessed from the
Work library in noninteractive mode. In addition, you cannot view data in the Work
library from the Libraries section of the navigation pane if the data was created in interactive mode. However,
you can access that data programmatically
in interactive mode.
Special Considerations When Using Interactive Mode
The following list summarizes some of the special considerations for using interactive
mode:
-
If you run a program that creates output data in interactive mode, you must refresh the Libraries section of the navigation pane to view the new data.
-
You cannot view any data that you create in the Work library in interactive mode in the Libraries section of the navigation pane. However, you can access that data programmatically.
-
Because each program that is opened in interactive mode creates a new workspace server session, any options, macros and macro variables, and other data that is specific to your workspace server session cannot be shared with other programs in either interactive or noninteractive mode. Programs that are opened in noninteractive mode use the same workspace server session and can therefore share options, macros and macro variables, and other data.
-
When you run a program in interactive mode, results are generated only in HTML.
-
You can turn interactive mode on and off for an individual program tab by clicking. When interactive mode is turned on, the button appears to be highlighted on the
toolbar. If you want to use interactive mode for all program tabs, click and select Preferences.
Click General, and then select Start
new programs in interactive mode. If you do not select
this option, you must turn interactive mode on each time you want
to use it.
Copyright © SAS Institute Inc. All rights reserved.