Using SAS Studio
About Using SAS Studio
When you sign on to
SAS Studio, the main SAS Studio window appears with a blank program
window so that you can start programming immediately. You also have
access to all five sections of the navigation pane.
Note: To sign out of SAS Studio,
click the Sign Out button on the toolbar.
Do not use the Back button on your web browser.
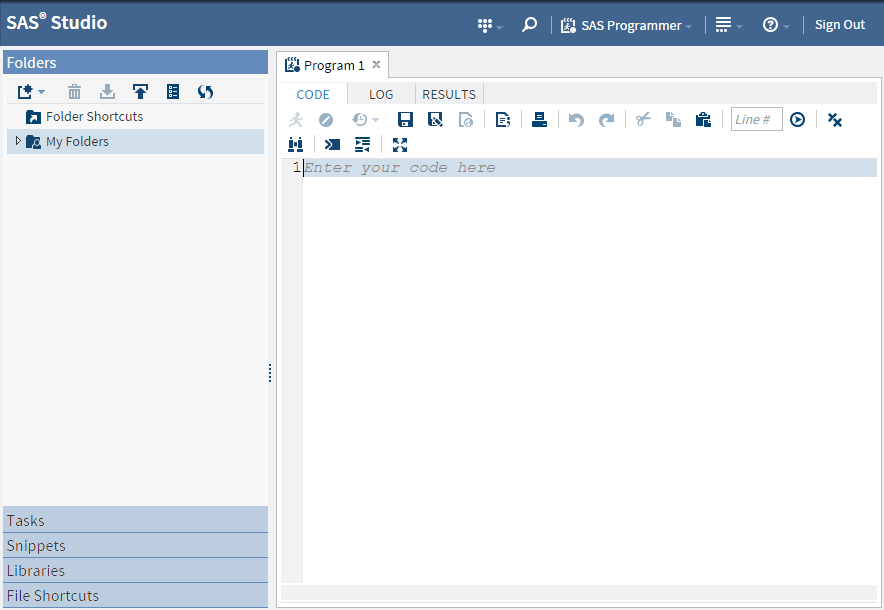
The main window of SAS
Studio consists of a navigation pane on the left and a work area on
the right. The navigation pane provides access to your folder shortcuts
and folders, your tasks and snippets, the libraries that you have
access to, and your file shortcuts. The Folders section is displayed
by default.
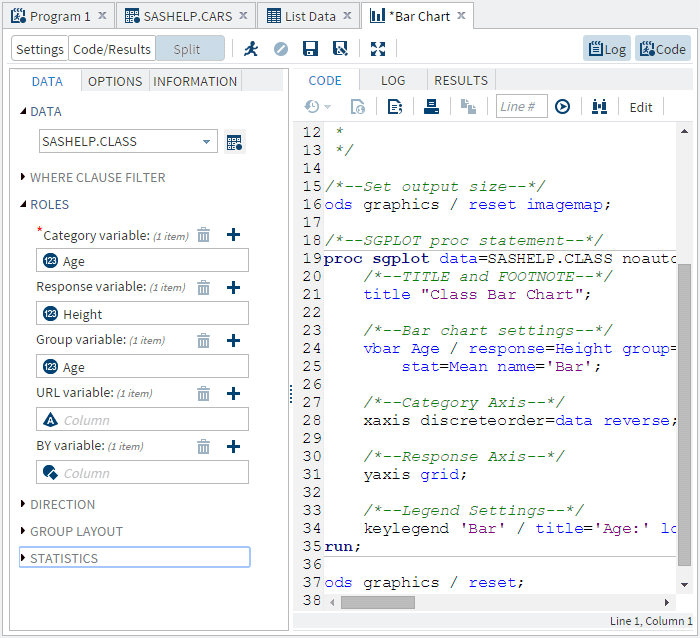
The work area is used
to display your data, code, tasks, logs, and results. As you open
these items, they are added to the work area as windows in a tabbed
interface.
Using the Navigation Pane
Working with Folders
The Folders section
of the navigation pane enables you to access files and folders from
the following locations:
-
your SAS server
-
any remote FTP server on which you have an account
Note: SAS Studio supports only
FTP servers that use a UNIX style directory listing. Filenames in
Asian languages are not supported on the FTP servers.
The type of SAS Studio
deployment you are using determines the folders and files you can
access from the Folders section and the locations to which you can
assign libraries.
-
If you are running the SAS Studio Mid-Tier (the enterprise edition) deployment, then your My Folders location is your home directory on the remote SAS server.
-
If you are running the SAS Studio Basic deployment, then your My Folders location is your home directory on the remote SAS server. The folders list also includes the root folder of the UNIX file system on the remote SAS server.
-
If you are running the SAS Studio Single-User deployment, then your SAS server is your local machine. Your My Folders location is your home directory on your local machine. The folders list also includes folders for your desktop, documents folder, and all currently mapped drives.
For more information,
see SAS Studio: Administrator's Guide.
You can open files that
are saved on the SAS server or the FTP server, such as SAS program
files or program package files. You can also open SAS tables that
are saved on the SAS server.
Note: You cannot open SAS tables
from a remote FTP server.
You can use the Folders
section to create folders and folder shortcuts, download and upload
files, and create a new SAS program. From the folders tree, you can
expand and collapse folders and open items in folders by double-clicking
them or dragging them to the work area.
Note: Files and folders that are
located on an FTP server and are accessible by using an FTP shortcut
cannot contain any of the following characters in their names:
{ } [ ] , : ; “ ‘ / \ | + < > ? @ # $ % ^ & ( ) + !SAS
Studio cannot access, move, rename, or delete files and folders on
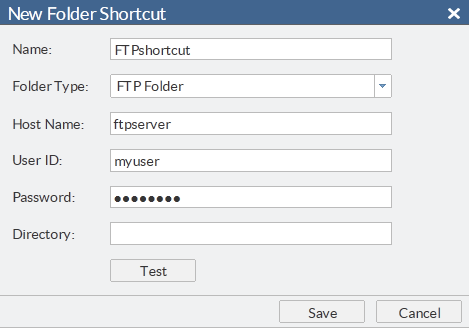
an FTP server whose names contain invalid characters.To create a new folder
shortcut:
-
If you are creating a shortcut to a SAS server folder, enter the physical path for the directory in the Directory box.If you are creating a shortcut to an FTP folder, enter the network address of the FTP host in the Host Name box as well as your user name and password. By default, the directory is the home directory of the FTP user. You can use the Directory box to specify another directory that is relative to the home directory. For example, if the home directory of the FTP user is
c:\homedir, and you specifydatain the Directory box, then the root directory of the shortcut isc:\homedir\dataon the FTP server. You can validate your connection to the FTP server by clicking Test.Note: If your mid-tier and FTP servers are running different operating systems, you must fully qualify the name of the FTP host in the Host Name box. If this name is not fully qualified, then the connection might fail.
To create a new folder,
select the folder in the Folders section in which you want to create
the new folder. Click  and select Folder. The
New Folder window opens. Enter the name of the new folder. The new
folder is added to the list of folders.
and select Folder. The
New Folder window opens. Enter the name of the new folder. The new
folder is added to the list of folders.
and select Folder. The
New Folder window opens. Enter the name of the new folder. The new
folder is added to the list of folders.
To download a file,
select the file that you want to download and click  . You are prompted to open the file in the default
application or save it to your local computer.
. You are prompted to open the file in the default
application or save it to your local computer.
. You are prompted to open the file in the default
application or save it to your local computer.
To upload one or more
files from your local computer, select the folder to which you want
to upload the files and click  . The Upload Files window opens. Click Choose
Files to browse for the files that you want to upload.
. The Upload Files window opens. Click Choose
Files to browse for the files that you want to upload.
. The Upload Files window opens. Click Choose
Files to browse for the files that you want to upload.
Working with Tasks
The Tasks section of
the navigation pane enables you to access tasks in SAS Studio. Tasks
are based on SAS procedures and generate SAS code and formatted results
for you. SAS Studio is shipped with several predefined tasks that
you can run. You can also edit a copy of these predefined tasks, and
you can create your own new tasks.
To create a new task,
click  . SAS Studio creates a template in the work area that
you can use to create custom tasks for your site. Custom tasks can
be accessed from the My Tasks folder. For more information,
see
Understanding Tasks in SAS Studio.
. SAS Studio creates a template in the work area that
you can use to create custom tasks for your site. Custom tasks can
be accessed from the My Tasks folder. For more information,
see
Understanding Tasks in SAS Studio.
. SAS Studio creates a template in the work area that
you can use to create custom tasks for your site. Custom tasks can
be accessed from the My Tasks folder. For more information,
see
Understanding Tasks in SAS Studio.To edit a task that
you have created, select the task from the My Tasks folder and click  . The XML code that is used to create the task is
opened in the work area. If you want to edit a predefined task, you
must first right-click the task and select Add to My Tasks. For more information,
see
Edit a Predefined Task.
. The XML code that is used to create the task is
opened in the work area. If you want to edit a predefined task, you
must first right-click the task and select Add to My Tasks. For more information,
see
Edit a Predefined Task.
. The XML code that is used to create the task is
opened in the work area. If you want to edit a predefined task, you
must first right-click the task and select Add to My Tasks. For more information,
see
Edit a Predefined Task.Note: You can edit only the tasks
that are in the My Tasks folder.
Working with Snippets
The Snippets section
of the navigation pane enables you to access your code snippets. Code
snippets are samples of commonly used SAS code
that you can insert into your SAS program. SAS Studio is shipped with
several predefined code snippets that you can use. You can also edit
a copy of these snippets and create your own custom snippets. Your
custom snippets can be accessed from the My Snippets folder. For more information,
see
Working with Programs.
To edit a snippet that
you have created, select the snippet from the My Snippets folder and
click . If you want to edit a predefined snippet, you must
first right-click the snippet and select Add to My Snippets.
. If you want to edit a predefined snippet, you must
first right-click the snippet and select Add to My Snippets.
Note: You can edit only the snippets
that are in the My Snippets folder.
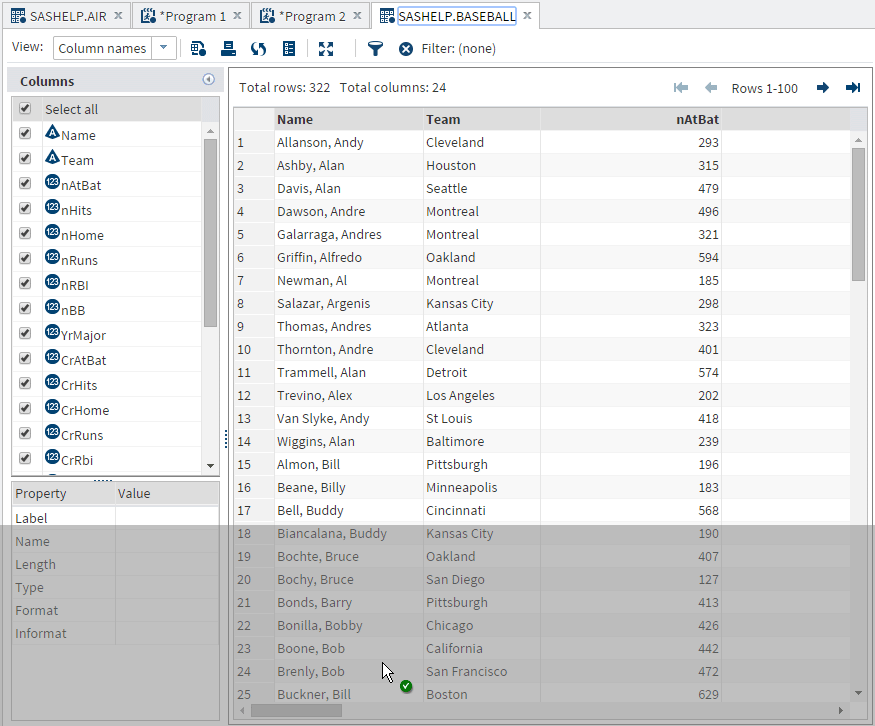
Working with Libraries
The Libraries section
of the navigation pane enables you to access your SAS libraries. SAS
tables are stored in SAS libraries. From the Libraries section, you
can open SAS tables and add them to your programs. You can use the
Libraries section to expand a table and view the columns in that table.
The icon in front of the column name indicates the type.
Here are examples of
common icons for the column types.
|
Icon
|
Type of Column
|
|---|---|
 |
Character
|
 |
Numeric
|
 |
Date
|
 |
Datetime
|
You can drag tables
and columns from the Libraries section to a program, and SAS Studio
adds code for the dragged items to your program. For more information,
see
Opening and Creating Programs.
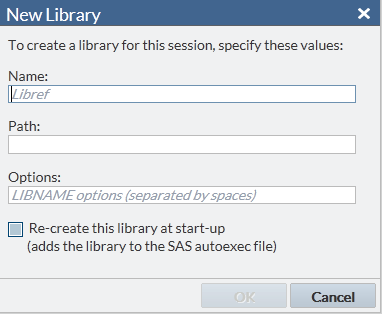
You can also create
new libraries and assign existing libraries.
To create a new library:

To assign unassigned
libraries, click  . If you want to access the selected libraries each
time you use SAS Studio, select Assign selected libraries
at start-up. If a library is unassigned, then you cannot
access the tables in that library.
. If you want to access the selected libraries each
time you use SAS Studio, select Assign selected libraries
at start-up. If a library is unassigned, then you cannot
access the tables in that library.
. If you want to access the selected libraries each
time you use SAS Studio, select Assign selected libraries
at start-up. If a library is unassigned, then you cannot
access the tables in that library.
Using File Shortcuts
File shortcuts enable
you to quickly access files that you specify. You can create a file
shortcut to a file on your SAS server, via a URL, or on your FTP server.
Note: You can create a file shortcut
to a file on an FTP server only if you have created a folder shortcut
to an FTP folder.
To create a new file
shortcut, click  . You can define the shortcut by specifying a complete
path and filename or by specifying a URL. If you want this shortcut
to be available the next time you use SAS Studio, select Re-create
this file shortcut at start-up.
. You can define the shortcut by specifying a complete
path and filename or by specifying a URL. If you want this shortcut
to be available the next time you use SAS Studio, select Re-create
this file shortcut at start-up.
. You can define the shortcut by specifying a complete
path and filename or by specifying a URL. If you want this shortcut
to be available the next time you use SAS Studio, select Re-create
this file shortcut at start-up.
You can open a file
from a file shortcut by double-clicking it or dragging it to the work
area.
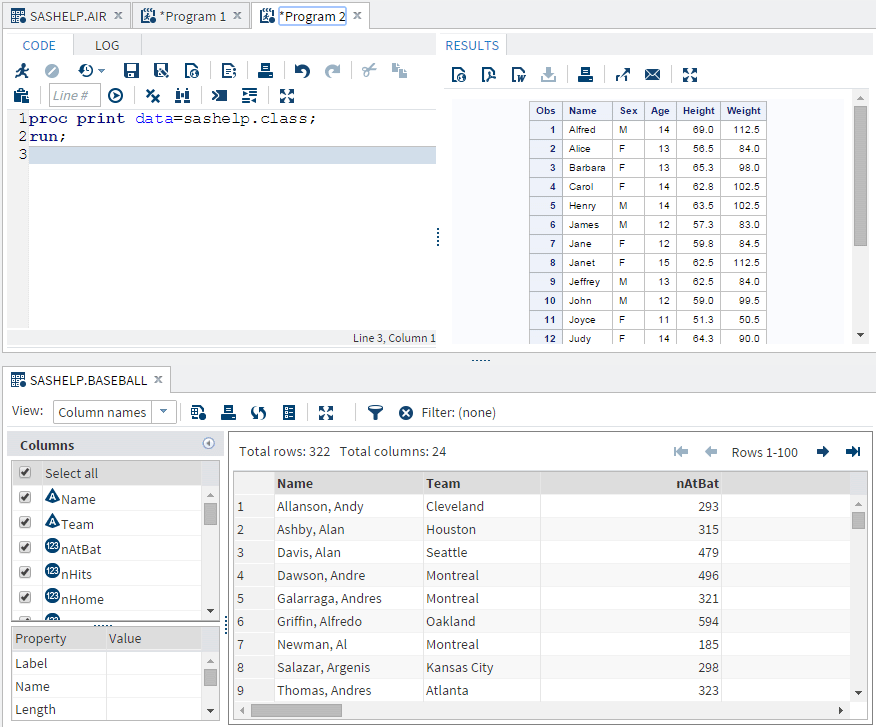
Using the Work Area
About Using the Work Area
The work area is the
main portion of the SAS Studio application for accessing programs
and tasks and for viewing data. The work area is always displayed
and cannot be minimized. When you open a program, task, or table,
the windows open as new tabs in the work area. The code, log, and
results that are associated with programs and tasks are grouped together
under the main tab for the program or task.
Customizing the Work Area
By default, the work
area is displayed beside the navigation pane, but you can maximize
the work area and hide the navigation pane. You can also close all
of the tabs in the work area at once.
To maximize the work
area, click  and select Maximize View.
and select Maximize View.
Note: To reopen the navigation
pane, click and select Exit Maximized View.
and select Exit Maximized View.
To close all tabs that
are open in the work area, click and select Close All Tabs.
You are prompted to save any unsaved programs or tasks.
and select Close All Tabs.
You are prompted to save any unsaved programs or tasks.
Rearranging the Tabs in the Work Area

Searching in SAS Studio
You can use the Search
feature to search all of the sections of the navigation pane. The
types of items that you can search for depend on what is selected
in the navigation pane. For example, if a folder or folder shortcut
in the Folders section is selected, you can search for folders and
files, and you can choose whether to include subfolders in the search.
If a task category in the Tasks section is selected, you can search
for task names, associated SAS procedures, and task descriptions.
To access the Search
feature, click  . The search box opens so that you can enter the text
that you want to search for.
. The search box opens so that you can enter the text
that you want to search for.
. The search box opens so that you can enter the text
that you want to search for.
You can limit the scope
of your search by selecting or clearing any of the Narrow
by options. These options vary depending on what is selected
in the navigation pane. By default, the search is case sensitive.
To search for both uppercase and lowercase text, clear the Match
case check box.
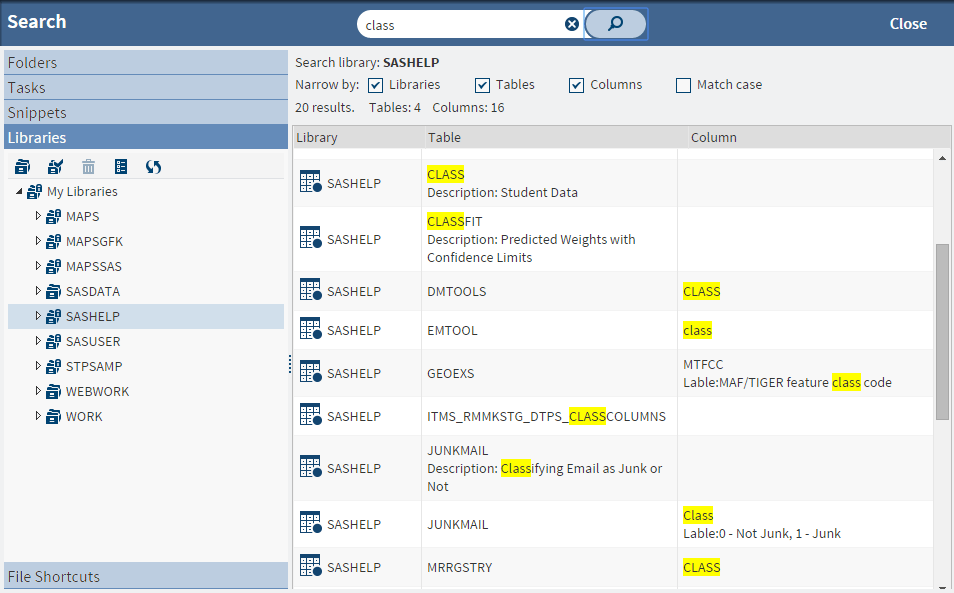
The following example
shows a search for “class” in the Sashelp library. The
search includes all tables and columns in the Sashelp library, and
it is not case sensitive.
You can open an item
from your results by double-clicking it. To return to your search
results list, click again.
again.
To clear the search
results, click  .
.
.
Setting General Preferences
The Preferences window
enables you to change several options that affect SAS Studio.
To access the general
options, click  and select Preferences.
Click General.
and select Preferences.
Click General.
and select Preferences.
Click General.
|
Option
|
Description
|
|---|---|
|
Show generated code
in the SAS log
|
displays the ODS statements,
%LET statements, and any other code that is automatically generated
by SAS in the log file. This option applies to both SAS tasks and
SAS program files.
|
|
Include a Show Details
button in error messages
|
adds a Show Details
button to any error messages that SAS Studio generates.
|
|
Start new programs in
interactive mode
|
opens new programs with
the interactive mode on. This option is available only if you are
running the first maintenance release for SAS 9.4. For more information,
see
Working in Interactive Mode.
|
|
Time-out interval: (hours)
|
specifies the amount
of time that SAS Studio allows you to be logged on without any activity.
The default value is one hour.
|
|
SAS variable name policy
|
enables you to specify
one of the following sets of rules to apply to SAS variable names.
|
|
Default text encoding
|
specifies the character-set
encoding that is used when text files are read or written. The default
value is UTF-8. This option is not available for SAS servers running
on z/OS.
Note: You can also specify the
text encoding when you open a single file by holding down the Alt
key and double-clicking the file. The Choose Text Encoding window
opens and you can select the encoding. This option applies to SAS
program files (*.SAS), text files (*.txt), comma-separated values
files, (*.csv), and log (*.log) file types.
|
Understanding Perspectives
Because SAS Studio can
be used by a variety of people and groups within an organization,
you can choose to view a specific subset of features, or perspective,
that meets your needs best. Perspectives are sets of functionality
that are customized to meet the needs of different types of users.
SAS Studio includes two perspectives: the SAS Programmer perspective
and the Visual Programmer perspective.
The SAS Programmer perspective
is for users who intend to use SAS Studio mainly for writing and editing
SAS programs. By default, the SAS Programmer perspective opens with
a new program window and includes all five sections of the navigation
pane so that you can easily manage all of your program files and code
snippets.
The Visual Programmer
perspective is designed for users who want to work with process flows
in a project-based environment. You can use process flows in the Visual
Programmer perspective to combine individual processes into one repeatable
process flow that you can save, reuse, and share with other users.
By default, the Visual Programmer perspective opens with a new process
flow window and includes four sections in the navigation pane: Folders,
Tasks, Snippets, and Libraries.
Note: If you open a process flow
while you are using the SAS Programmer perspective, you are prompted
to switch to the Visual Programmer perspective.
In both perspectives,
you can run the predefined tasks that are shipped with SAS Studio,
and you can create and edit tasks. You can also use both perspectives
to create and run SAS programs and queries.
The differences between
the perspectives can be viewed in the following table:
|
Element in SAS Studio
|
Available in SAS Programmer?
|
Available in Visual
Programmer?
|
|---|---|---|
|
Navigation Pane sections
|
||
|
Yes
|
Yes
|
|
Yes
|
Yes
|
|
Yes
|
Yes
|
|
Yes
|
Yes
|
|
Yes
|
Yes, but not displayed
by default
|
|
SAS Programs
|
Yes
|
Yes
|
|
Queries
|
Yes
|
Yes
|
|
Process Flows
|
No
|
Yes
|
After you have started
SAS Studio and selected a perspective, you can change the perspective
that you are using by clicking the perspectives menu on the toolbar
and selecting the perspective that you want to use.
You can specify which
sections of the navigation pane are displayed in SAS Studio by clicking and selecting View.
and selecting View.
Editing the Autoexec File
The autoexec.sas file
includes SAS statements that run each time you start SAS Studio and
connect to your SAS server. For example, you can use the autoexec.sas
file to assign libraries that you want to be available every time
you use SAS Studio in both interactive and noninteractive modes.
Note: If you create a new library
by using the New Library window, you can
select the Re-create this library at start-up option
to automatically add the LIBNAME statement to the autoexec.sas file.
For more information,
see
Working with Libraries.
Changing Your SAS Workspace Server
If you have access to
more than one SAS workspace server, you can change the server that
SAS Studio connects to. To change the server, click and select Change SAS Workspace Server.
Select the server that you want to use. When you change servers, any
libraries and file shortcuts that you created are deleted. For more
information, see SAS Studio: Administrator's Guide.
and select Change SAS Workspace Server.
Select the server that you want to use. When you change servers, any
libraries and file shortcuts that you created are deleted. For more
information, see SAS Studio: Administrator's Guide.
Copyright © SAS Institute Inc. All rights reserved.