Using Detail Report Filters
Use a Basic Report Filter
Create a Basic Report Filter
To create a basic report
filter:
-
TipUse the arrow to the left of the filter name on the Filters tab to expand or collapse the filter details when you are working with multiple filters.
-
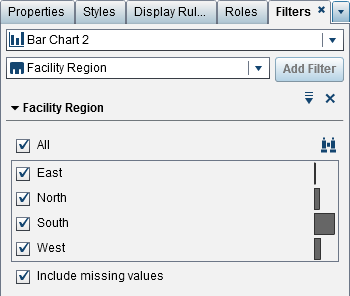
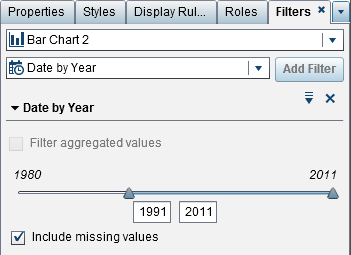
For a basic filter that uses discrete values, a check box is displayed for each distinct value that uses the current format applied to the data item. To the right of each value, a bar indicates the frequency. Select the data values that you want to filter or clear the selections for the data values that you do not want to filter. Select All to select all of the values.Here is an example of a basic filter for discrete values:
-
-
Click
 (to the left of the delete icon) for options. The
available options depend on whether you are filtering characters,
dates, or numerics. You can sort the values or frequencies in the
filter.
The following options are available:OptionAvailabilityEdit FilterThis option is always available.Filter Using Continuous ValuesThis option is available only for measure data items.Filter Using Discrete ValuesThis option is available for measure and category data items.Include Missing ValuesThis option is available when you filter continuous values. It works the same as selecting the Include missing values check box.Exclude Missing ValuesThis option is available when you filter continuous values. It works the same as clearing the Include missing values check box.Select AllThis option is available when you filter discrete values. It selects all of the current discrete values that are listed. This option does not affect the Include missing values setting.Clear AllThis option is available when you filter discrete values. It clears the selections of all of the current discrete values that are listed. This option does not affect the Include missing values setting.Invert SelectionThis option is available when you filter discrete values. It changes all of the discrete value check boxes so that if they are selected, then they are cleared. If they are cleared, then they are selected. This option does not affect the Include missing values setting.Sort by ValuesThis option enables you to sort by the values in the filter.Sort by FrequencyThis option enables you to sort by the frequencies in the filter.
(to the left of the delete icon) for options. The
available options depend on whether you are filtering characters,
dates, or numerics. You can sort the values or frequencies in the
filter.
The following options are available:OptionAvailabilityEdit FilterThis option is always available.Filter Using Continuous ValuesThis option is available only for measure data items.Filter Using Discrete ValuesThis option is available for measure and category data items.Include Missing ValuesThis option is available when you filter continuous values. It works the same as selecting the Include missing values check box.Exclude Missing ValuesThis option is available when you filter continuous values. It works the same as clearing the Include missing values check box.Select AllThis option is available when you filter discrete values. It selects all of the current discrete values that are listed. This option does not affect the Include missing values setting.Clear AllThis option is available when you filter discrete values. It clears the selections of all of the current discrete values that are listed. This option does not affect the Include missing values setting.Invert SelectionThis option is available when you filter discrete values. It changes all of the discrete value check boxes so that if they are selected, then they are cleared. If they are cleared, then they are selected. This option does not affect the Include missing values setting.Sort by ValuesThis option enables you to sort by the values in the filter.Sort by FrequencyThis option enables you to sort by the frequencies in the filter.

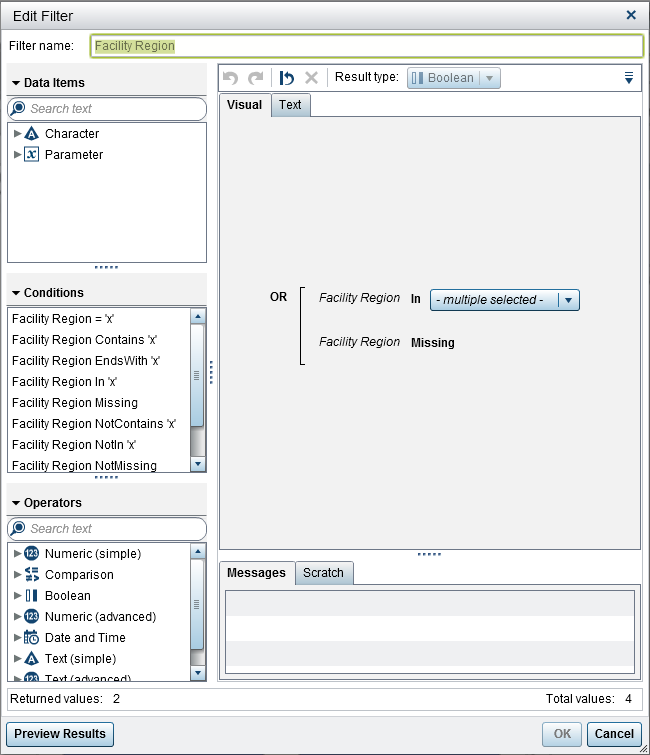
Edit a Basic Report Filter
To edit a basic report
filter:
-
Edit the expression for your filter.
-
You can drag and drop conditions and operators onto the expression on the Visual tab in the right pane.
-
You can enter the expression on the Text tab in the right pane.
-
You can create an expression using both the Visual and Text tabs in the right pane.
For information, see Conditions for Filters.Note: The AND and OR operators can accept more than two conditions. To add a condition to the operator, drag and drop a condition onto the operator name in the right pane. For example, to add a third condition to an AND operator, drag and drop the new condition onto AND in the expression.TipRight-click the AND or OR operator in the expression, and then select Add New Condition.
-

Use an Advanced Report Filter
About Advanced Report Filters
For most report objects,
you can create advanced filters to subset your data by using the Filters tab
in the right pane of the designer.
Advanced filters enable
you to create filters that use more than one data item.
Here are some key points
about advanced filters:
-
Advanced filters that are created in the explorer might contain expressions that you cannot create in the designer.
-
Advanced global filters that are created in the explorer are supported by the designer, but you cannot create advanced global filters in the designer.
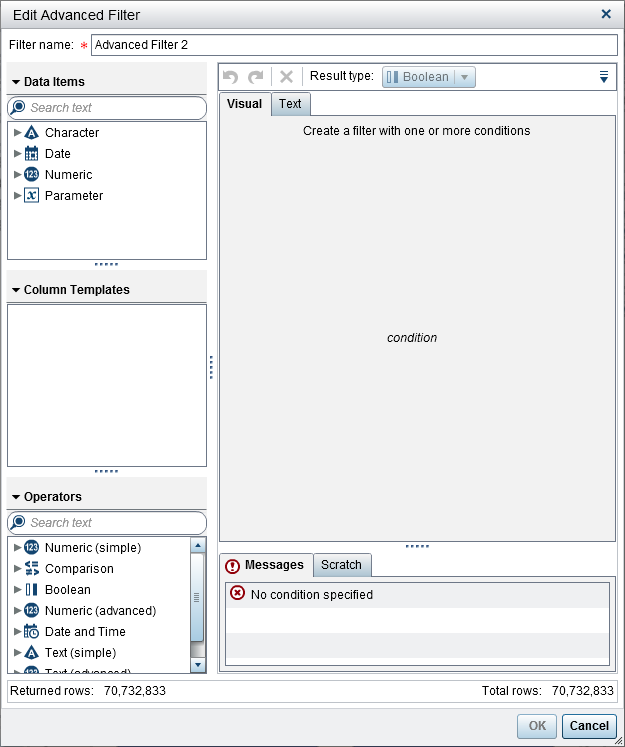
Create an Advanced Report Filter
To create an advanced
report filter:
-
(Optional) Add operators to the expression. You can use the Visual tab, Text tab, or a combination of both tabs.To add operators using the Visual tab:
-
From the Operators list, select an operator to join the conditions in your expression. For more information, see Conditions for Filters.
-
Edit an Advanced Report Filter
To edit an advanced
report filter:
-
Edit or add a condition for the filter. You can use the Visual tab, Text tab, or a combination of both tabs.To add conditions using the Visual tab:
-
From the Column Templates list, select a condition. For more information, see Conditions for Filters.
-
(Optional) Add an operator to the expression. You can use the Visual tab, Text tab, or a combination of both tabs.To add an operator using the Visual tab:
-
From the Operators list, select an operator to join the conditions in your expression. For more information, see Conditions for Filters.
-
Use a Data Source Filter in a Report
About Data Source Filters
Data source filters
are used to restrict the data that is displayed in a report. The data
source filters that you create in the designer are applied to every
report object in the report that uses the data source. A report that
has multiple data sources can contain multiple data source filters.
You can use either continuous
values or discrete values to create a data source filter. Continuous
value filters can be used only for measures. Discrete value filters
can be used for any character; numeric; or date, datetime, or data
item; as long as the total number of distinct values does not exceed
a maximum number.
Data source filters
are not displayed on the Filters or the Data tabs.
A data source filter updates the cardinality values that appear on
the Data tab.
There is a limit of
one data source filter per data source. However,
if you want to filter on more than one data source, you can create
a combination filter.
Create a Data Source Filter
-
Add a condition for the filter. You can use the Visual tab, Text tab, or a combination of both tabs.To add conditions using the Visual tab:
-
From the Column Templates list, select a condition. For more information, see Conditions for Filters.
-
(Optional) Add an operator to the expression. You can use the Visual tab, Text tab, or a combination of both tabs.To add an operator using the Visual tab:
-
From the Operators list, select an operator to join the conditions in your expression. For more information, see Conditions for Filters.
-
Edit a Data Source Filter
-
Add or modify the condition for the filter. You can use the Visual tab, Text tab, or a combination of both tabs.To edit conditions using the Visual tab:
-
From the Column Templates list, select a condition. For more information, see Conditions for Filters.
Copyright © SAS Institute Inc. All rights reserved.