Configuring SPD Server Host Software for Your Site
Configure SPD Server Ports
During installation,
you can configure the data server port that is used to make connections
from the SAS SPD Server LIBNAME engine to the SPD Server. You can
also configure the SNET Server port that is used to make connections
from a JDBC client to the SPD Server.
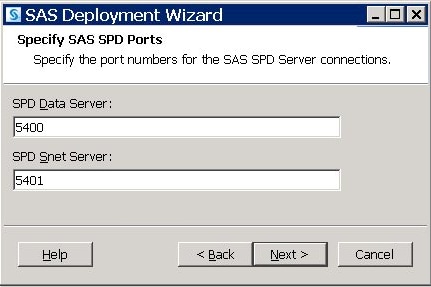
The UNIX installation
values are stored in the
<InstallDir>/site/rc.spds start-up script as: NSPORT=<data server port> and SNSPORT=<snet server port>.
Configure the SPD Server System
-
Issue the Password Manager groupdef command to define a group called
admingrp. Next, issue the Password Manager add command to add an SPD Server user ID for yourself (assuming that you are the SPD Server administrator). Both the groupdef and add commands prompt you to enter values. Use the following transcript file from a typical command sequence for reference. Notice that the password prompt does not echo any characters as you type. If you want to verify your work, issue the Password Manager list command to print the contents of the SPD Server password file, after you issue the add command.SAS Scalable Performance Data Server Host 4.50 Password Manager Utility Copyright (c) 1996-2009 by SAS Institute Inc, Cary NC 27513 USA Enter command > groupdef admingrp Group admingrp defined Enter command > add Enter username to add > admin Enter password for admin > Verify password > Enter authorization level (0 to 7) for admin: > 7 Enter IP Address or <Return > Enter password expiration time in days > 365 Enter group name or <Return> > admingrp Enter the maximum allowed time (in days) between successful logins <Default = infinite> > Enter the maximum allowed login failures <Default = infinite> > Enter admin’s performance class(1=LOW 2=MED 3=HIGH carriage return for LOW) > User admin added Enter command > quit
-
Add other user IDs before you open the SPD Server system for use. Authorization level 7 is privileged. Authorization level 7 allows users to circumvent SPD Server ACL security measures. Unlike in the previous example, you should give most or all users authorization level 0 (which is non-privileged), so that users cannot bypass SPD Server security. For more information, see Notes for SPD Server Administrators.
-
In the
InstallDir/sitedirectory, edit the libnames.parm file to add the site-specific LIBNAME domains that your SPD Server supports. Decide how to organize your existing disk storage to best exploit the capabilities of the SPD Server. For more information, see SPD Server Host Commands and the libsamp.parm file. For more information about managing resources, see Managing Computing Resources with a Name Server. -
Edit and configure the resource script file rc.spds. In the
/InstallDir/sitedirectory, use a UNIX text editor to open the rc.spds file. The tasks to configure the rc.spds file include the following:For more information about configuring these settings in the rc.spds file, see Configuring the rc.spds File. -
Add the following services to your
/etc/servicesor/etc/inet/servicesfile on the SPD Server host machine. The following example assumes that you want to use registered ports for your SPD Server host, and you choose to use the default SPD Server name server port 5190 and the SNET Server port 5191.You need the SNET service only if you plan to run the SNET Server. By default, the sample rc.spds script runs spdssnet.If you choose to use different port addresses, replace the????strings in the following examples with unused 4-digit port addresses. Also remember to update your rc.spds script accordingly. Determine unused port addresses by scanning the existing addresses and then choosing a number that does not appear. Choose a port number greater than 5000 to avoid conflicts with reserved and system-defined port addresses. -
Start SPD Server. Execute the
InstallDir/site/rc.spdsscript that you customized in the previous steps. The SPD Server environment starts in the context of your current UNIX user ID.Customizing the rc.spds script is important because it defines UNIX ownership and file access permissions on SPD Server resources. Ownership and file permissions are set in the context of the SPD Server run-time environment. If you plan to execute rc.spds when your system starts, the rc.spds script should be executed in the context of the appropriate UNIX user ID. Using the appropriate UNIX user ID ensures that the resources created in the start-up configuration meet the necessary file ownership and permission requirements for SPD Server.