Setting Up Digital Certificates Using OpenSSL
Step 1. Generate a New RSA Private Key and Certificate Signing Request (CSR)
The tasks that you perform to request a digital certificate for the CA, the server, and the client are similar. However, the values that you
specify are different.
We are using an example to show you how to generate a private key and certificate in PEM format. SAS on UNIX and z/OS platforms requires that you use PEM format.
There are many different options that you can use with OpenSSL to generate certificates
and private keys. SAS recommends using the highest encryption standards with access controls to secure your deployment.
In the following example,
Proton, Inc. is the organization that is applying to become a CA.
A certificate request is sent to a certificate authority to get it
signed, thereby becoming a CA. After Proton, Inc. becomes a CA, it
can serve as a CA for issuing other digital certificates to clients
and servers on its network. The certificates generated by the Proton,
Inc. CA are considered site-signed certificates.
Note: You can also sign the certificate
yourself if you have your own certificate authority or create a self-signed
certificate.
Perform the following
tasks:
-
In this example, we are using an OpenSSL conf file. You do not have to use this file. You can submit your options with the OpenSSL command or allow OpenSSL to prompt you.Edit your existing openssl.cnf file or create an openssl.cnf file. OpenSSL by default looks for a configuration file in
/usr/lib/ssl/openssl.cnf. It is good practice to add-config ./openssl.cnfto the commands OpenSSL CA or OpenSSL REQ to ensure that OpenSSL is reading the correct file.Note: You can find where the openssl.cnf file is located by submitting the OpenSSL command.openssl version -d
Here is an example of some of the information that can be specified in the openssl.cnf file. Here is a partial file example. There is a lot more information about certificates that can be specified.Example of an OpenSSL.cnf File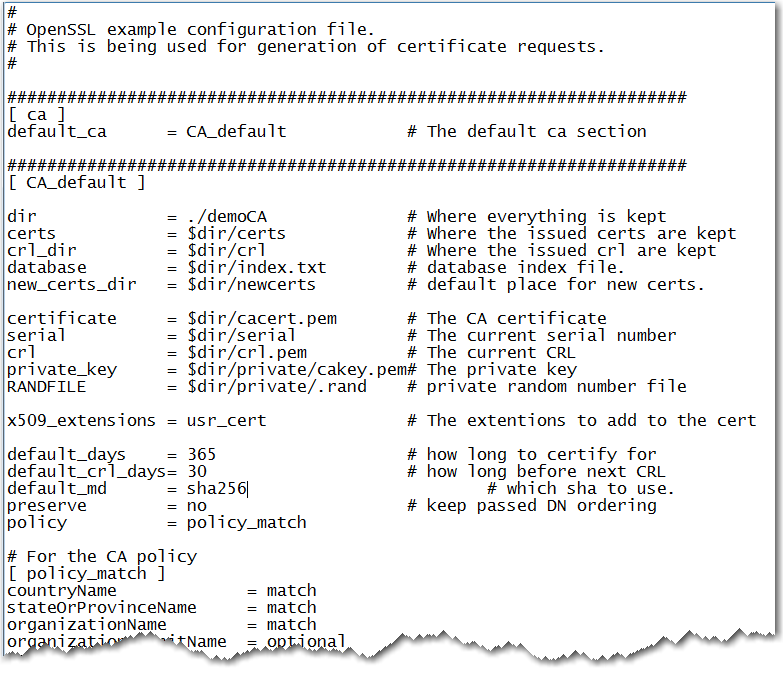
-
Select the directory where OpenSSL was built.
-
Initialize OpenSSL.
$ openssl
-
Issue the appropriate command to request a digital certificate. In the example below, we are creating an RSA private key and generating a Certificate Signing Request all at once.
OpenSSL Commands for Generating an RSA Private Key and Certificate Signing Request Request Certificate forOpenSSL CommandCAreq -config ./openssl.cnf -new -out ca.csr -newkey rsa:2048 -keyout cakey.pem -nodes -sha256Serverreq -config ./openssl.cnf -new -out server.csr -newkey rsa:2048 -keyout serverkey.pem -sha256Clientreq -config ./openssl.cnf -new -out client.csr -newkey rsa:2048 -keyout clientkey.pem -sha256Note: For FIPS 140-2 compliant TLS, specify -sha256. SHA256 and above is highly recommended when creating your private key.Arguments and Values Used in OpenSSL Commands OpenSSL Arguments and ValuesFunctionsreqRequests a certificate-config ./openssl.cnfSpecifies the storage location for the configuration details for the OpenSSL program-newIdentifies the request as new-out ca.csrSpecifies the storage location for the certificate request-newkey rsa:2048Generates a new private key along with the certificate request that is 2048 bits in length using the RSA algorithm.-keyout cakey.pemSpecifies the storage location for the private key-nodesPrevents the private key from being encrypted-sha256Specifies that the SHA256 hash algorithm be used. Use SHA256 for FIPS 140-2. Without this option, the default is SHA-1. -
Informational messages are displayed and prompts for additional information appear according to the specific request.To accept a default value, press the Enter key. To change a default value, type the appropriate information and press the Enter key.Note: Unless the -NODES option is used in the OpenSSL command when creating a digital certificate request, OpenSSL prompts you for a password before allowing access to the private key. It is highly recommended that you supply a password to help protect the private key.Here is an example of a request for a digital certificate:
OpenSSL> req -config ./openssl.cnf -new -out ca.req -newkey rsa:2048
-keyout privkey.pem -nodes
Using configuration from ./openssl.cnf
Generating a 2048 bit RSA private key
............................++++++
..........................................++++++
writing new private key to 'cakey.pem'
-----
You are about to be asked to enter information that will be incorporated
into your certificate request.
What you are about to enter is what is called a Distinguished Name or a DN.
There are quite a few fields but you can leave some blank
For some fields there will be a default value,
If you enter '.', the field will be left blank.
-----
Country Name (2 letter code) [US]:
State or Province Name (full name) [North Carolina]:
Locality Name (city) [Cary]:
Organization Name (company) [Proton Inc.]:
Organizational Unit Name (department) [IDB]:
Common Name (YOUR name) []: proton.com
Email Address []:Joe.Bass@proton.com
Please enter the following 'extra' attributes to be sent with
your certificate request
A challenge password []:
An optional company name []:
OpenSSL>
The request for a digital certificate is complete.
Note: For the server, the Common
Name must be the name of the computer that the server runs on. In
our examples, we are using proton.com.
Step 2 (Optional). Generate a Public Certificate from an Existing Certificate
Perform the following tasks to generate a digital certificate for a CA, a server,
and a client based on an existing certificate.
-
Issue the appropriate command to generate a public certificate from the certificate signing request.
OpenSSL Commands for Generating Digital Certificates on UNIX Generate Certificate forOpenSSL CommandCAx509 -req -in ca.csr -signkey cakey.pem -out ca.pem -sha256Note: This command generates a self-signed certificate.Serverca -config ./openssl.cnf -in server.csr -out server.pem -md sha256Note: This command creates certificates signed by the CA. These are defined in the openssl.cnf file.Clientca -config ./openssl.cnf -in client.csr -out client.pem -md sha256Note: This command creates certificates signed by the CA. These are defined in the openssl.cnf file.Note: The -md sha256 option is the minimum value that should be specified when using FIPS 140-2 compliant TLS.Arguments and Values Used in OpenSSL Commands to Generate a Certificate OpenSSL Arguments and ValuesFunctionsx509Identifies the certificate display and signing utility-reqSpecifies that a certificate be generated from the requestcaIdentifies the Certificate Authority utility-config ./openssl.cnfSpecifies the storage location for the configuration details for the OpenSSL utility-in filename.csrSpecifies the storage location for the input for the certificate request-out filename.pemSpecifies the storage location for the certificate-signkey cakey.pemSpecifies the private key that is used to sign the certificate that is generated by the certificate request-md sha256Specifies that the SHA256 hash algorithm be used. Use SHA256 for FIPS 140-2. Without this option, the default is SHA-1. -
Informational messages are displayed and prompts for additional information appear according to the specific request.To accept a default value, press the Enter key. To change a default value, type the appropriate information, and press the Enter key.Here is a sample of the messaging for creating a server digital certificate:Note: The password is for the CA's private key.
Using configuration from ./openssl.cnf
Enter PEM pass phrase: password
Check that the request matches the signature
Signature ok
The Subjects Distinguished Name is as follows
countryName           :PRINTABLE:'US'
stateOrProvinceName   :PRINTABLE:'NC'
localityName          :PRINTABLE:'Cary'
organizationName      :PRINTABLE:'Proton, Inc.'
organizationalUnitName:PRINTABLE:'IDB'
commonName            :PRINTABLE:'proton.com'
Certificate is to be certified until Oct 16 17:48:27 2014 GMT (365 days)
Sign the certificate? [y/n]:y
1 out of 1 certificate requests certified, commit? [y/n]y
Write out database with 1 new entries Data Base Updated
The subject's Distinguished Name is obtained from the digital certificate request.The generation of a digital certificate is complete.A root CA digital certificate is self-signed, which means that the digital certificate is signed with the private key that corresponds to the public key that is in the digital certificate. Except for root CAs, digital certificates are usually signed with a private key that corresponds to a public key that belongs to someone else, usually the CA.
Step 3. Secure Your Private Key File
To help secure access to the private key, use a password to restrict access to the
private key file. This can either be done
when the private key is generated or it can be performed afterward. For example,
to use OpenSSL to add a password to a private key file, use the following command:
openssl rsa -aes256 -in /tmp/cakey.pem -out /tmp/enccakey.pem
OpenSSL will prompt us for the password to use on the private key file.
Step 4. Check Your Digital Certificate Using OpenSSL
To check a digital certificate, issue the following command:
openssl> x509 -text -in filename.pemA digital certificate contains data that was collected to generate the digital certificate
timestamps, a digital signature, and other information. However, because the generated digital certificate is encoded
(usually in PEM format), it is unreadable.
Step 5. Create a Certificate Chain in PEM Format Using OpenSSL
After generating a digital certificate for the CA, the server, and the client (optional),
you must identify for the OpenSSL
client application one or more CAs that are to be trusted. This list is called a chain of trust.
Note: In the
third maintenance release of SAS 9.4, you can use
the SAS Deployment Manager after installation to add to the trusted
CA bundle of certificates. For more information, see Add Your Certificates to the Trusted CA Bundle.
If there is only one CA to trust, in the client application, specify the name of the
file that contains the OpenSSL CA digital certificate. If multiple CAs are to be
trusted, you can copy and paste into a new file the contents
of all the digital certificates of CAs to be trusted by the client application. These
CAs can be primary, intermediate, or root certificates. Add the root CAs to the client’s
truststore.
For the server, do not
include the Root CA in the server's certificate chain.
To manually create a new trust list, use the following template:
(Your Server Certificate - ssl.crt)

-----BEGIN CERTIFICATE-----

<PEM encoded certificate>

-----END CERTIFICATE-----

(Your Intermediate CA Certificate(s))

-----BEGIN CERTIFICATE-----

<PEM encoded certificate>

-----END CERTIFICATE-----

(Your Root CA Certificate)

-----BEGIN CERTIFICATE-----

<PEM encoded certificate>

-----END CERTIFICATE-----
The content of the digital certificate in this example is represented as
<PEM
                        encoded certificate>
. The content of each digital
certificate is delimited with a -----BEGIN CERTIFICATE----- and -----END
CERTIFICATE----- pair. All text outside the delimiters
is ignored. Therefore, you might not want to use delimited lines for
descriptive comments.
Generally, OpenSSL returns .pem files, CA's return .crt files (Microsoft returns .cer
files). Instead of manually cutting and pasting these files together (regardless
of your file extension), you can also concatenate the certificate authority files
together. For example, you can take an intermediate authority certificate file, a
root authority certificate file, and primary certificate file and concatenate them
into a single PEM file. An example of concatenating certificates is as follows:
cat server.pem > certchain.pem
cat intermediateCA.pem >> certchain.pem
cat rootCA.pem >> certchain.pem
Note: You can place these files
in any order.
Because the digital certificate is encoded, it is unreadable. To view the file contents,
you can use the following
OpenSSL commands for your file type:
openssl x509 -in cert.pem -text -noout
openssl x509 -in cert.cer -text -noout
openssl x509 -in cert.crt -text -noout
Use the following OpenSSL command to view a DER encoded Certificate:
openssl x509 -in certificate.der -inform der -text -noout
Note: If you are including a digital
certificate that is stored in DER format into your certificate chain,
you must first convert it to PEM format. For more information, seeConvert between PEM and DER File Formats Using OpenSSL.
Step 6. Verify Certificates in the Trust Chain Using OpenSSL
Clients and servers
exchange and validate each other’s digital certificates. All
of the CA certificates that are needed to validate a server certificate
compose a trust chain. All CA certificates in a trust chain have to
be available for server certificate validation. The certificates are
either combined into one file pointed to by the SSLCALISTLOC= option
or are located as individual files in an OpenSSL directory pointed
to by the SSLCACERTDIR environment variable or the SSL_CERT_DIR environment
variable.
For more information, see SSLCACERTDIR Environment Variable, SSL_CERT_DIR Environment Variable, and SSLCALISTLOC= System Option.
You can use the following
OpenSSL command to verify certificates signed by a recognized certificate
authority (CA):
openssl verify -verbose -CAfile <your-CA_file>.pem <your-server-cert>.pemIf your local OpenSSL installation recognizes the certificate or its signing authority and everything checks out (dates, signing chain, and so on.), you get a simple OK message.
Note: In the
third maintenance release of SAS 9.4, you can use
the SAS Deployment Manager after installation to add your trust chain.
The SAS Deployment Manager also validates those certificates. For more information,
see Add Your Certificates to the Trusted CA Bundle.
Step 7. End OpenSSL
To end OpenSSL, type quit at
the prompt.
Copyright © SAS Institute Inc. All Rights Reserved.