Creating Graphics Output Using SAS/GRAPH Software
One way to create a hard copy of your Ishikawa diagram is to send it to a graphics device using SAS/GRAPH software. To do this, you should submit a GOPTIONS statement to direct the graphics output to the appropriate location and control the output format before you invoke the ISHIKAWA environment. For example, the following GOPTIONS statement directs the output to a PostScript device:
goptions target=psl noprompt;
If you do not specify a target device before invoking the ISHIKAWA environment, you will be prompted for one before the graph is generated.
In the ISHIKAWA environment, when you are ready to route your output to a hard copy device, select →→. This opens a dialog that enables you to customize various aspects of your graph.
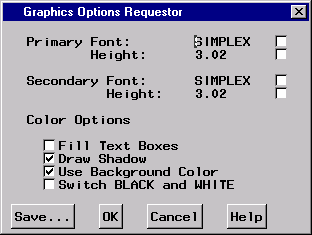
Figure 8.56: Hard Copy Requestor
To save the diagram to the default graphics catalog in the WORK library (WORK.GSEG), simply press and close the dialog. The default member name is ISHIKAWA.
To save the diagram to a different graphics catalog, select and then use the Member selector window to specify a library, a SAS catalog, and a member name.
When sending a diagram directly to an output device, you can ignore the member name entirely.
To save to your own graphics catalog, select and then use the Save a member selection window to specify a catalog and data set name. Simply select when you want to save your diagram to the default graphics catalog (WORK.GSEG). When sending a diagram directly to an output device, you can use .
You must specify two SAS/GRAPH fonts for drawing the labels in the hard copy of the diagram. The hardware fonts used in the ISHIKAWA environment cannot be used for your hard copy. The primary font and size are used for the first three levels of text. The secondary font and size are used for the remaining levels of text.
To change fonts, enter a valid SAS/GRAPH font name in the font field or click on the button to the right of the font field to display a font requestor dialog. The default font is SIMPLEX.
You can specify the height of the text directly in the height field (in screen percent units), or you can click on the button to the right of the field to request an absolute height or a relative height.
Figure 8.57: Font Height Selector
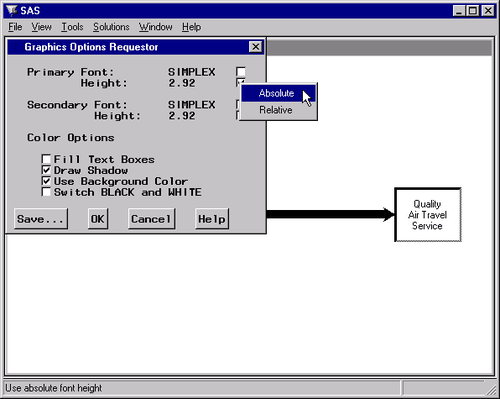
Select when you want the font height in the output to be the same height as the font height used in the ISHIKAWA environment even if the output window and the ISHIKAWA window differ in size. Select to maintain the same font height to window size proportion in both the ISHIKAWA window and the output window. The numeric value entered in the height field after either choice is a screen percent unit. The default text height is absolute.
Use the and check boxes to suppress the box fills and box shadows from the output. They cannot be used to add these features to the hard copy if they were not present in the ISHIKAWA window.
Use the check box to indicate whether the background color from the ISHIKAWA environment is used in the output. This option is useful when you are sending your diagram to a color device and you want the background in your hard copy to match that of your ISHIKAWA environment.
Use the check box to interchange black and white when the diagram is sent to the output device. This option is useful when you send your diagram from a white-on-black display to a black-on-white hard copy device.
Click on to generate the hard copy output or click on to quit.