User-Defined Reports
Overview of User-Defined Reports
User-defined reports
require the following files to be uploaded to the SAS Content Server:
-
the SAS program that creates the report.
-
a SAS program file that lists the SAS Model Manager global macro variables that are used in your report.
-
a report template XML file that specifies the report requirements, such as report name and the number of required models to run the report.
After these three files have been uploaded to the SAS Content Server, the user-defined report type is included as a report type in the new report drop-down list on the Reports page.
The New
Report window includes controls to specify the type of
output that the report creates, such as HTML or PDF, and a style for
the report. You can modify your report to include the SAS code so
that the New Report window offers the report
output controls for your report.
Create a User-Defined Report
To create a user-defined
report:
-
Write and test your SAS program that creates a report.
-
To format the output for a user-defined report, add the SAS code below to your report code in order to select the Output type and the Style in the New Report window. The Output type enables you to select a report output format of HTML, PDF, or RTF. The Style enables you to select a report output style for your report.Replace report-name with the name of your user-defined report. The name can contain letters, the underscore ( _ ), hyphen ( - ), and the period ( . ). End your user-defined report with the %MM_ExportReportsEnd macro.
Filename mmreport catalog "sashelp.modelmgr.reportexportmacros.source";
%include mmreport;
%MM_ExportReportsBegin(fileName=report-name);
          …
   your-user—defined-code
          …
%MM_ExportReportsEnd;
-
In the report XML file, add this SAS program name to the FILENAME= argument of the <Code> element (for example,
<Code filename="myUserReport.sas"/>). For more information, see Report Templates.
For an example of a
report, see Example User-Defined Report.
Defining Macro Variables for a User-Defined Report
Executing a user-defined report requires a SAS program that lists the report code’s
macro variables. If you do not have macro variables in your report, create a SAS program
file with
a comment in it. This file is required.
Here is an example program to define macro variables:
%let _MM_User=miller;
%let _MM_Password=Rumpillstillskin3;
In the report XML file,
add this SAS program name to the FILENAME= argument of the <PreCode>
element (for example,
<PreCode filename="myMacroDefs.sas"/>). For more information,
see Report Templates.For an example
of a macro variable program, see Example User-Defined Report.
For a list of macro
variables, see Macro Variables in SAS Model Manager: Macro Reference.
Upload SAS Programs to the SAS Content Server
After you have the
two SAS programs for your user report, follow these steps to upload
them to the SAS Content Server:
-
From the Projects category view, click
 , and select New Template.
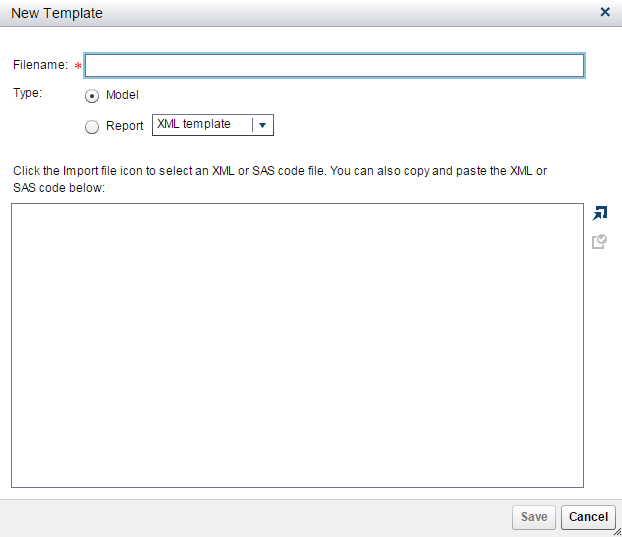
-
Enter a filename.
-
Select Report (SAS code).
-
Click
 to select a SAS code file. Click Open. You can also copy and paste the SAS code in the text box.
-
Click Save.
-
Repeat the steps to upload the second file.
Report Templates
You create a report template XML definition file to describe your user-defined report.
After you create the report template, upload the template to the SAS Content
Server.
SAS Model Manager provides a sample report template that you can use as a model for
your XML template. You can use any template as a
model or you can create an XML file with the required XML elements. A best practice
is to open the model XML template and save the template using another name.
To open a sample report
template:
-
From the Projects category, click, and select Manage Templates.
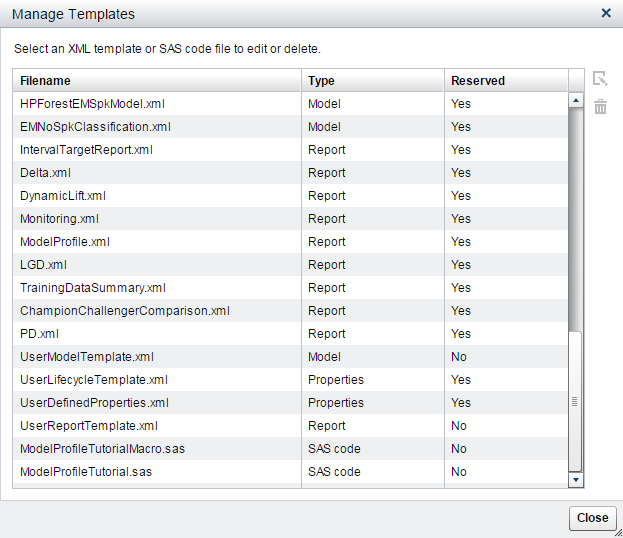
-
Select UserReportTemplate.xml and click
 . The UserReportTemplate.xml file has arguments in
quotation marks that you modify for your report. Replace the text
in quotation marks with values that are appropriate for your report.
See the argument descriptions below. Make your changes and click Save to upload the report template to the SAS Content Server.
. The UserReportTemplate.xml file has arguments in
quotation marks that you modify for your report. Replace the text
in quotation marks with values that are appropriate for your report.
See the argument descriptions below. Make your changes and click Save to upload the report template to the SAS Content Server.
-
Click Close.
Here is the report template XML definition:
<?xml version="1.0" encoding="UTF-8" ?>
<ReportTemplate
	name="report-name"
	type="UserDefinedReport"
	displayName="display-name"
	description="model-description"
	>
	<Report>
		<Data datasetName="input-data-set-name"/>
		<Models expectedModelType="model-type"
           requiredNumberOfModels="1"
           level="level">
   </Models>
		<SourceCode>
			<PreCode filename="pre-code-filename.sas"/>
			<Code filename="score-code-filename.sas"/>
		</SourceCode>
		<Output format="output-format" filename="output-name"/>
	</Report>
	<Parameters>
		<Parameter name="parameter-name" value="parameter-value" />
	</Parameters>
</ReportTemplate>
<ReportTemplate>
element arguments
name="report-name"
specifies the name
of the report. The characters @ \ / * % # & $ ( ) ! ? < > ^ + ~ ` = { } [ ] | ; : ‘ " cannot be used in the name.
displayName="display-name"
specifies the name
of the report that is displayed in the Report section
of the New Report window.
description="model-description"
specifies a description
of the report that is displayed at the bottom of the New
Report window when the report is selected in the window.
<Report> element
arguments
<Data datasetName="input-data-set-name"/>
specifies the name of a data source data set that is used for input to the report. The data set must be in the form libref.filename. You can use the following global macro variables as a value for input-data-set-name
as long as the value of the macro variable is in the form of libref.filename:
-
&_MM_InputLib
-
&_MM_OutputLib
-
&_MM_PerformanceLib
-
&_MM_TestLib
-
&_MM_TrainLib
<Models
expectedModelType="model-type"
requiredNumberOfModels="number-of-models"
level="level">
</Models>
specifies information
about the model.
expectedModelType="model-type"
specifies the model
type.
Valid values: ANALYTICAL,
CLASSIFICATION, PREDICTION, SEGMENTATION, ANY
requiredNumberOfModels="number-of-models"
specifies the number
of models that are processed in this report.
level="folder"
specifies where the
report is to obtain a list of models. If folder is VERSION, the report
creates a list of models in the version. If folder is PROJECT, the
report creates a list of models from all versions in the project.
Valid values: VERSION,
PROJECT
<SourceCode>
<PreCode filename="pre-code-filename.sas"/>
<Code filename="report-code-filename.sas"/>
</SourceCode>
specifies the files that are used to execute the report.
<PreCode filename="pre-code-filename.sas"/>
specifies the name of the SAS program that contains macro variable definitions.
<Code filename="report-code-filename.sas"/>
specifies the name
of the SAS program that creates the report.
<Output format="output-format"
filename="output-report-name"/>
specifies the output format arguments:
format="output-format"
specifies the format of the report output.
Valid values: HTML,
PDF, or RTF
filename="output-report-name"
specifies the name
of the output report.
<Parameters> Element
Argument
<Parameter name="parameter-name"
value="parameter-value"
/>
This element is not
used. It is reserved for future use.
Edit a SAS Program on the SAS Content Server
To edit the program
after the file has been uploaded to the SAS Content Server:
-
Click and select Manage Templates.
-
Select an XML template, SAS code file, or user-defined properties template to edit. In order for the template to be editable, the Reserved column must be marked as No. Life cycle templates cannot be edited but can be viewed.
-
Click. Make your changes and click Save.
-
Click Close.
Delete a SAS Program from the SAS Content Server
Deleting a User Report SAS Content Server is a two-step process. You must delete the
SAS program and the report template.
To delete a user report:
-
Click and select Manage Templates.
-
Select an XML template, SAS code file, or user-defined properties template to delete. The Reserved column must be marked as No to delete a file. The user-defined properties template file cannot be deleted.
-
Click
 . A confirmation window appears.
-
Click Yes to delete the file.
-
Click Close.
Run a User-Defined Report
To run a user-defined
report:
-
Click
 and select your user-defined report. The New
Report window appears.
and select your user-defined report. The New
Report window appears.
-
Enter a name and description if you do not want to use the default values.
-
Select an output type. The default is PDF.
-
Select a style for the report. When the SAS default option is selected, the default style and themes are used in generating the report. For example, the SAS default style for the HTML output type is HTMLBLUE.
-
From the list, select the models that you want to include in the report.
-
Click Run. The report is generated and appears in the default viewer for the selected output type.
See Also
Example User-Defined Report
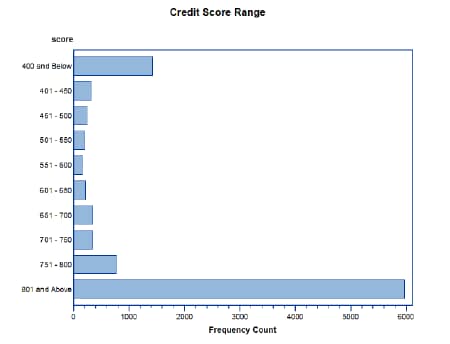
Overview of the Example User-Defined Report
The example user-defined report categorizes scoring values into score ranges and then graphs the results. The program name is Score Range Report. The following
SAS programs and report template file are required to create this report:
-
The SAS report program is the file ScoreRange.sas
-
The SAS program file that contains macro variables is ScoreRangeMacro.sas
-
The report template XML file is ScoreRangeTemplate.xml
SAS Report Program
Here is the SAS code for a user-defined report to categorize score codes:
filename mmreport catalog "sashelp.modelmgr.reportexportmacros.source";
%include mmreport;

%MM_ExportReportsBegin(fileName=scoreRange);

options NOmprint NOdate;
%let _MM_PosteriorVar=P_1;


proc format;
  value score
    low - 400 = '400 and Below'
    401 - 450 = '401 - 450'
    451 - 500 = '451 - 500'
    501 - 550 = '501 - 550'
    551 - 600 = '551 - 600'
    601 - 650 = '601 - 650'
    651 - 700 = '651 - 700'
    701 - 750 = '701 - 750'
    751 - 800 = '751 - 800'
    801 - high= '801 and Above';
run;
quit;

%Macro scoreRange();

  %if &_MM_ScoreCodeType = %str(SAS Program) %then
    %do;
       %let _MM_OutputDS=work.scoreresult;
       %inc &_MM_Score;
    %end;
  %else
    %do;
       data work.scoreresult;
       set &_MM_InputDS;
       %inc &_MM_Score;
       run;
    %end;

  data work.scoreresult2;
    set work.scoreresult;
    keep score;
    if &_MM_PosteriorVar =. then delete;
    score = int (((1-&_MM_PosteriorVar) * 480) + 350 + 0.5);
  run;

  proc freq data=work.scoreresult2;
    table score/out=scoresummary;
    format score score.;
    title 'Credit Score Range';
  quit;

  proc gchart data=work.scoresummary;
    hbar score / sumvar=count discrete;
    title 'Credit Score Range';
  run;
  quit;
%Mend scoreRange;

/*   Reporting section */

ods listing close;

%getModelInfo(0);

/* Define libref and data source for _MM_InputDS */
libname MMLib 'C:\SMM141Tutorials\Data';
%let _MM_InputDS=MMLib.DELINQUENCY_SCORING_INPUT;

%scoreRange();
%closeLibsAndFiles();

%MM_ExportReportsEnd;
SAS Program File for Macro Variables
The file ScoreRangeMacro.sas contains only a comment in it because macro variables
are not used in the report code:
/* ScoreRangeMacro.sas empty file */
Report Template XML File
Here is the report template XML file for the user-defined Score Range report:
<?xml version="1.0" encoding="UTF-8" ?>
<ReportTemplate
	name="Score Range Report"
	type="UserDefinedReport"
	displayName="Score Range Report"
	description="Score Range Report"
	>
	<Report>
		<Data datasetName=""/>
		<Models expectedModelType="ANALYTICAL"
           requiredNumberOfModels="1" level="VERSION">
		</Models>
		<SourceCode>
			<PreCode filename="ScoreRangeMacro.sas"/>
			<Code filename="ScoreRange.sas"/>
		</SourceCode>
		<Output format="PDF" filename="ScoreRange"/>
	</Report>
	<Parameters>
	</Parameters>
</ReportTemplate>
Score Range Report Output
The Credit Score Range
graph is one of the output pages in the PDF report output.
Copyright © SAS Institute Inc. All Rights Reserved.
Last updated: June 12, 2017