Example: JAVA Interface
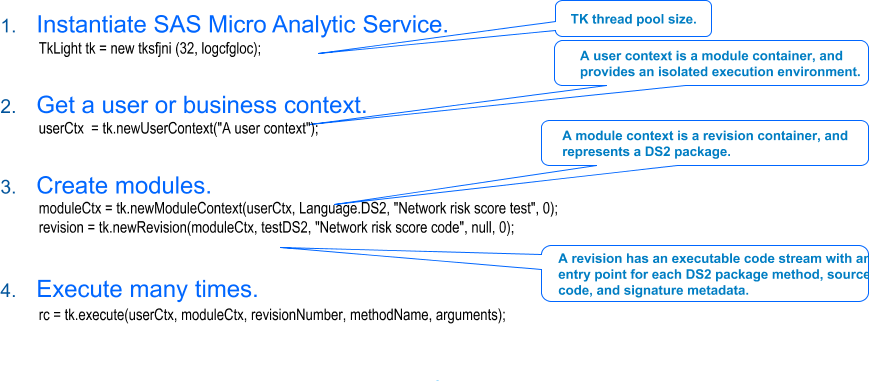
Instantiate SAS Micro Analytic Service
When using the Java
interface, instantiating the tksfjni Java class starts SAS Micro Analytic
Service.
Note: When using the REST interface,
the service is started automatically when the web application is started.
int threads = 4;
TkLight tk = new tksfjni(threads, null);
The threads argument creates a threaded kernel thread pool
of size 4. The SAS threaded kernel architecture is the internal architecture
that enables SAS analytics. SAS Micro Analytic Service uses the worker
threads in the threaded kernel thread pool to dispatch code compilation
and execution tasks. For most applications, the best performance
is achieved by setting the thread pool size to be approximately equivalent
to the number of cores in the server where SAS Micro Analytic Service
is running. Passing zero as the threads argument causes SAS Micro
Analytic Service to set the thread pool size equal to the total number
of logical processors that are present on the hosting server. For
example, Intel hyper-threaded processors have two logical processors
per core. Therefore, if threads is specified as zero on a system that
has one Intel quad-core hyper-threaded processor, the thread pool
size is 8. Changing the thread pool size requires restarting SAS Micro
Analytic Service.
The second argument,
which is null in the example above, can be used to specify the location
of a logging configuration file that controls SAS Micro Analytic Service
logging. SAS Micro Analytic Service uses the SAS 9.4 Logging Facility.
For more information, see SAS 9.4 Logging: Configuration
and Programming Reference.
Create a User Context
All modules are owned
by a user context, so you must create a context to contain the module
that is published below.
// Create a user context
long userCtx  = tk.newUserContext("My user context");
if (userCtx == -1) {
		System.out.println("   User context creation failed.");
		tk.term();
		return;
}
Note: When you use the REST interface,
the creation of a context is done automatically.
The steps that follow
illustrate how to publish code to SAS Micro Analytic Service, where
it is compiled and prepared for high-performance execution.
Create Modules
Create a module to hold
the revisions of the code by calling the newModuleContext() method,
with the user context ID. Doing this causes the new module to be owned
by the user context you just created.
long moduleCtx = tk.newModuleContext(userCtx, Language.DS2,
								"myPgk", 0);
if (moduleCtx == -1) {
	      System.out.println("   Module context creation failed.");
		  tk.term();
		return;
}
The second argument,
Language.DS2, specifies that you are using this module to publish
a DS2 package. The third argument is the package name, which should
match the package name in the source code. If it does not, SAS Micro
Analytic Service corrects the name upon successfully creating the
revision.
Now you need source
code to publish. See DS2 Programming for SAS Micro Analytic Service for information about writing code
for SAS Micro Analytic Service. This
example uses the following simple program:
String myCode = "ds2_options sas;\n" +
			"package myPkg;\n" +
			"method myMth(int i, in_out int j);\n" +
			"   j = i + 5;\n" +
			"end;\n" +
			"endpackage;\n";
The source code is passed
to SAS Micro Analytic Service as a string argument to the newRevision()
method. Notice the escaped newline characters at the end of each
line. If you read in the source code from a file, the newline characters
are included. However, if you use a literal string as above, the best
practice is to include newline characters so that any compiler messages
can be easily traced to the given line number.
To publish your code
to SAS Micro Analytic Service, call the newRevision() method, passing
in the module ID, source code string, and a description. The last
two parameters are for options that are not used with DS2.
int rev = tk.newRevision(moduleCtx, myCode,
					"my DS2 package", null, 0);
if (rev > 0) {
			System.out.println("   Revision " + rev + " created.");
}
else {
			System.out.println("   Revision not created.");
}
If the revision number
that is returned is greater than zero, the code compiled correctly
and is now ready to be executed. Otherwise, call the following function
in order to check the compiler messages for errors:
String[] msgs = tk.getCompilationMessages(moduleCtx);
The example package
contains one method, called “myMth,” which has one input
and one output argument. Before executing the method, you must create
the method arguments. The Java interface uses a tksfValues object
to pass arguments to and from the method to execute.
tksfValues args = new tksfValues(2, 1);
The first parameter
to the tksfValues constructor is the total number of method arguments,
including both inputs and outputs. The second parameter specifies
the number of output arguments from the method. Because DS2 output
arguments are passed by reference, both inputs and outputs must be
populated in the tksfValues object. For more information, see DS2 Programming for SAS Micro Analytic Service.
args.setInt(3);
		args.setOutInt();
Note: The REST API does not support
method overloading.
Continue to change the
value in the argument vector and call the execute() function, as many
times as needed. The execute() function takes the following arguments:
user context ID, module ID, revision number (passing zero selects
the latest revision), the name of the method to execute, and the populated
tksfValues object.
rc = tk.execute(userCtx, moduleCtx, rev, "myMth", args);
Successful execution
returns zero for the return code, and the results can be retrieved
from the tksfValues object. Arguments are positional and are retrieved
by the zero-based index. In this case, the single integer output
value can be retrieved from index position 1 (the second slot in the
argument’s object).
if (rc == 0)
			int result = args.getInt(1);
Copyright © SAS Institute Inc. All rights reserved.