WINDOW Statement
| Valid in: | DATA step |
| Category: | Window Display |
| Type: | Declarative |
Syntax
Arguments
- window-options
-
specifies characteristics of the window as a whole. Specify these window-options before any field or GROUP= specifications:
- COLOR=color
-
specifies the color of the window background for operating environments that have this capability. In other operating environments, this option affects the color of the window border. The following colors are available:
BLACK MAGENTA BLUE ORANGE BROWN PINK CYAN RED GRAY WHITE GREEN YELLOW Default:If you do not specify a color with the COLOR= option, the window's background color is device-dependent instead of black, and the color of a field is device-dependent instead of white.Tip:The representation of colors might vary, depending on the monitor being used. COLOR= has no effect on monochrome monitors.
- COLUMNS=columns
-
specifies the number of columns in the window.Default:The window fills all remaining columns on the monitor; the number of columns that are available depends on the type of monitor that is being used.
- ICOLUMN=column
-
specifies the initial column within the monitor at which the window is displayed.Default:SAS displays the window at column 1.
- IROW=row
-
specifies the initial row (or line) within the monitor at which the window is displayed.Default:SAS displays the window at row 1.
- KEYS=<<libref.>catalog.>keys-entry
-
specifies the name of a KEYS entry that contains the function key definitions for the window.Default:SAS uses the current function key settings that are defined in the KEYS window.Tips:If you specify only an entry name, SAS looks in the SASUSER.PROFILE catalog for a KEYS entry of the name that is specified. You can also specify the three-level name of a KEYS entry, in the form
libref.catalog.keys-entryTo create a set of function key definitions for a window, use the KEYS window. Define the keys as you want, and use the SAVE command to save the definitions in the SASUSER.PROFILE catalog or in a SAS library and catalog that you specify.
- MENU=<<libref.>catalog.>pmenu-entry
-
specifies the name of a menu (pmenu) you have built with the PMENU procedure.Tip:If you specify only an entry name, SAS looks in the SASUSER.PROFILE catalog for a PMENU entry of the name specified. You can also specify the three-level name of a PMENU entry in the form
libref.catalog.pmenu-entry
- field-definition(s)
-
specifies and describes a variable or character string to be displayed in a window or within a group of related fields.Tips:A window or group can contain any number of fields, and you can define the same field in several groups or windows.
You can specify multiple field-definitions.
- group-definition(s)
-
specifies a group and defines all fields within a group. A group definition consists of two parts: the GROUP= option and one or more field definitions.
- GROUP=group
-
specifies a group of related fields.Default:A window contains one unnamed group of fields.Restriction:group must be a SAS name.Tips:When you refer to a group in a DISPLAY statement, write the name as window.group.
A group contains all fields in a window that you want to display at the same time. Display various groups of fields within the same window at different times by naming each group. Choose the group to appear by specifying window.group in the DISPLAY statement.
Specifying several groups within a window prevents repetition of window options that do not change and helps you keep track of related displays. For example, if you are defining a window to check data values, arrange the display of variables and messages for most data values in the data set in a group that is named STANDARD. Arrange the display of different messages in a group that is named CHECKIT that appears when data values meet the conditions that you want to check.
Details
The Basics
Field Definitions
- row column
-
specifies the position of the variable or character string.SAS keeps track of its position in the window with a pointer. For example, when you tell SAS to write a variable's value in the third column of the second row of a window, the pointer moves to row 2, column 3 to write the value. Use the pointer controls that are listed here to move the pointer to the appropriate position for a field.
- #numeric-variable
-
specifies the row within the window that is given by the value of numeric-variable.Restriction:#numeric-variable must be a positive integer. If the value is not an integer, the decimal portion is truncated and only the integer is used.
- #(expression)
-
specifies the row within the window that is given by the value of expression.Restrictions:expression can contain array references and must evaluate to a positive integer.
Enclose expression in parentheses.
- @numeric-variable
-
specifies the column within the window that is given by the value of numeric-variable.Restriction:numeric-variable must be a positive integer. If the value is not an integer, the decimal portion is truncated and only the integer is used.
- @(expression)
-
specifies the column within the window that is given by the value of expression.Restrictions:expression can contain array references and must evaluate to a positive integer.
Enclose expression in parentheses.
- +numeric-variable
-
moves the pointer the number of columns that is given by the numeric-variable.Restriction:+numeric-variable must be a positive or negative integer. If the value is not an integer, the decimal portion is truncated and only the integer is used.
Default:If you omit row in the first field of a window or group, SAS uses the first row of the window. If you omit row in a later field specification, SAS continues on the row that contains the previous field. If you omit column, SAS uses column 1 (the left border of the window).Tip:Although you can specify either row or column first, the examples in this documentation show the row first.
- variable
-
specifies a variable to be displayed or to be assigned the value that you enter at that position when the window is displayed.Tips:variable can be the name of a variable or of an array reference.
To allow a variable value in a field to be displayed but not changed by the user, use the PROTECT= option (described later in this section). You can also protect an entire window or group for the current execution of the DISPLAY statement by specifying the NOINPUT option in the DISPLAY statement.
If a field definition contains the name of a new variable, that variable is added to the data set that is being created (unless you use a KEEP or DROP specification).
- format
-
gives the format for the variable.Default:If you omit format, SAS uses an informat and format that are specified elsewhere (for example, in an ATTRIB, INFORMAT, or FORMAT statement or permanently stored with the data set) or a SAS default informat and format.Tips:If a field displays a variable that cannot be changed (that is, you use the PROTECT=YES option), format can be any SAS format or a format that you define with the FORMAT procedure.
If a field can both display a variable and accept input, you must either specify the informat in an INFORMAT or ATTRIB statement or use a SAS format such as $CHAR. or TIME. that has a corresponding informat.
If a format is specified, the corresponding informat is assigned automatically to fields that can accept input.
A format and an informat in a WINDOW statement override an informat and a format that are specified elsewhere.
- 'character-string'
-
contains the text of a character string to be displayed.Restrictions:The character string must be enclosed in quotation marks.
You cannot enter a value in a field that contains a character string.
- options
-
Specify field definition attributes:
- ATTR=highlighting-attribute
-
controls these highlighting attributes of the field:
BLINK causes the field to blink. HIGHLIGHT displays the field at high intensity. REV_VIDEO displays the field in reverse video. UNDERLINE underlines the field. Alias:A=Tips:To specify more than one highlighting attribute, use the formATTR=(highlighting-attribute-1,...)The highlighting attributes that are available depend on the type of monitor that you use.
- AUTOSKIP=YES | NO
-
controls whether the cursor moves to the next unprotected field of the current window or group when you have entered data in all positions of a field.
YES specifies that the cursor moves automatically to the next unprotected field. NO specifies that the cursor does not move automatically. Alias:AUTO=Default:NO
- COLOR=color
-
specifies a color for the variable or character string. You can specify one of the following colors:
BLACK MAGENTA BLUE ORANGE BROWN PINK CYAN RED GRAY WHITE GREEN YELLOW Alias:C=Default:WHITETips:The representation of colors might vary, depending on the monitor that you use.COLOR= has no effect on monochrome monitors.
- DISPLAY=YES | NO
-
controls whether the contents of a field are displayed.
YES specifies that SAS displays characters in a field as you type them in. NO specifies that the entered characters are not displayed. Default:YES
- PERSIST=YES | NO
-
controls whether a field is displayed by all executions of a DISPLAY statement in the same iteration of the DATA step until the DISPLAY statement contains the BLANK option.
YES specifies that each execution of the DISPLAY statement displays all previously displayed contents of the field as well as the contents that are scheduled for display by the current DISPLAY statement. If the new contents overlap persisting contents, the persisting contents are no longer displayed. NO specifies that each execution of a DISPLAY statement displays only the current contents of the field. Default:NOTip:PERSIST= is most useful when the position of a field changes in each execution of a DISPLAY statement.
- PROTECT=YES | NO
-
controls whether information can be entered into a field.
YES specifies that you cannot enter information. NO specifies that you can enter information. Alias:P=Default:NoTip:Use PROTECT= only for fields that contain variables; fields that contain text are automatically protected.
- REQUIRED=YES | NO
-
controls whether a field can be left blank.
NO specifies that you can leave the field blank. YES specifies that you must enter a value in the field. Default:NOTip:If you try to leave a field blank that was defined with REQUIRED=YES, SAS does not allow you to input values in any subsequent fields in the window.
Automatic Variables
- _CMD_
-
contains the last command from the window's command line that was not recognized by the window.Tip:_CMD_ is a character variable with a length of 80 bytes; its value is set to ' ' (blank) before each execution of a DISPLAY statement.Example:Sending a Message
- _MSG_
-
contains a message that you specify to be displayed in the message area of the window.Tip:_MSG_ is a character variable with a length of 80 bytes; its value is set to ' ' (blank) after each execution of a DISPLAY statement.Example:Sending a Message
Displaying Windows
Examples
Example 1: Creating a Single Window
data _null_;
   window start
          #9  @26 'WELCOME TO THE SAS SYSTEM'
                  color=black
          #12  @19 'THIS PROGRAM CREATES'
          #12  @40 'TWO SAS DATA SETS'
          #14 @26 'AND USES THREE PROCEDURES'
          #18 @27 'Press ENTER to continue';
    display start;
    stop;
run;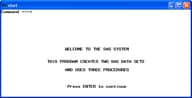
Example 2: Displaying Two Windows Simultaneously
libname category 'SAS-library';
data Assignment;
   set category.article end=final;
   drop a b j s o;
   window Assignment irow=1 rows=12 color=white
          #3 @10 'Article:' +1 art protect=yes
          'Name:' +1 name $14.;
   window Showtotal irow=20 rows=12 color=white
          group=subtotal
          #1 @10 'Adams has' +1 a
          #2 @10 'Brown has' +1 b
          #3 @10 'Johnson has' +1 j
          #4 @10 'Smith has' +1 s
          #5 @10 'Other has' +1 o
          group=lastmessage
          #8 @10
          'ALL ARTICLES ASSIGNED.
          Press ENTER to stop processing.';
   display Assignment blank;
   if name='Adams' then a+1;
   else if name='Brown' then b+1;
   else if name='Johnson' then j+1;
   else if name='Smith' then s+1;
   else o+1;
   display Showtotal.subtotal blank noinput;
   if final then display Showtotal.lastmessage;
run;
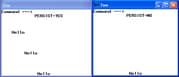
Example 3: Persisting and Nonpersisting Fields
data _null_;
   array row{3} r1-r3;
   array col{3} c1-c3;
   input row{*} col{*};
   window One
          rows=20 columns=36
          #1 @14 'PERSIST=YES' color=black
          #(row{i}) @(col{i}) 'Hello'
          color=black persist=yes;
   window Two
          icolumn=43 rows=20 columns=36
          #1 @14 'PERSIST=NO' color=black
          #(row{i}) @(col{i}) 'Hello'
          color=black persist=no;
   do i=1 to 3;
      display One;
      display Two;
   end;
   datalines;
5 10 15 5 10 15
;
Example 4: Sending a Message
if _cmd_ ne ' ' then
   _msg_='CAUTION: UNRECOGNIZED COMMAND' || _cmd_;
CAUTION: UNRECOGNIZED COMMAND commandCommand is
the erroneous windowing command.
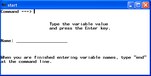
Example 5: Creating a SAS Data Set
data new;
   length name $20;
   window start
      #3  @20 'Type the variable name'
      #4  @20 'and press the Enter key.'
      #7 'Name:' +1 name attr=underline
      #11 'When you are finished entering variable names, type "end"'
      #12 'at the command line.';
   display start;
run;
proc print;
run;